Abstract
This document provides details on integrating an iSCSI Portal with the Linux iSCSI Enterprise Target modified to track data changes, a tool named ddless to write only the changed data to Solaris ZFS volumes while creating ZFS volume snapshots on a daily basis providing long-term backup and recoverability of SAN storage disks.
Preface
The iSCSI initiators connect with the iSCSI Portal providing connection redirection services in a round-robin fashion to available iSCSI Enterprise Target hosts featuring multiple Ethernet interfaces. The iSCSI Enterprise Target provides virtual disk services to iSCSI initiators. As iSCSI initiators write data to the underlying logical volumes using Linux LVM (Logical Volume Management), the iSCSI Enterprise Target tracks these changes in a ddmap which is a binary map indicating which 16 KB segments have been written to.
A tool named ddless can read either complete logical volumes or utilize the ddmap data reading only those 16 KB segments that have been written to and then write the actual changes to Solaris ZFS volumes. Only during the backup process are LVM snapshots utilized allowing iSCSI Enterprise Target to perform at its peak. By transmitting incremental changes we reduce the backup time.
Once the backup process completes, a Solaris ZFS volume snapshot is established. Customizable ZFS volume snapshot rotation can be configured providing, for example, daily backups for several weeks and weekly backups for several months. A GUI tool called TkZFS has been written to manage the Solaris ZFS volumes and snapshots. TkZFS allows the operator to create clones of Solaris ZFS snapshots which can be exposed to remote hosts for complete or partial system restoration.
Production Information
As of April 2011, we provide 80 TB of iSCSI storage (>50% utilized), configured 92 targets each consisting of a single LUN (logical unit). On Solaris ZFS we currently maintain 77 volumes from the iSCSI Enterprise target and 42 volumes from the Equallogic storage. 9021 ZFS snapshots are in place to provide restorability of logical volumes for up to one full year.
The system has been developed over several years, it was put into production June of 2010.
How to read this document
Read it all. The more complex answer is it depends on the reader and how technically involved the reader is with SAN terminology. However, as the author has also learned, things can be learned sometimes by reading other books or by immersion - it is possible.
It is recommended to read the "Amherst College SAN History" chapter first, then followed by at least the "Architecture Overview" sections of all chapters, such as iSCSI Target, iSCSI Portal, ddless and ddmap and the ZFS Archive. Then as interest develops the reader can dive into each chapter in more detail.
Some chapters, such as the DDMAP Kernel Reference, are only needed when studying the low level implementation of ddmap and debugging ddmap.
Acknowledgments
I would like to acknowledge the many contributors of the iscsi-target-development mailing list and specifically Ming Zang, Arne Redlich and Ross Walker who have consistently helped many mailing members with complex storage problems.
I would also like to acknowledge members of the departments "Systems and Networking Group" and "Computer Science" of Amherst College for aiding us with the concepts and implementation the project described within this document.
How this document was prepared
This documentation was prepared using AsciiDoc, GraphViz, Dia and Gimp.
Amherst College SAN History
StoneFly
We have initially worked with iSCSI storage using the vendor StoneFly which was introduced by Brandon Stone at Amherst College between 2003 and 2004. Some storage was provisioned using the StoneFly equipment for some of our Windows file servers. The StoneFly device was connected to RaidWeb disk arrays which consume IDE disks and expose a RAIDed SCSI disk channel. The StoneFly device provides iSCSI targets and LUNs. We have learned over time that the RaidWeb boxes can pass along disk errors as SCSI bus timeouts making them unreliable. At that time StoneFly did not provide any SAN backup or replication facility at that time.
The author would like to acknowledge Brandon Stone’s commentary. He said to me in the server room one day that I would be involved in open-source iSCSI. Back in the days (as some know this phrase), I honestly had no idea what paths I would be traveling. This document is the result.
Equallogic
In 2005 Amherst College decided to look for a commercial vendor for SAN disk storage. Several vendors were considered and with the strong influence of smart product and vendor selection, David Irwin advised us to choose the Equallogic, which is now part of Dell and we happen to be a Dell shop. The Equallogic has grown currently to about 21 TB of storage provisioned mainly for Exchange mail, file servers, CMS and VMware virtual machine hosts.
The purchase of the Equallogic also triggered the purchase of another product called FilesX which promised to aid with the fast backup of file and Exchange servers. Alternative options for Equallogic backup is to use Equallogic replication requiring further Equallogic devices at the remote site increasing the costs substantially.
FilesX required a destination disk device to write the backup data. We invested in less expensive storage using NexSAN’s fiber-channel based AtaBeast and then later SataBeast. The SataBeasts provide generally 32 TB of storage using 42 disks.
The FilesX product was operated by David Irwin. The product was a Windows only product and installed disk input/output drivers on the hosts that it was backing up. The driver would track the changes written to disk and later deliver those changes to the FilesX server. One of the inherent problems is that a reboot caused a complete disk read and transfer to the FilesX server. We have found the performance of those reads to be between 1 and 3 MB/s. The Equallogic can provide much better performance than that. The FilesX vendor advised us to use a SAN mode bypassing the host for the full reads, however that did not help in terms of performance.
We spent some time with the FilesX vendor and determined that they configured their transfer mechanism to read using 16 KB blocks. After some investigation of disk transfers between the Equallogic and a Linux host, we determined that the amount of data a process reads at once matters. Reading using 16 KB block sizes results in poor performance. Reading using 1MB block sizes, we can see about 80-90 MB/s, for example. The vendor was advised to change their algorithm to read in 1MB block sizes and process in 16 KB increments when processing a full read. The vendor did not provide a fix.
At this time we have started to backup some of the Equallogic data using a linux host as an agent to transfer data. The iSCSI initiator on CentOS 4 was used to read the data from the Equallogic snapshot and write the data to the SataBeast on an LVM logical volume. The command then used was:
dd if=/dev/sda of=/dev/vg_satabeast1_vol0/lv_nfs_bk bs=1M
Later on it became apparent that Linux was buffering everything it was reading hence wasting considerable time and keeping our transfer speeds at 50MB/s. The SataBeast is able to write around 160 MB/s. We have determined that if you read from a raw device in Linux you can bypass the buffering and we finally have speeds of around 100MB/s. We have also found that the optimization of the Ethernet driver matters. For example, with the e1000 driver (Intel Ethernet) we had to use the latest source code and optimize the load options:
options e1000 InterruptThrottleRate=1,1 FlowControl=3,3 RxDescriptors=4096,4096 TxDescriptors=4096,4096 RxIntDelay=0,0 TxIntDelay=0,0
With FilesX reading a disk at 1-3 MB/s versus Linux reading the same disk at 100 MB/s was a problem. David Irwin spent countless hours trying to get through the full backups after a maintenance reboot of all Exchange servers for several weeks. File servers were initially assigned to the FilesX backup software, however systems like file servers provide over 6 TB of data and FilesX’s performance became a bottleneck.s
iSCSI Enterprise Target
In the year 2005, we have started to look at open-source iSCSI target software. Several projects were considered, among them were: iet (iSCSI Enterprise Target), scst (Generic SCSI target subsystem). We initially used fiber-channel with scst since that was the supported transport protocol at that time. The iSCSI transport protocol was added using some of the source code from iet later on. There was a general consensus that we did not want to provision fiber-channel to every system.
The host iscsi-target1 was born, providing 1.5 TB of storage, using the iet project. Looking back, the implementation was crude and had a lot of issues: we had no target configuration automation, we had no clustering of two nodes in case one died and no network interface redundancy and no backups other than file level backups.
The target configuration automation process was helped along with scripts that would allow an operator to specify the configuration of a target and LUN in a text file. The text file was processed updating the running iet environment and static config files. The earliest external reference to this project can be found at http://sourceforge.net/apps/mediawiki/iscsitarget/index.php?title=Easy_management.
The host iscsi-target1 functioned well while it was operating, however, things like software maintenance were painful, since the system restart took well over 2 minutes. A SAN outage of over 2 minutes is not an acceptable event.
In 2006, we decided to fix the short-comings of iscsi-target1. We designed iscsi-target3 (iscsi-target2 was a non-hot spare for iscsi-target1).
The backing store for iscsi-target3 was a fiber-channel based AtaBeast (now SataBeast) by NexSan. We used the Linux heartbeat project for clustering and let it manage the LVM volume group resource, the IP addresses for several VLANs and the iet service itself. A detailed write up about this setup is provided at https://www3.amherst.edu/~swplotner/iscsitarget-2006/.
The issue of block-level backup was also addressed and modified over the years. The initial implementation used dd (a Unix tool to convert and copy data) to transfer data blocks from a source SataBeast to a destination SataBeast located in another building connected via fiber-channel. The data transfer was performed for each actively used LVM logical volume utilizing a logical volume snapshot during the time of backup.
In terms of backup, we are not interested in a constant hot copy using DRBD (Distributed Replicated Block Device), but rather a copy that originated from snapshot back in time. At this time, a single backup instance was sufficient, however 5 years later that has changed.
Toolbox dd, ddless and ddmap
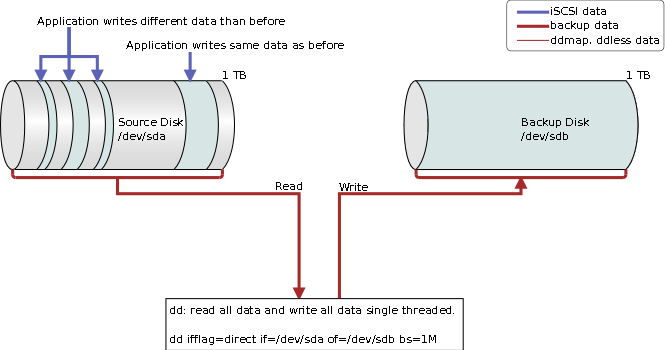
We have discussed several ideas of how to backup logical volumes consuming terabytes of data. The standard dd tool has basically two problems: it reads and it writes. Let’s rephrase this: it reads all the data and writes all the data.
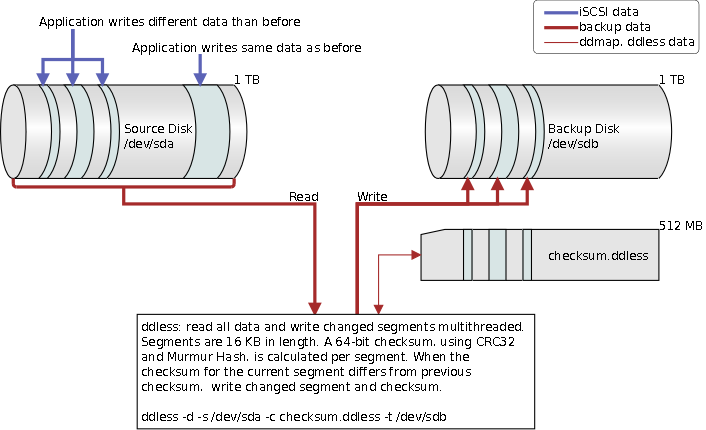
We decided to work on the write problem first, because writing the same over and over is a waste and also causes unnecessary high load average on Linux systems. We designed a tool called ddless which would only write those 16 KB segments that had not changed. Given a 16 KB segment, we compute a checksum and store it in a ddless checksum file. The segment is only written back to the disk if its checksum differs from the existing ddless checksum. If the ddless checksum does not exist, we write all segments and compute their checksums.
We have used ddless for several years with iscsi-target3. A few years later we decided to work on the read issue. Reading the same data over and over is also a waste. If we could only know what has changed.
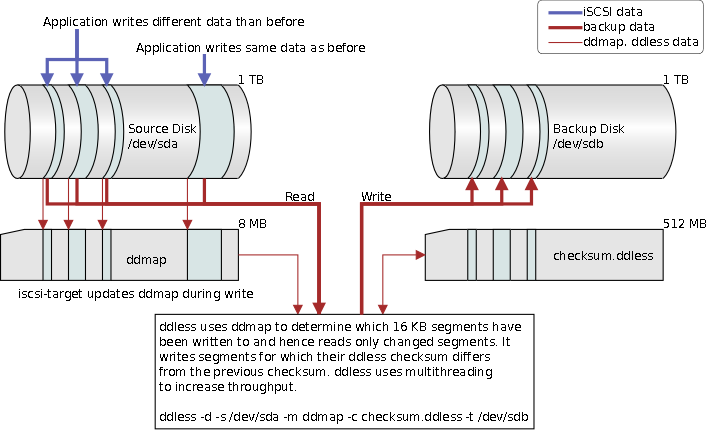
We are aware of LVM snapshots and their write performance issues, so tracking long-term data changes using LVM snapshots is not feasible. A different solution is to create a bitmap where each bit tracks a 16 KB segment. If the segment got written to we flip the bit to 1. When we want to know what has changed, we look at the bits of the bitmap with the value 1, read the related data and then clear the map. We have called these bitmaps ddmap and they indicate which data segments contain changes that must be read. A LVM snapshot is utilized to read the disk’s data in conjunction with the ddmap bitmap. The snapshot lasts for the duration of the backup only.
The command line tool ddless has been modified to support ddmap indicating which segments need to be read. The ddmap feature is implemented in the block_io and file_io layer of the iscsi-target server. The ddmap data can be managed via the /proc/net/iet/ddmap/ file system. More details on this in later sections.
The ddless/ddmap integration allows us to backup changes of 32 TB LVM system in about 2 hours instead of several days. This is of course work load dependent. If a process decides to make changes to each and every data block, then we will spend several days backing up the data.
Keep in mind that the idea of ddmap was not created until after we had tested Sun’s ZFS zfs send/receive functionality. That worked flawlessly, except that ZFS volume backed block devices have inconsistent read and write performance which made Sun’s ComStar + ZFS combination a non-viable iscsi-target to present real-time video streams, for example.
iSCSI Target (iscsi-target)
Architecture Overview (iscsi-target)
The iscsi-target name refers to a collection of services, such as the heartbeat clustering, volume group resources, the iSCSI Enterprise Target, and networking configuration.
Heartbeat Cluster
Earlier implementations of the iSCSI Enterprise Target (IET) on our systems utilized the heartbeat cluster software for fail-over purposes. The design was limited to an active/passive node setup with maximum of two nodes. The current design allows for n nodes to be active.
LVM Volume Group Resources
A LVM volume group can only be active on a single node. The physical volumes of the volume group must be visible to all nodes which can be implemented using fiber-channel host bus adapters (HBA) or a shared SCSI bus provided each HBA does not reset the bus during boot.
Each volume group resource is expected to have a logical volume named lv_iscsi_target. This logical volume is formatted using the ext3 file system and is mounted in conjunction with the volume group resource activation. It contains all IET meta data of logical volumes of the current volume group. This feature specifically allows volume groups to be moved from node to node during maintenance or failover events.
The heartbeat resource group configuration provides support for ordered resources. In this case a resource group is configured consisting of a volume group and a file system. On start-up the volume group is activated followed by mounting the file system; on shut-down the file system is dismounted before the volume group is deactivated.
iSCSI Enterprise Target (IET)
Each LVM volume group consists of logical volumes to be configured as LUNs for use by iSCSI Enterprise Target (IET). IET configuration files are by default located under /etc/iet. This location is a node specific location. Since a volume group can migrate from node to node, the target and LUN configuration in ietd.conf cannot be the same for each node. A node that does not hold a volume group resource would not be able to open the referenced logical volumes since they are not mapped by the device mapper.
The lv_iscsi_target device is mounted under /mnt/iscsi-target/vg_name#_vol#/ and consists of IET configuration components such as ietd.conf, initiators.allow and targets.allow. When the iscsi-target services are started, the IET configuration components from each active volume group are are combined into a single IET configuration stored under /etc/iet.
-
ietd.conf contains target and associated LUN configuration
-
initiators.allow controls target initiator access
-
targets.allow controls target network access
Networking
Our networking environment requires us to support iSCSI services in multiple VLANs. Earlier implementations of the IET project provisioned bonded/ether-channeled network interfaces to improve bandwidth and throughput. To support operating system with multipath requirements bonded interfaces are not best practice because the resulting path and traffic layout is possibly not balanced.
The current design supports multiple physical Ethernet interfaces, divided into sub-interfaces consisting of 802.1q tagged VLANs. A given VLAN can carry multiple subnets. Each virtual interface is assigned an IP address from the subnet it services. Having multiple IP addresses from a common subnet on separate interfaces in one host requires special network configuration options such as ARP filter and source-routing. The alternative solution is to create subnet per network interface. We believe, however, that this will create more complexity on each host involved with storage networking.
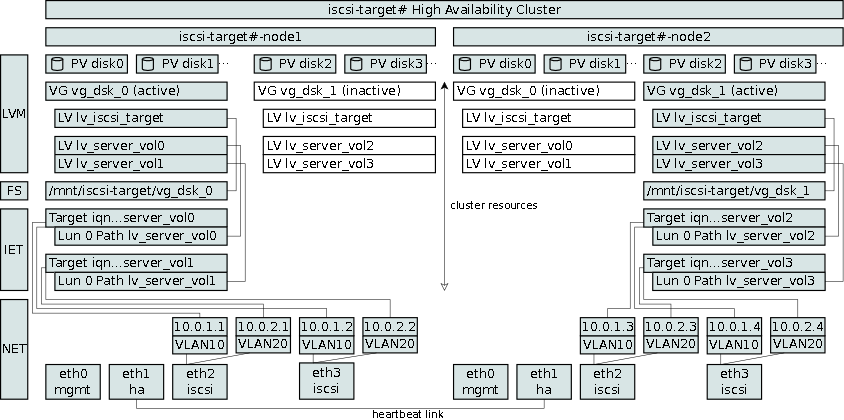
The architecture overview figure presents a cluster state where vg_disk_0 is active on node1 and inactive on node2, similarly vg_disk_1 is active on node2 and inactive on node1. Each node provisions iSCSI targets and LUNs. On node1, the logical volume lv_server_vol0 is served under the target iqn…server_vol via the interface IP addresses 10.0.1.1 and 10.0.1.2, assuming class C addresses in the same subnet. Notice, that if the volume group vg_dsk_0 becomes active on node2, the target’s IP addresses will change to 10.0.1.3 and 10.0.1.4.
|
|
It should become clear that an initiator will loose connectivity with the target when volume group resources migrate. |
An iSCSI Portal can solve the above problem. Before describing the architecture of the iscsi-portal, we need to understand the standard iSCSI Discovery and Normal sessions.
iSCSI Discovery and Normal Session
This section highlights the iSCSI Discovery and Normal session establishment. For complete details, refer to RFC 3720 [rfc3720].
The iSCSI initiator is the entity that desires to see a device. An iSCSI target is the entity that provisions the device to an initiator. The communication channel is established using TCP and the commonly used port number 3260. The endpoints of that communication channel are called network portals on both the initiator and the target.
Before the initiator can access a target, the initiator discovers targets automatically or manually. During target discovery, the initiator establishes a discovery session with a network portal and queries it for known targets. The response from the target is a list of targets and their associated IP addresses. At this time the initiator closes the discovery session and initiates a normal session with the discovered target with the intend to obtain LUNs which can be disk devices from the discovered target.
The following figure demonstrates the Discovery session between an initiator with the IP 10.0.1.90 and the target network portal on VLAN10 with the IP 10.0.1.1.

Because the target is configured to use two network portals, 10.0.1.1 and 10.0.1.2, the initiator establishes multiple connections resulting in multiple identical disk devices of lv_server_vol0 at the initiator. The initiator requires multipath software and configuration.
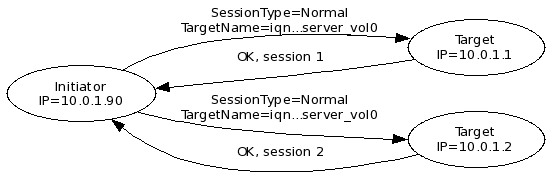
The initiator stores the original TargetAddress for each connection. In this context the TargetAddress is also called a portal address. The initiator uses the portal address, for example, to re-establish a session after the network cable was cut and fixed again.
|
|
Initiators that interact with the standard iSCSI Enterprise Target (IET) follow the above described discovery and normal sessions sequences. Use the iscsi-portal to control target portal address provisioning. |
Software Packages
The iscsi-target software packages are depicted in the following diagram:
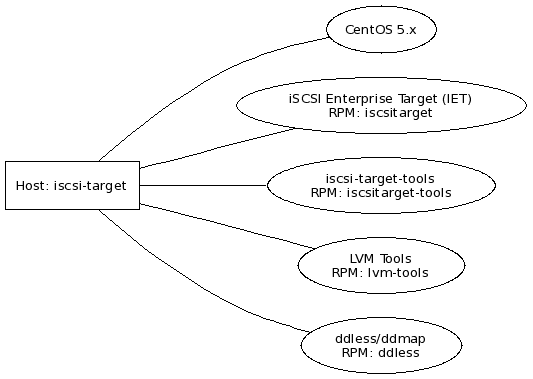
The iscsi-target host is identified with a box shape while software components are identified with an ellipse shape. Each software component consists of a software component name, which is commonly used in this documentation, followed by a RPM (RedHat Package Management) package name.
The following list presents package names providing a short description of the components:
- iscsitarget
-
The iSCSI Enterprise Target software. Configuration files are found under /etc/iet and are managed by the iscsitarget-tools package.
- /etc/iet/
-
- ietd.conf
-
Generated IET daemon configuration. The content of this file depends on the active volume groups of the current node.
- initiators.allow
-
Defines on a per target basis which initiators are allowed to connect. The rules we employ here are based on the initiator name and not the initiator IP, since it is common for a single initiator to have multiple IP addresses.
- target.allow
-
Defines which interfaces a target is exposed to.
- ietadm
-
command line interface to facilitate IET daemon management
- /proc/net/iet/
-
- session
-
contains listing of targets and associated sessions
- volume
-
contains listing of targets and associated volumes (LUNs)
- reservation
-
contains listing of targets and associated reservations
- vpd
-
contains targets and associated Vital Product Data (VPD) information
- ddmap
-
contains ddmap data of logical volumes provisioned by targets
- iscsitarget-tools
-
support tools for target cluster configuration located under /etc/iscsi-target
- ietd_cluster.sh
-
iscsi-target cluster service control script. Allows you to start and stop the iscsi-target services across the entire cluster.
- ietd_config.sh
-
configuration of iscsitarget-tools
- ietd_ddmap.sh
-
manages the state changes of ddmap data during startup and shutdown. You can query the status of the ddmap state of each logical volume.
- ietd_iptables.sh
-
manages the iptable rules during startup and shutdown of the iscsi-target services.
- ietd_routing.sh
-
manages the source routing for multiple interfaces that share IP addresses from a common subnet.
- ietd_service.sh
-
callback script with hooks for pre- and post- iscsi-target service startup and shutdown.
- ietd_targets.sh
-
manages the target and LUN configuration defined in targets.conf. Targets can be flagged online or offline, targets can be added, LUNs can be resized online.
- ietd_vg.sh
-
manages the mount point directories for volume group meta data like IET configuration and ddmap state during system startup.
- iet-tools.plx
-
command line tool to support target operations for ietd_targets.sh.
- iostat_top.sh
-
top like tool to watch disk IO of logical volumes.
- lvm_cluster.sh
-
a logical volume manager cluster tool that selects the proper node when executing specifically recognized commands like lvcreate, lvextend, lvremove, for example. Each command references a specific volume group, the tool chooses the node with the active volume group.
- session_top.sh
-
top like tool to watch and track the number of sessions per target.
- targets.conf
-
configuration file for all targets and LUNs and other meta data.
- targets_update.sh
-
triggers the ietd_targets.sh management for all configured targets within a cluster.
- zfs_tools.sh
-
zfs snapshot management interface.
- lvm-tools
-
support tools for LVM management
- /etc/lvm/lvm_tools.conf
-
configuration of the LVM tool chain.
- lvm_copy
-
copy block device contents from a source to target, the source and target can be file, logical volume or other block device.
- lvm_devsize
-
tool to determine block device size
- lvm_iostat
-
performance gathering tool for block devices
- lvm_snap_copy
-
utilizes lvm_snap_create, lvm_copy, and lvm_snap_remove.
- lvm_snap_create
-
creates a snapshot of a logical volume allocating a percentage of the origin volume
- lvm_snap_remove
-
removes a snapshot
- ddless
-
- ddless
-
copies block device data from a source to a target. Employs ddless checksums to reduce writes of identical data and uses ddmap data to reduce reads from the source device.
- ddmap
-
reads and combines multiple ddmap sources into a single ddmap file.
Our current iscsi-target nodes utilize CentOS 5 64-bit as the operating system. Ensure that the operating system updates have been installed.
Use the following commands to install the above packages listed above.
[root@iscsi-target-node1 /]# yum install iscsitarget
[root@iscsi-target-node1 /]# yum install iscsitarget-tools
[root@iscsi-target-node1 /]# yum install lvm-tools
[root@iscsi-target-node1 /]# yum install ddless
General System Preparation
The boot process of a system normally starts system services such as iscsi-target, however, since the services are clustered, we need to disable the iscsi-target services. Heartbeat manages the startup and shutdown of the iscsi-target services.
The heartbeat service should also be disabled because some of the configured resources require specific mount points to be created, we have automated that part during startup.
The following commands should be executed to configure the required system boot state:
[root@iscsi-target-node1 /]# chkconfig iscsi-target off
[root@iscsi-target-node1 /]# chkconfig heartbeat off
#
# disable volume groups
#
vgchange -an

#
# create iscsi-target volume group data mount points (iet, ddmap
# configuration files). Each volume group has logical volumes and
# for each of those there is configuration information for iet
# ddmap. These mount points MUST exist BEFORE the cluster starts!
#
/etc/iscsi-target/ietd_vg.sh

#
# then start heartbeat (this guarantees that we don't have the vg open
# on two nodes during heartbeat's startup), also make sure that since
# heartbeat is in the off state (chkconfig), it MUST be added otherwise
# it won't be shutdown during reboot(!): chkconfig --add heartbeat
#
service heartbeat start
The /etc/hosts file should be populated with all cluster node names, in case DNS experiences a failure condition.
127.0.0.1   localhost.localdomain localhost
192.168.0.1 iscsi-target-node1.amherst.edu iscsi-target-node1
192.168.0.2 iscsi-target-node2.amherst.edu iscsi-target-node2
The /etc/sysconfig/iptables contains the iptables configuration and it should by default block all incoming traffic except for the following services:
-
ssh, tcp port 22
-
iscsi, tcp port 3260
-
cluster, udp 694
The iscsitarget-tools has scripts that monitor the changes in the volume and session files under /proc/net/iet. A cron job needs to be setup to actively monitor the state changes.
#
# ietd state diff
#
*/5 * * * * root /etc/iscsi-target/iet-tools.plx -c state_diff > /dev/null 2>&1
Since an operator is notified via email as state changes occur, you should also configure the operator’s email address in /etc/iscsi-target/iet-tools.conf.
IO Scheduler
It is recommended practice to change the underlying disk scheduler from cfq to deadline.
Make sure you are using the deadline scheduler on the underlying block devices because the cfq scheduler doesn’t work correctly with IO threads spawned from the kernel.
— Ross Walker
The disk queue scheduler can be configured on a per block device using the following command:
echo deadline > /sys/block/sd?/queue/scheduler
It can also be globally configured as a kernel boot parameter configurable in /etc/grub.conf:
title CentOS (2.6.18-194.26.1.el5)
        root (hd0,0)
        kernel /vmlinuz-2.6.18-194.26.1.el5 ro root=/dev/vg_sata0/lv_os_root elevator=deadline
        initrd /initrd-2.6.18-194.26.1.el5.img
Subsequent kernel updates retain the setting in grub.conf.
Logical Volume Management (LVM)
LVM is configured by default to look at all disks for LVM data structures. This can be problem, if a LUN provisioned to another host also maintains LVM data structures. After some period of time, LVM on the iscsi-target detects these nested data structures and allocates device mapper entries for logical volumes that are in use by another host.
The LVM configuration at the iscsi-target should filter devices and only look at devices that are part of the managed volume groups. In our implementation we are looking at devices that originate from the multipath daemon and any other devices except the root file system device are ignored.
The /etc/lvm/lvm.conf contains a filter setting that controls which devices LVM considers. Keep in mind that you can only have a single filter setting. You must create a single regular expression that works for the entire system. In our case want to accept the local disk partition 2 which contains LVM, accept devices from the multipath daemon and reject everything else:
filter = [ "a|/dev/sda2|", "a|/dev/mapper/mpath.*|", "r|.*|" ]
Multipathing devices for use by LVM
It is highly recommended to implement multiple data paths to the disks that make up the volume groups. Configuration details of multipath can be obtained via the man page multipath.conf and also via http://sources.redhat.com/lvm2/wiki/MultipathUsageGuide.
A multipath default policy needs to be established in the file /etc/multipath.conf:
defaults {
        polling_interval 5

        selector "round-robin 0"
        path_grouping_policy multibus
        path_checker tur

        # lower this until reads are smooth on the graphs (default 1000)
        rr_min_io 16
        rr_weight uniform

        failback 10
        no_path_retry fail
        user_friendly_names yes
}
The polling_interval is kept at the suggested default value of 5 seconds. The selector value "round-robin 0" is the only currently implemented path selector. The path_grouping_policy is multibus, indicating that all paths are in one priority group. The path checker uses the SCSI test unit ready (tur) command to verify the availability of a device. Path switches occur after 16 IO operations. Note, that this has to be tuned according to the backend devices. Since each path has the same priority we choose the rr_weight value to be uniform. Once a failed path becomes available again, defer its acceptance by 10 seconds. If a path has failed, the no_path_retry value of fail, indicates to not queue any data on that path. The user_friendly_names provide more manageable device entries.
The multipath.conf file contains blacklist and device sections which need to be adjusted according to your environment. In our case, we are utilizing NexSAN SataBeasts and the devices appear properly.
The multipaths section allows you to assign user friendly names to the WWIDs of LUNs coming from the SataBeasts. A sample section:
multipaths {

        #
        # mpath_vg_dsk_00
        #
        multipath {
                wwid 36000402003fc407163ac25d900000000
                alias mpath_vg_dsk_00
        }

        # more...
}
The WWID is obtained by interrogating each block device using the following command:
[root@iscsi-target-node1 /]# /sbin/scsi_id -g -u -s /block/sdb
36000402003fc407163ac25d900000000
The device mapper assigns in conjunction with the multipath daemon the following persistent device path /dev/mapper/mpath_vg_dsk_00 which must be used when creating the physical volume and subsequent volume group.
[root@iscsi-target-node1 /]# pvcreate /dev/mapper/mpath_vg_dsk_00
[root@iscsi-target-node1 /]# vgcreate vg_dsk_00 /dev/mapper/mpath_vg_dsk_00
Enable the multipath service and observe the multipath status:
[root@iscsi-target-node1 /]# chkconfig multipathd on
[root@iscsi-target-node1 /]# service multipathd start
[root@iscsi-target-node1 /]# multipath -l
mpath_vg_dsk_00 (36000402003fc407163ac25d900000000) dm-3 NEXSAN,SATABeast
[size=1.4T][features=0][hwhandler=0][rw]
\_ round-robin 0 [prio=0][active]
 \_ 4:0:4:0 sda  8:16 [active][undef]
 \_ 3:0:4:0 sdb  8:32 [active][undef]
A device can be removed from the linux kernel via the following command.
[root@iscsi-target-node1 /]# echo 1 > /sys/block/sdX/device/delete
This is useful at times when removing paths from a multipath device. More details can be found at http://www.softpanorama.org/Commercial_linuxes/Devices/multipath.shtml.
Networking Configuration
Several network interfaces require specific configuration features:
-
management
-
heartbeat
-
iSCSI
The management and heartbeat interfaces should be in different VLANs and subnets and can be configured with static IP addressing.
The interfaces that expose iSCSI traffic, however, require more attention. On the switch side of the iSCSI interface it is generally recommended to support large MTUs and ethernet flow control send and receive support. The following is an example of a CISCO configured switchport for a single VLAN carrying iSCSI traffic:
interface GigabitEthernet9/16
 description iscsi-target-node1-port0
 switchport
 switchport access vlan 10
 mtu 9216
 flowcontrol receive on
 flowcontrol send on
 spanning-tree portfast
If the iSCSI target provides services to multiple VLANs carrying iSCSI traffic use the following configuration which provides a trunk interface pruned to service specific VLANs:
interface TenGigabitEthernet6/1
 description iscsi-target-node1-port0.trunk
 switchport
 switchport trunk encapsulation dot1q
 switchport trunk allowed vlan 10,20
 switchport mode trunk
 switchport nonegotiate
 mtu 9216
 flowcontrol receive on
 flowcontrol send on
 spanning-tree portfast trunk
ARP Filter
Supporting multiple IP addresses from a common subnet on different network adapters on a single host has by default ARP and routing issues in Linux because the kernel believes that IP addresses are owned by the host and not the interface.
|
|
The following section presents a solution to the ARP and routing issue, however, there might be other ways to solve this. |
The following is an excerpt from the kernel documenation/ip-sysctl.txt file in regards to arp_filter.
arp_filter - BOOLEAN
1 Allows you to have multiple network interfaces on the same subnet, and have the ARPs for each interface be answered based on whether or not the kernel would route a packet from the ARP’d IP out that interface (therefore you must use source based routing for this to work). In other words it allows control of which cards (usually 1) will respond to an arp request.
0 - (default) The kernel can respond to arp requests with addresses from other interfaces. This may seem wrong but it usually makes sense, because it increases the chance of successful communication. IP addresses are owned by the complete host on Linux, not by particular interfaces. Only for more complex setups like load- balancing, does this behaviour cause problems.
arp_filter for the interface will be enabled if at least one of conf/{all,interface}/arp_filter is set to TRUE, it will be disabled otherwise
— LWN
ARP filtering can be configured using /etc/sysctl.conf to ensure the change is persistent after a reboot.
net.ipv4.conf.all.arp_filter = 1
Routing based on Source IP Address
Standard routing rules are evaluated using a single routing table. The routing table selection is made using the destination IP address.
To implement routing based on source IP address, we need to establish new routing tables and routing rules. Routing rules can be added to control routing, for example, by source IP address. Refer to the man ip for more information. Routing rules can invoke the evaluation of a routing table, hence we create a distinct routing table per managed iSCSI interface.
|
|
Linux supports more than one routing table. The standard route command manipulates the main routing table. |
To aid the iscsi-target network portal configuration and source routing requirement stated above, we present the network interface configuration:
# Intel Corporation 82598EB 10-Gigabit AF Dual Port Network Connection
DEVICE=eth2
BOOTPROTO=none
HWADDR=00:1B:21:58:2D:F7
ONBOOT=yes
MTU=9000
VLAN=yes DEVICE=eth2.10 BOOTPROTO=static ONBOOT=yes IPADDR=10.0.1.1 NETMASK=255.255.255.0 IET_PORTAL_GROUP=pg_vlan10_fabricIET_ROUTE_TABLE=rt_vlan10_port0
# Intel Corporation 82598EB 10-Gigabit AF Dual Port Network Connection
DEVICE=eth3
BOOTPROTO=none
HWADDR=00:1B:21:58:2D:F6
ONBOOT=yes
MTU=9000
VLAN=yes DEVICE=eth3.10 BOOTPROTO=static ONBOOT=yes IPADDR=10.0.1.2 NETMASK=255.255.255.0 IET_PORTAL_GROUP=pg_vlan10_fabric
| The IET_PORTAL_GROUP must be consistent for interfaces servicing a specific fabric or iSCSI subnet. This tag is utilized by ietd_targets.sh script and identifies network portal membership of a configured target. | |
|
The IET_ROUTE_TABLE entry must unique for each fabric or iSCSI subnet port because specific source routing configuration is required on a per IP/port assignment basis. This tag is utilized by the ietd_routing.sh script and enables IP source routing.
The IET_ROUTE_TABLE value is a symbolic name that requires a numeric translation. The numbers refer to routing table rules and are configured in /etc/iproute2/rt_tables. Refer to man ip for more detailed information. The assignment of the numeric routing table ID is arbitrary, we chose to start with the number 10. /etc/iproute2/rt_tables
# # reserved values # 255 local 254 main 253 default 0 unspec # # amherst: routing table numbers, managed by /etc/iscsi-target/ietd_routing.sh # # iscsi 10 rt_vlan10_port0 11 rt_vlan10_port1 12 rt_vlan11_port0 13 rt_vlan11_port1 |
Both of the above configuration items IET_PORTAL_GROUP and IET_ROUTE_TABLE are enhancements added to the network configuration. It does not impact the standard linux network configuration, however, the iscsi-target-tools utilize these configuration values.
The source routing is configured by the ietd_routing.sh script which enumerates all ifcfg-eth* scripts looking for IET_ROUTE_TABLE names, IPADDR, and NETMASK. The values of these variables are used to produce the new routing tables and routing rules.
The cluster services normally invoke the startup of the iscsi-target services and hence the ietd_routing.sh script. It is recommended during initial configuration to manually start the ietd_routing.sh script via:
[root@iscsi-target-node1 /] cd /etc/iscsi-target
[root@iscsi-target-node1 /]./ietd_routing.sh start
[root@iscsi-target-node1 /]./ietd_routing.sh status
ip route show table rt_vlan10_port0
10.0.1.0/24 dev eth2  scope link  src 10.0.1.1

ip route show table rt_vlan10_port1
10.0.1.0/24 dev eth3  scope link  src 10.0.1.2

ip rule list
0:      from all lookup 255
10:     from 10.0.1.1 lookup rt_vlan10_port0
10:     from 10.0.1.2 lookup rt_vlan10_port1
32766:  from all lookup main
32767:  from all lookup default
0: from all lookup 255
10: from 10.0.1.1 lookup rt_vlan10_port0
10: from 10.0.1.2 lookup rt_vlan10_port1
32766: from all lookup main
32767: from all lookup default
| Note the command output was initiated by ip route and the output has been abbreviated. | |
| Note the command output was initiated by ip rule and the output has been abbreviated. |
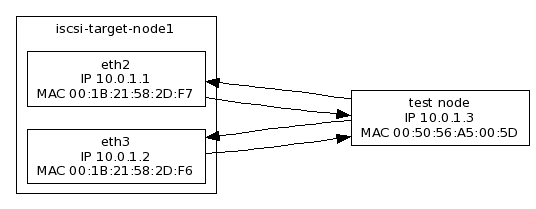
Network Configuration Validation
Once the ARP filter and source routing is working, it is time to validate the network communication channels. Prepare a host with a single network interface and IP address 10.0.1.3. It should be able to communicate with the previously configured interfaces eth2 and eth3 on VLAN 10. Note for each interface the MAC address and IP address.
The goal is to verify the ARP request/response and the subsequent IP conversation. Before testing begins, it is assumed that ARP table of the test node has been cleared:
-
The test node initiates a conversation using telnet and port 3260 and the destination IP address 10.0.1.1. The packet trace on the receiving interface eth2 should see the ARP request and response and the subsequent TCP traffic.
-
The test node repeats the above procedure with the destination IP address 10.0.1.2. The packet trace on the receiving interface eth3 should see the ARP request and response and the subsequent TCP traffic.
During the execution of the above two steps, only one of the destination interfaces should reveal packet activity.
[root@iscsi-test ~]# telnet 10.0.1.1 3260
Trying 10.0.1.1...
Connected to iscsi-target-port0 (10.0.1.1).
Escape character is '^]'.

[root@iscsi-target-node1 ~]# tcpdump -n -e -i eth1 host 10.0.1.3
23:12:59.676609 00:50:56:a5:00:5d > Broadcast, ethertype ARP (0x0806), length 60: arp who-has 10.0.1.1 tell 10.0.1.3
23:12:59.676703 00:1B:21:58:2D:F7 > 00:50:56:a5:00:5d, ethertype ARP (0x0806), length 42: arp reply 10.0.1.1 is-at 00:1B:21:58:2D:F7
23:12:59.676800 00:50:56:a5:00:5d > 00:1B:21:58:2D:F7, ethertype IPv4 (0x0800), length 74: 10.0.1.3.33147 > 10.0.1.1.iscsi-target
23:12:59.676861 00:1B:21:58:2D:F7 > 00:50:56:a5:00:5d, ethertype IPv4 (0x0800), length 74: 10.0.1.1.iscsi-target > 10.0.1.3.33147
23:12:59.677190 00:50:56:a5:00:5d > 00:1B:21:58:2D:F7, ethertype IPv4 (0x0800), length 66: 10.0.1.3.33147 > 10.0.1.1.iscsi-target

[root@iscsi-target-node1 ~]# tcpdump -n -e -i eth2 host 10.0.1.3
23:12:59.676427 00:50:56:a5:00:5d > Broadcast, ethertype ARP (0x0806), length 60: arp who-has 10.0.1.1 tell 10.0.1.3
[root@iscsi-test ~]# telnet 10.0.1.2 3260
Trying 10.0.1.2...
Connected to iscsi-target0-port1 (10.0.1.2).
Escape character is '^]'.

[root@iscsi-target-node1 ~]# tcpdump -n -e -i eth1 host 10.0.1.3
23:14:20.566939 00:50:56:a5:00:5d > Broadcast, ethertype ARP (0x0806), length 60: arp who-has 10.0.1.2 tell 10.0.1.3

[root@iscsi-target-node1 ~]# tcpdump -n -e -i eth2 host 10.0.1.3
23:14:20.566601 00:50:56:a5:00:5d > Broadcast, ethertype ARP (0x0806), length 60: arp who-has 10.0.1.2 tell 10.0.1.3
23:14:20.566784 00:1B:21:58:2D:F6 > 00:50:56:a5:00:5d, ethertype ARP (0x0806), length 42: arp reply 10.0.1.2 is-at 00:1B:21:58:2D:F6
23:14:20.566808 00:50:56:a5:00:5d > 00:1B:21:58:2D:F6, ethertype IPv4 (0x0800), length 74: 10.0.1.3.32884 > 10.0.1.2.iscsi-target
23:14:20.566858 00:1B:21:58:2D:F6 > 00:50:56:a5:00:5d, ethertype IPv4 (0x0800), length 74: 10.0.1.2.iscsi-target > 10.0.1.3.32884
23:14:20.566888 00:50:56:a5:00:5d > 00:1B:21:58:2D:F6, ethertype IPv4 (0x0800), length 66: 10.0.1.3.32884 > 10.0.1.2.iscsi-target
|
|
The above tcpdump trace have been slightly reduced to enhance readability. |
|
|
Make sure that the correct interface answers during the tests. A case to avoid is to see incoming traffic on eth3 and then outgoing traffic on eth2. Eventually, the switch processing the traffic from eth2 will broadcast the traffic to every switchport on your network! This problem is known as unicast flooding. A good reference is located at http://www.cisco.com/en/US/products/hw/switches/ps700/products_tech_note09186a00801d0808.shtml. If source routing and ARP filtering is not configured, for example, the cause of unicast flooding is due to asymmetric routing. We have experienced this problem first hand and would like to advise the reader to verify the network traces in detail. |
Network Performance Validation
To ensure reliable network throughput, interface performance must be validated. There are many tools and methodologies to test network interface performance. We are using 10 Gb/s Intel server cards with the ixbe driver.
The well-known ttcp tool works well for 1 Gb/s interfaces, however, for 10 Gb/s interfaces iperf has the required features. A single TCP connection will not fill the data pipe utilizing ttcp. With iperf you can add multiple threads to the testing process and achieve close to 9.8 Gb/s.
The server side runs:
[root@iscsi-target-node1 /]# ./iperf -s
The client side executes:
[root@iscsi-target-node1 /]# ./iperf -c 192.168.0.1 -fm -P4

[  5] local 192.168.0.1 port 5001 connected with 192.168.0.2 port 53407
[  4] local 192.168.0.1 port 5001 connected with 192.168.0.2 port 53408
[  6] local 192.168.0.1 port 5001 connected with 192.168.0.2 port 53409
[  7] local 192.168.0.1 port 5001 connected with 192.168.0.2 port 53410
[  5]  0.0-10.0 sec  2.87 GBytes  2.46 Gbits/sec
[  4]  0.0-10.0 sec  2.88 GBytes  2.47 Gbits/sec
[  6]  0.0-10.0 sec  2.88 GBytes  2.47 Gbits/sec
[  7]  0.0-10.0 sec  2.86 GBytes  2.45 Gbits/sec
[SUM]  0.0-10.0 sec  11.5 GBytes  9.85 Gbits/sec
Heartbeat Cluster
The CentOS 5 distribution currently provides heartbeat-2.1.3 [heartbeat]. Use the following commands to install the required packages for heartbeat.
[root@iscsi-target-node1 /]# yum install heartbeat
[root@iscsi-target-node1 /]# yum install heartbeat-gui
|
|
We have found that the heartbeat RPM from CentOS has a %pre script execution problem during the RPM installation. This can be resolved by re-running the yum install heartbeat command a second time. |
Before starting the heartbeat services, several configuration files must be created.
auth 2
2 sha1 somesecretpreferablylong
The following file /etc/ha.d/ha.cf.template is not part of the distribution of hearbeat; however, it is a copy of ha.cf. One of the goals with the heartbeat configuration files is to keep them in sync across nodes. This is in contrast with heartbeat’s cluster resource management which is automatically synchronized across cluster nodes. The template is processed by the ha.cf.make script and it replaces @HA_UCAST1@ variable with node specific unicast interface and IP address specifications.
logfacility     local0

@HA_UCAST1@

node iscsi-target-node1.amherst.edu
node iscsi-target-node2.amherst.edu

ping 148.85.2.1
respawn root /usr/lib64/heartbeat/pingd -m 100 -d 2s -a pingd

#
# Specifies whether Heartbeat should run v2-style. We set it to on
#
crm yes
Each cluster node must be specified using the FQDN. Also recommended is a ping node specification, as it allows the cluster nodes to test the reachability of an IP address, the default gateway for example. This is used in conjunction with the pingd and provides a value that can be used as a resource location constraint value. Resources can be pinned to specific nodes based on the reachability of the surrounding network.
The ha.cf.make script is only suited to handle 2 cluster nodes due to the unicast configuration of the heartbeat protocol. Heartbeat also supports a broadcast mode which is more suitable for clusters with more than 2 nodes. In that case this template is not necessary. We initially prefer 2 node cluster to utilize the unicast mode to reduce the amount of broadcasting on the cluster segment.
#!/bin/sh

#
# generate a host specific ha.cf file using uname -n
#
ROOTDIR=$(dirname $0)
cd $ROOTDIR

ha_host=$(uname -n)

case "$ha_host" in
        iscsi-target-node1.amherst.edu)
                ha_ucast1="ucast eth1 192.168.88.86"
                ;;
        iscsi-target-node2.amherst.edu)
                ha_ucast1="ucast eth1 192.168.88.85"
                ;;
        *)
                echo "missing hostname definition in $0"
                exit 1
esac

if [ ! -e ha.cf.template ]; then
        echo "ha.cf.template not found"
        exit 1
fi

cat ha.cf.template | \
        sed "s/@HA_UCAST1@/$ha_ucast1/" > ha.cf
The cluster node1 is usually used to make all configuration changes. Changes are then propagated using the rsync tool. The following script is commonly invoked to synchronize specific files and directories on the cluster nodes (currently only node2):
#!/bin/sh

NODE2=iscsi-target-node2

rsync -avrR \
        --delete \
        --files-from=amh_cluster_sync_include.conf \
        --exclude-from=amh_cluster_sync_exclude.conf \
        / $NODE2:/

/etc/ha.d/ha.cf.make
ssh $NODE2 /etc/ha.d/ha.cf.make
# cluster
/etc/ha.d/

# hosts
/etc/hosts

# iptables
/etc/sysconfig/iptables

# sysctl and boot up
/etc/sysctl.conf
/etc/rc.d/rc.local

# iscsi-target (cluster management files)
/etc/iscsi-target/

# ip route names
/etc/iproute2/rt_tables

# lvm
/etc/lvm/lvm.conf

# multipath
/etc/multipath.conf

# cron
/etc/cron.d/
# iscsi-target excludes
/etc/iscsi-target/iet_state/
Cluster Resources
Several cluster resources must be configured to make the iscsi-target host functional:
-
stonith (Shoot the other node in the head)
-
volume group
-
iscsi-target
In case cluster node1 looses its services and node2 considers node1 dead, node2 is designed to run the stonith resource, such that it can power off node1. This becomes more complex when the cluster has more than two nodes.
The volume group resource consists of the volume group and its associated file system that contains target configuration files.
The iscsi-target resource is a multi-instance resource, designed to be running on n number of nodes.
We utilize the heartbeat GUI, called hb-gui, to configure the resources.
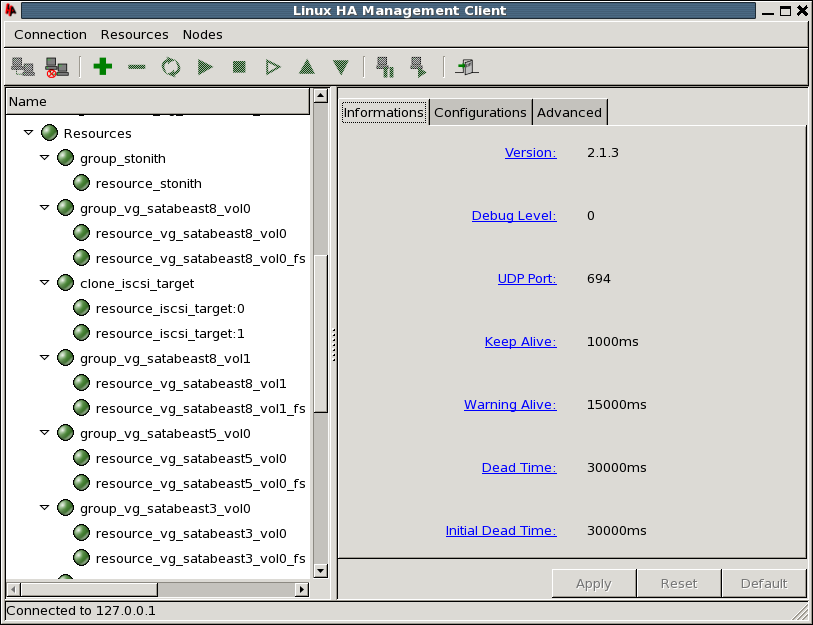
The top level item linux-ha in the hb_gui requires the following configuration changes:
-
Enable Stonith
-
Default Action Timeout: 50 seconds
The stonith action is configured to power off a non-functioning node. The default action timeout value must be set to allow the iscsi-target services to cease on service transition.
Resources can be configured individually or as a group. The advantage of a grouped resource, is that one can add other resources into the group and can change the start and stop sequencing. Hence, all resources in this project are contained in resource groups.
Stonith
A resource group named group_stonith must be created and populated with a single resource named resource_stonith. The stonith resource is responsible for powering off a non-functioning node. Since our design consists of two nodes, we only allow node2 to stonith node1. This was chosen because we do not wish for both nodes to engage in a stonith operation at the same time. The underlying stonith code ensures that only node2 can actually perform the operation.
* group_stonith
Resource group container
Attributes:
        ordered:        true
        collocated:     true
        target_role:    started
| |
stonith resource
Attributes:
        Resource ID:    resource_stonith
        Type:           external/stonith_ssh_proxy
        Class:          stonith
        Provider:       heartbeat

Parameters:
        hostlist:       iscsi-target-node1
        username_at_host: stonith@stonithhost
        ssh_orig_cmd_key: a098sdfsad8f90asdf09s8adf08as
|
We have derived our external/stonith_ssh_proxy resource from the heartbeat provided ssh resource and modified it to ssh into a host that manages power on/off operations of systems. Power operations are can be controlled using Intelligent Platform Management Interface (IPMI). Their interfaces are in a separate VLAN.
It is recommended to create a secure stonith proxy host that has access to the IPMI network. The iscsi-target servers can then ssh into the stonith proxy using a non-root account, followed by a key (this prevents accidental death if you ssh to the stonith proxy from node2):
[root@iscsi-target-node2 /] ssh stonith@stonithhost a098sdfsad8f90asdf09s8adf08as
The configuration of .ssh/authorized_keys2 on the stonith proxy host is as follows:
from="#.#.#.#",no-port-forwarding,no-X11-forwarding,no-agent-forwarding,no-pty,command="./stonith.sh iscsi-targetX-node1" ssh-rsa AAAAB3NzaC1.....hk0= root@iscsi-targetX-node2.amherst.edu
This allows only the node2 to ssh in from …. It will forcibly execute the stonith.sh in the home directory of the stonith user with first parameter iscsi-targetX-node1. By doing this, only a specific node can power off some other specific node, and no other non-related cluster node. The stonith.sh script is summarized as follows:
sys=$1
key=$SSH_ORIGINAL_COMMAND

case "$sys" in
        iscsi-targetX-node1)
                if [ "$key" == "a098sdfsad8f90asdf09s8adf08as" ]; then
                        ipmitool -H1.1.1.1 -Uadmin -Psetit chassis power reset
                        sleep 10
                        ipmitool -H1.1.1.1 -Uadmin -Psetit chassis power off
                fi
esac
Volume Group
The configuration of a volume group resource consists of two resources, namely, the LVM volume group and and a file system resource residing within the volume group. The file system resource consists of configuration components such as ietd.conf, initiators.allow, targets.allow. To emphasize, configuration for ietd actually resides on a file system within a dedicated logical volume named lv_iscsi_target that is part of the volume group resource.
By keeping the configuration information within the volume group, the configuration information migrates along with the volume group when services are transferred from node1 to node2. It is understood that IET keeps its configuration files under /etc/iet; the iscsitarget-tools package provides scripts to automatically manage the configuration data during iscsi-target service state changes.
* group_vg_dsk_0
Resource group container
Attributes:
        ordered:        true
        collocated:     true
        target_role:    started
| |
LVM resource
Attributes:
        Resource ID:    resource_vg_dsk_0
        Type:           LVM
        Class:          ocf
        Provider:       heartbeat

Parameters:
        volgrpname:     vg_dsk_0
| |
Filesystem resource
Attributes:
        Resource ID:    resource_vg_dsk_0_fs
        Type:           Filesystem
        Class:          ocf
        Provider:       heartbeat

Parameters:
        device:         /dev/vg_dsk_0/lv_iscsi_target
        directory:      /mnt/iscsi-target/vg_dsk_0
        fstype:         ext3
|
Before activating the resource group container, prepare the ext3 file system using the following commands:
[root@iscsi-target-node1 /] lvcreate -L8G -n lv_iscsi_target vg_dsk_0
[root@iscsi-target-node1 /] mke2fs -j /dev/vg_dsk_0/lv_iscsi_target
[root@iscsi-target-node1 /] tune2fs -c 0 -i 0 /dev/vg_dsk_0/lv_iscsi_target
Each configured volume group must also be registered in the ietd_config.sh file, so that the targets_update.sh script can properly manage configured targets.
iscsi-target
The iscsi-target resource is a resource group of type clone because iscsi-target services will be running on n number of nodes. The clone_iscsi_target resource group consists of n resource_iscsi_target:# instances:
* clone_iscsi_target
|
Resource group container. Standard resource containers are created before inserting cluster resources. Enable the clone checkbox causes the clone container to be implicitly created during the creation of the iscsi-target resource.
The clone_max defines how many instances of iscsi-target services we are running and it should match the number of nodes in the cluster. The clone_node_max value indicates how many instances of the iscsi-target service can be run on a single node, in our case, one; you cannot run multiple instances of the iSCSI Enterprise Target (IET) on a host. Attributes:
clone_max: 2
clone_node_max: 1
target_role: started
| |
iscsi-target:# service instances
Attributes:
        Resource ID:    resource_iscsi_target
        Type:           iscsi-target
        Class:          lsb
        Provider:       heartbeat
|
Cluster Resource Locations
Resources if not configured with location constraints will execute on any random node of the cluster. Locations constraints can be assigned to resources or resource groups using runtime conditions such as #uname eq iscsi-target-node2, meaning the resource is allowed to run if the current host matches iscsi-target-node2. If the node is not available, then the resource is forced onto another online node. The condition gives the resource a preferred node.
* Constraints/Locations
        - location_stonith
        - location_vg_dsk_0
        - ...
stonith is preferred on node2
Attributes:
        ID:             location_stonith
        Resource:       group_stonith
        Score:          Infinity
        Boolean:        And

Expressions:
        #uname  eq      iscsi-target-node2.amherst.edu
| |
The location of a volume group is assigned by the operator.
Attributes:
        ID:             location_vg_dsk_0
        Resource:       group_vg_dsk_0
        Score:          Infinity
        Boolean:        And

Expressions:
        #uname  eq      iscsi-target-node1.amherst.edu
|
Cluster Resource Ordering
Since there are two resource groups that provide services, the volume group and the iscsi-target clone resource, it must be ensured that the resource groups start up and shut down in a specific order. This dependency can be enforced using constraint order rules.
* Constraints/Orders
        - order_vg_dsk_0_iscsi
        - ...
Each volume group and iscsi-target service requires a constraint order definition. Below we enforce that the resource group named group_vg_dsk_0 is started before the clone_iscsi_target services. The rule is automatically reversed when stopping the services.
Attributes:
        ID:     order_vg_dsk_0_iscsi
        From:   group_vg_dsk_0
        Type:   before
        To:     clone_iscsi_target
|
Operator’s Manual
The operator’s manual concentrates on the iscsitarget-tools package configuration and program files allowing you to configure and provision targets and LUNs.
The /etc/iscsi-target directory contains the following files:
[root@iscsi-target-node1 /]# ls -l /etc/iscsi-target/ total 216 -rwxr-xr-x 1 root root 373 Jun 14 2010 ietd_cluster.sh -rw-r--r-- 1 root root 1266 Aug 3 2010 ietd_config.sh
| configuration files | |
| shell scripts to be invoked after making changes to configuration files. |
Configuring ietd_config.sh (Global Config)
The ietd_config.sh script contains one-time configuration variables and values and also variables that need to be modified after adding a new volume group resource.
- VGMETA_DIR=/mnt/iscsi-target
-
The VGMETA_DIR variable is utilized when referencing volume group specific data components. The volume group name is appended to VGMETA_DIR and the resulting path must be the mount point of the volume group resource’s file system resource.
Using the example of vg_dsk_0, the resulting path would be /mnt/iscsi-target/vg_dsk_0. Under this location, the iscsitarget-tools scripts maintain several other files and directories such as:
- ddmap
-
Contains volume group related ddmap state information. It is copied from /proc/net/iet/ddmap/… during iscsi-target service shutdown or failover.
- iet
-
Contains volume group related IET configuration files derived from targets.conf such as ietd.conf, initiators.allow and targets.allow.
- lunsize
-
Contains volume group related logical volume sizes that are used to detect LUN size changes.
- targets.d
-
Contains volume group related user programmable/dynamic target configurations. This can be used by other automation processes to generate targets on the fly without modifying the target.conf file.
- target_sessions
-
Contains volume group related targets and their number of sessions per target used by sessions_top.sh.
- zfs
-
Contains volume group related zfs meta data for backup purposes.
- DDMAP_PROC=/proc/net/iet/ddmap
-
The location of the RAM based ddmap data. This location is fixed.
- IPTABLES_PORT=3260
-
The default port for iSCSI traffic. iSCSI traffic is blocked during service shutdown and unblocked during service startup.
- IET_CONF_DIR=/etc/iet
-
The default location for IET configuration files. This location is fixed.
- IET_TARGET_HOSTS="iscsi-target-node1 iscsi-target-node2"
-
Specify the complete FQDN of each cluster member. Use uname -n to determine the proper names. This is used when processing the targets.conf on each cluster node.
- IET_VGS="vg_dsk_0 vg_dsk_1"
-
Specifies the volume groups the iscsi-target cluster manages. Volume groups must be visible on all cluster nodes.
- IET_TARGET_PREFIX="iqn.1990-01.edu.amherst:iet.iscsi-target"
-
This is the prefix for each generated target. Once it is set, do not change it, otherwise iSCSI initiators will be confused.
Configuring target.sh (Targets and LUNs)
The target.conf file is the core configuration file that affects the targets and logical volumes. It consists of several sections that are called upon during configuration update. The configuration update process is invoked via targets_update.sh. This script has to be executed after changing targets.conf.
The targets_update.sh script is expected to be run from cluster node1 and updates the targets.conf file on the other cluster nodes. Then the targets_update.sh executes the callbacks defined below on each cluster node individually. The targets.conf contains the definition of all targets across all nodes.
Given two volume groups, vg_dsk_0 on node1 and vg_dsk_1 on node2, the target.conf file will have configuration lines referring to both volume groups. When node1 processes the target.conf it will only process logical volumes residing on the active volume group vg_dsk_0. When node2 processes the same target.conf file, it will only process logical volumes residing on the active volume group vg_dsk_1.
The target.conf file is treated as a bash shell script.
The following section outlines the implemented function callbacks:
- conf_global
-
Global configuration options
- conf_target_options
-
Target options
- conf_target_callback_pre
-
Callback before target is created
- conf_target_callback
-
Callback when target is created
- conf_targets
-
Configure Targets and LUNs
targets.conf: conf_global
The conf_global function is invoked to establish configuration values that are also considered global in ietd.conf. Refer to the man ietd.conf help page for more information.
The shell function option followed by a native IET option can be invoked. Multiple option invocations are supported. For example:
function conf_global
{
        option ImmediateData Yes
        option TgtNotFoundRespondServiceUnavailable Yes
}
The TgtNotFoundRespondServiceUnavailable is not a standard IET option; details of this enhancement are described here: IET Patch: iet-07-tgtnotfound-svcunavailable
targets.conf: conf_target_options
The conf_target_options section could be made part of conf_global, however, it was created to possibly make changes on a target specific basis in the future.
The shell function option followed by a native IET option can be invoked. Multiple option invocations are supported. For example:
function conf_target_options
{
        option InitialR2T No
        option ImmediateData Yes
        option MaxRecvDataSegmentLength 262144
        option MaxXmitDataSegmentLength 262144
        option MaxBurstLength 262144
        option FirstBurstLength 65536

        # do not close connections on initiators, let the tcp stack time things out
        option NOPInterval 0
        option NOPTimeout 0
}
targets.conf: conf_target_callback_pre
The conf_target_callback_pre function is invoked before processing the target configuration under conf_targets. It is currently used to for Solaris ZFS backup support. The VGMETA_DIR/vg/zfs/backup file is initialized.
function conf_target_callback_pre
{
        local vg="$1"

        mkdir -p "$VGMETA_DIR/$vg/zfs"
        > "$VGMETA_DIR/$vg/zfs/backup"
}
targets.conf: conf_target_callback
The conf_target_callback function is invoked while processing the target configuration under conf_targets. It is currently used to include or exclude targets for ZFS backup processing. Targets to be included in Solaris ZFS backups must be appended to VGMETA_DIR/vg/zfs/backup.
function conf_target_callback
{
        local dev="$1"
        local vg="$2"
        local lv="$3"

        case "$lv" in
                *_zfssnap)
                        echo "callback> zfssnaps $vg/$lv are backups we are processing"
                        ;;
                lv_srvrux69_digitool_bkup_vol00)
                        echo "callback> no backup"
                        ;;
                *)
                        echo "$vg/$lv" >> "$VGMETA_DIR/$vg/zfs/backup"
                        ;;
        esac
}
targets.conf: conf_targets
The conf_targets section is critical to defining and managing targets and LUNs.
|
|
A target definition only supports single LUN. This decision had to be made, because we cannot support a target with multiple LUNs residing on different volume groups. The reason is that one can migrate a single volume group within a cluster. A target must have access to all of its configured LUNs from volume groups that are active on the current cluster node. |
The shell function target followed by several parameters can be invoked. Multiple target invocations are supported.
target up /dev... blockio AMHDSK- pg_vlan10_fabric "$ig_srvr_name"
- target
-
The target function being invoked.
- up|down
-
Specify up to bring the target online. Specify down to remove the target; connections with initiators will be lost.
- /dev…
-
Specify a path to a logical volume using the format: /dev/vg/lv. Only logical volumes are supported with the iscsitarget-tools package.
- blockio|fileio
-
Standard IET Type option, fileio uses Linux page-cache, blockio bypasses the Linux page-cache.
- AMHDSK-yymmdd-nn
-
Specify the LUN’s serial number, both IET ScsiId and ScsiSN are configured with this option. It is recommended to define a string with a maximum length of 16 characters.
- pg_vlan10_fabric
-
Specify the IET_PORTAL_GROUP value indicating which network interfaces service this target.
- "$ig_srvr_name"
-
Specify the initiator name(s) that can access this target. Use a space to separate multiple initiator names and ensure to quote the entire string so that it appears as one argument.
|
|
A target is exposed via specific network interfaces, also known as portals. The exposed target then requires access control to ensure that permitted initiators can access the target. Access control can be accomplished using the initiator IP addresses or initiator name (IQN). Utilizing the initiator name means maintaining a single value. This is also crucial when working with the iscsi-portal, it will impersonate the initiator using the initiator name to query for available targets. |
|
|
CHAP could be used for authentication, however, we have found problems with initiators not being able to properly reconnect under load once a network connection was broken. The iscsitarget-tools package already supports the incoming and outgoing user commands. Invoke the shell function in the targets.conf file: user in|out username secret |
A functional example:
#----------------------------------------------------------------------
# server# servername (Comment)
#----------------------------------------------------------------------
ig_server01_apps="iqn.1994-05.com.redhat:swiscsi.server01.apps"

target up /dev/vg_dsk_0/lv_server01_apps_vol00 blockio AMHDSK-100415-01 pg_vlan10_fabric "$ig_server01_apps"
The resulting iSCSI target IQN (iSCSI Qualified Name) is derived from the IET_TARGET_PREFIX, the IET_PORTAL_GROUP, the volume group and the logical volume name. When the target configuration is processed, the target’s IQN is displayed:
tgt> tgt_name: iqn.1990-01.edu.amherst:iet.iscsi-target.pg-vlan10-fabric.vg-dsk-0.lv-server01-apps-vol00 (up)
tgt> lun: 0, path: /dev/vg_dsk_0/lv_server01_apps_vol00 lun size: 1024.00G
Operator Commands
The following section explains commonly used operator commands. There are several other invokable shell scripts located under /etc/iscsi-target, many of them are used internally when starting and stopping iscsi-target services.
targets_update.sh
After making changes to the targets.conf file, invoke targets_update.sh script from node1:
[root@iscsi-target-node1 /]# ./targets_update.sh
This will first synchronize the cluster configuration files, specifically targets.conf and then invoke on each cluster node the ietd_targets.sh script to configure targets and logical volumes. It will only work on logical volumes, hence targets, that have an active volume group on the current node.
New targets are dynamically added. Current online targets flagged as offline will be removed; this does not remove the underlying logical volume, it only removes the target configuration. Logical volumes that have changed size are taken offline and online to allow IET to see the new volume size. Initiator connections are forced to re-establish their connections.
lvm_cluster.sh
Logical volumes must be managed using the lvm_cluster.sh provided command. The logical volumes of a volume group are only active on one cluster node. Hence, the operator would have to know which volume group is active on which node. The lvm_cluster.sh script handles that instead. Without any arguments the usage is provided:
[root@iscsi-target-node1 /]# ./lvm_cluster.sh
Usage: ./lvm_cluster.sh {vgs|vgdisplay|lvs|lvscan|lvcreate|lvextend|lvremove}
The lvm_cluster.sh script understands the above LVM commands and extracts based on their arguments the referenced volume group. Once the volume group is determined it executes the LVM command on the proper cluster node.
Operator Tasks
The following section explains commonly used operator tasks, such as adding and removing volumes.
Add a new volume
Before creating new volume the operator must decide in which volume group to create the volume. The volume group selection can be based on available space or based on how much IO the logical volume is expected to receive. It is better to distribute high volume IO logical volumes across different volume groups. Use the vgs command shown below to determine the available volume group space:
[root@iscsi-target-node1 /]# ./lvm_cluster.sh vgs

iet_host: iscsi-target-node1.amherst.edu
  VG                 #PV #LV #SN Attr   VSize  VFree
  vg_dsk_0             1  25   1 wz--n- 16.37T 7.58T

iet_host: iscsi-target-node2.amherst.edu
  VG                 #PV #LV #SN Attr   VSize  VFree
  vg_dsk_1             1  13   0 wz--n- 16.37T 5.98T
Using the data from the above volume group output, vg_dsk_0 has the most space available. The logical volume with a size of 1024G and a name of lv_server01_apps_vol00 on the volume group vg_dsk_0 is created next:
[root@iscsi-target-node1 /]# ./lvm_cluster.sh lvcreate -L1024G -n lv_server01_apps_vol00 vg_dsk_0
Once the logical volume is created, it must be configured in the target.conf file:
#----------------------------------------------------------------------
# server# servername (Comment)
#----------------------------------------------------------------------
ig_server01_apps="iqn.1994-05.com.redhat:swiscsi.server01.apps"

target up /dev/vg_dsk_0/lv_server01_apps_vol00 blockio AMHDSK-100415-01 pg_vlan10_fabric "$ig_server01_apps"
The above target configuration specifies that the target should be brought online. It uses the logical volume device path with blockio and a volume serial number of "AMHDSK-100415-01" exposed on network interfaces that are associated with pg_vlan10_fabric tag and allowing the initiator specified in ig_server01_apps access.
The ig component of the initiator variable means "initiator group" as multiple initiators can be allowed access to a target. This applies to clustered targets, such as VMware ESX/i clusters, for example. Separate multiple initiators with a white space.
Once configured, make the target active and online.
[root@iscsi-target-node1 /]# ./targets_update.sh
tgt> tgt_name: iqn.1990-01.edu.amherst:iet.iscsi-target.pg-vlan10-fabric.vg-dsk-0.lv-server01-apps-vol00 (up)
tgt> lun: 0, path: /dev/vg_dsk_0/lv_server01_apps_vol00 lun size: 1024.00G
Connections to the target can be verified by looking at the contents of /proc/net/iet/session. The target and volume configuration can be verified by looking at the contents of /proc/net/iet/volume.
Offline a volume
Taking a volume offline will disrupt the network traffic with the initiator. It is important to ensure that the initiator has closed active sessions before commencing with the next step:
#---------------------------------------------------------------------- # server# servername (Comment) #---------------------------------------------------------------------- ig_server01_apps="iqn.1994-05.com.redhat:swiscsi.server01.apps" target down
| note the keyword down. |
Update the configuration:
[root@iscsi-target-node1 /]# ./targets_update.sh
tgt> tgt_name: iqn.1990-01.edu.amherst:iet.iscsi-target.pg-vlan10-fabric.vg-dsk-0.lv-server01-apps-vol00 (down)
The related volume and sessions should not appear any more in /proc/net/iet/session and /proc/net/iet/volume.
Removing a volume
To remove a volume, first offline it. This step is described in the previous operator task. Once the volume is offline, the logical volume can be removed. Ensure that there is a backup before removing the logical volume.
[root@iscsi-target-node1 /]# ./lvm_cluster.sh lvremove /dev/vg_dsk_0/lv_server01_apps_vol00
Change volume size
Volume sizes should only be increased, otherwise data loss may occur. IET does not natively support this operation, hence iscsitarget-tools tracks the volume sizes. When a volume size change has been detected, the volume is temporarily taken offline and brought back online. Initiators will have to reconnect at that point. At the initiator side, the operator can rescan devices to see the device size changes.
The following example adds 500 GB of disk space to the logical volume:
[root@iscsi-target-node1 /]# ./lvm_cluster.sh lvextend -L+500G /dev/vg_dsk_0/lv_server01_apps_vol00
Update the configuration:
[root@iscsi-target-node1 /]# ./targets_update.sh
Change the portal group
To change the volume’s portal group, first take the volume offline, change the portal group assignment and then configure the volume as online. These tasks have been described previously. Changing a target’s portal group may be required when exposing the target to a different VLAN, for example.
Status Display: IO Top
The I/O performance values can be monitored in real-time using the iostat_top.sh script. It utilizes the lvm_iostat tool to translate device mapper paths such as dm-27 to proper logical volume paths. The display is updated every 2 seconds and processes the data from /proc/diskstats. Several specific data columns are presented:
 22:38:56 up 73 days, 27 min,  5 users,  load average: 1.30, 3.20, 3.53
device displayname                                                    read                 write
dm-4   mpath_vg_satabeast3_vol0                           7786014208  7.3G      353500160   337M
dm-5   mpath_vg_satabeast3_vol1                           8446123520  7.9G      447481344   426M
dm-3   mpath_vg_satabeast5_vol0                           7358440448  6.9G        2289664   2.2M
dm-6   mpath_vg_satabeast8_vol0                       87874743893504 79.9T 31565047747584  28.7T
dm-2   mpath_vg_satabeast8_vol1                       83430106234880 75.9T 15029405897216  13.7T
dm-0   vg_sata0-lv_os_root                                4648768512  4.3G   260904964096   242G
dm-1   vg_sata0-lv_os_swap                                    446464  436k              0      0
dm-25  vg_satabeast8_vol0-lv_csc0_gfs_vol00                        0     0              0      0
dm-27  vg_satabeast8_vol0-lv_csc1_gfs_vol00              72137330688   67G 10572254326784   9.6T
dm-17  vg_satabeast8_vol0-lv_iscsi_target                  139301888  132M    13412704256    12G
dm-54  vg_satabeast8_vol0-lv_srvrnt09_storage_p_vol00   209945753600  195G   134006331392   124G
dm-52  vg_satabeast8_vol0-lv_srvrnt19_dcs_e_vol00        81667016704   76G   144084541952   134G

 read/s  write/s  #io  #io[ms]  read[bs]  write[bs]
      0        0    0        0         0          0
      0        0    0        0         0          0
      0        0    0        0         0          0
   100k     209k    2      101     14628       4290
   267k     1.0M    0       79    136704       8610
      0        0    0        0         0          0
      0        0    0        0         0          0
      0        0    0        0         0          0
      0        0    0        0         0          0
      0        0    0        0         0          0
      0        0    0        0         0          0
      0        0    0        0         0          0
- read
-
number of bytes read, both in units of bytes and human readable format.
- write
-
number of bytes written, both in units of bytes and human readable format.
- read/s
-
number of bytes read within a one second period
- write/s
-
number of bytes written within a one second period
- #io
-
number of I/Os currently in progress
- #io[ms]
-
number of milliseconds spent doing I/Os.
- read[bs]
-
approximate read blocksize within a one second period.
- write[bs]
-
approximate write blocksize within a one second period.
|
|
The read[bs] and write[bs] can be very useful to determine what kind of block size the host is using when reading and writing. |
Status Display: Session Top
The session top display allows the operator to observe how many sessions are connected with a given target. The session_top.sh allows the operator to save the number of current sessions connected with a target. When invoked later on the session_top.sh script compares the previously known number of sessions against the current number of sessions of each target.
This tool is especially useful during and after resource migration to ensure that all initiators have reconnected with their targets.
Current session state is saved within the directory structure of VGMETA_DIR, i.e. under /mnt/iscsi-target/$vg/target_sessions.
Invoke the following command to save the current session state:
[root@iscsi-target-node1 /]# ./session_top.sh save
To see the current session count changes, execute:
[root@iscsi-target-node1 /]# ./session_top.sh diff
To see the current session count changes in a top like manner, execute:
[root@iscsi-target-node1 /]# ./session_top.sh

DIFF  1 (expect:  2) iqn.1990-01.edu.amherst:iet.iscsi-target4.vg-vol0.lv-srvrnt09-storage-p-vol00
  OK 10 (expect: 10) iqn.1990-01.edu.amherst:iet.iscsi-target4.vg-vol0.lv-srvrnt19-dcs-e-vol00
  OK 10 (expect: 10) iqn.1990-01.edu.amherst:iet.iscsi-target4.vg-vol0.lv-srvrnt28-scans-d-vol00
  OK 10 (expect: 10) iqn.1990-01.edu.amherst:iet.iscsi-target4.vg-vol0.lv-srvrnt62-vmsys-d-vol00
The above example output reveals that the first target is missing one session. The display is automatically updated every 2 seconds.
Advanced Operator’s Manual
The following sections contain advanced operator commands that depending on the circumstance may need to be invoked. In some cases the commands and their explanation provide further background information of how the iscsi-target cluster operates.
Starting/Stopping iscsi-target services
Under normal working conditions, the iscsi-target services are controlled via the heartbeat software. However, it may be necessary under controlled conditions, to stop and start the iscsi-target services manually.
|
|
Manually starting or stopping the iscsi-target service does not inform the heartbeat about this event. If heartbeat was configured to monitor its services, it might go against the manual command override. |
[root@iscsi-target-node1 /]# service iscsi-target stop
Stopping iSCSI Target: iptables                            [  OK  ]
Stopping iSCSI Target: ddmap                               [  OK  ]
Stopping iSCSI Target: ietd                                [  OK  ]
When stopping the iscsi-target services, the iSCSI traffic is blocked using iptables, the ddmap bitmaps are transferred from /proc/net/iet/ddmap to /mnt/iscsi-target/vg_dsk_0/ddmap and the ietd process is stopped. Prior to stopping the ietd process all iSCSI sessions are removed and iSCSI targets and LUN configurations are also removed from memory.
[root@iscsi-target-node1 /]# service iscsi-target start
Starting iSCSI Target: routing                             [  OK  ]
Starting iSCSI Target: ddmap                               [  OK  ]
Starting iSCSI Target: targets                             [  OK  ]
Starting iSCSI Target: ietd                                [  OK  ]
Starting iSCSI Target: iptables                            [  OK  ]
During startup, the source routing is established for interfaces, the ddmap state updated, targets configured, ietd process started and iSCSI traffic is unblocked.
ietd_cluster.sh
The ietd_cluster.sh command provides cluster-wide iscsi-target service control using the following sub-commands:
[root@iscsi-target-node1 /]# ./ietd_cluster.sh
./ietd_cluster.sh [start|stop|restart|status]

[root@iscsi-target-node1 /]# ./ietd_cluster.sh status
iet_host: iscsi-target-node1.amherst.edu
iSCSI Target (pid 18833) is running...
iet_host: iscsi-target-node2.amherst.edu
iSCSI Target (pid 11258) is running...
|
|
The above command is executed on EVERY node of the iscsi-target cluster. |
This command is not invoked in any automated fashion; it is provided as a tool for the operator.
ietd_ddmap.sh
The ietd_ddmap.sh services script gets normally invoked during service startup and shutdown. It is responsible for managing the ddmap data coming from the /proc/net/iet/ddmap interface. Refer to the DDMAP Kernel reference for detailed information.
During iscsi-target shutdown, the data from the /proc/net/iet/ddmap interface must be read and stored on disk under /mnt/iscsi-target/volumegroup/ddmap. The startup event does not transfer any data to the /proc/net/iet/ddmap interface.
The ietd_ddmap.sh script maintains states for each target and LUN. A state change occurs during startup and shutdown. The following states are maintained:
- DDMAP_ACTIVE
-
During normal iscsi-target operations, the state of the ddmap is considered DDMAP_ACTIVE.
- Shutdown
-
During shutdown, the state is changed to DDMAP_CLEAN.
- Startup
-
During startup, the DDMAP_ACTIVE state is changed to DDMAP_DIRTY, indicating that we did not have a clean/known shutdown of the ddmap data.
- DDMAP_UNKNOWN
-
The initial state of a LUN.
- Shutdown
-
During shutdown, the DDMAP_UNKNOWN state is changed to DDMAP_DIRTY, indicating that the entire logical volume needs to be read during backup.
- Startup
-
During startup, the DDMAP_UNKNOWN state is changed to DDMAP_DIRTY, indicating that we need to read the entire logical volume’s data.
- DDMAP_CLEAN
-
The ddmap is in a clean state after normal shutdown.
- Shutdown
-
During shutdown, the DDMAP_CLEAN state does not change.
- Startup
-
During startup, the DDMAP_CLEAN states changes to DDMAP_ACTIVE.
- DDMAP_DIRTY
-
A dirty state can arise during startup if the state was previously active. A dirty states requires that the process backing the logical volume will have to read the entire volume.
- Shutdown
-
During shutdown, the DDMAP_DIRTY state does not change.
- Startup
-
During startup, the DDMAP_DIRTY state does not change.
The following state diagram displays the states as nodes and transitions as edges.
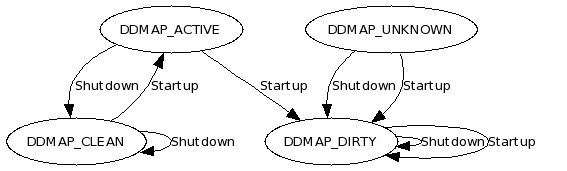
The ietd_ddmap.sh script has been designed to support multiple ddmap bitmaps per target and LUN. The most basic form of extracting the current ddmap is to read it from the /proc/net/iet/ddmap file system and store it as a file. This is exactly what happens during iscsi-target shutdown. However, in order to support multiple shutdown, startup, shutdown events correctly, each ddmap filename is tagged with a timestamp.
The listing below, shows a single ddmapdump file for a specific logical volume.
/mnt/iscsi-target/vg_satabeast8_vol0/ddmap/lv_csc0_gfs_vol00.20110414.230052.366082000.ddmapdump
/mnt/iscsi-target/vg_satabeast8_vol0/ddmap/lv_csc0_gfs_vol00.log
/mnt/iscsi-target/vg_satabeast8_vol0/ddmap/lv_csc0_gfs_vol00.state
The log file contains a historical log of all ddmap state changes. The state file contains the current ddmap state.
At the time of logical volume backup, multiple ddmapdump files are combined into a single ddmap file using the ddmap command. The resulting ddmap file is then utilized by the ddless command as a map to determine which data segments to actually read; only changed data segments are read, unless the logical volume state is DDMAP_DIRTY. After the backup is complete, the state of the logical volume is set to DDMAP_ACTIVE.
[root@iscsi-target-node1 /]# ./ietd_ddmap.sh
./ietd_ddmap.sh {status}

[root@iscsi-target-node1 /]# ./ietd_ddmap.sh status
vg_satabeast8_vol0/ddmap/lv_csc0_gfs_vol00.ddmap DDMAP_CLEAN
ietd_iptables.sh
The ietd_iptables.sh script is used to control iptable rules. iSCSI traffic is blocked at the time of iscsi-target shutdown and unblocked when the iscsi-target services start up.
[root@iscsi-target-node1 /]# ./ietd_iptables.sh
./ietd_iptables.sh {start|stop|status}
Without any arguments after the operational command start or stop all iSCSI traffic will be unblocked or blocked. One can specify an iptables compatible IP address specification to limit the blocking and unblocking to a specific IP address or IP subnet. This feature is utilized by cluster fencing devices.
ietd_routing.sh
Refer to Routing based on Source IP Address for configuration and management details.
ietd_targets.sh
The ietd_targets.sh script is normally invoked by the targets_update.sh script in a cluster mode, configure+cluster, meaning the script is executed on each cluster node. It is possible to request the target configuration to be run in offline mode which does not require the ietd to be running. By default the script runs using the online mode.
[root@iscsi-target-node1 /]# ./ietd_targets.sh
Usage: ./ietd_targets.sh {status|configure_cluster [online|offline]}
The status operation leverages the iet-tools.plx -c state command.
iet-tools.plx
The iet-tools.plx toolkit was written in perl to aid the parsing process of the ietd's /proc/net/iet/ data. The tool outputs the state of /proc/net/iet in various ways. There are numerous commands to aid the conversion of target names to target IDs. It has the ability to remove initiator sessions of a specific target or all targets (use with caution).
[root@iscsi-target-node1 /]# ./iet-tools.plx
./iet-tools.plx [-h] -c command

 state_raw              outputs the current state of /proc/net/iet
 state                  outputs the current state of /proc/net/iet
 state_diff             determine if the current state matches the tracked state
                        email operator report if changes occurred

 target_tid -t target   get target tid by name
 target_tid_new         get a new target tid [not thread-safe!]

 target_state -t target                 output the state of target
 target_lun_path -t target -l lun       get a target's lun's path using target and lun #
 ddmap_lun_path -d ddmap                get a target's lun's path using /proc/net/iet/ddmap/
 lun_path_target -p lun_path            get a target using the lun's path

 target_sessions_remove -t target       disconnects all client sessions of a target
 target_initiators -t target            list the initiator IP addresses of a target
 all_sessions_remove                    disconnects all client sessions

 target_sessions        outputs current target session counters
 target_sessions_diff   target session listing showing current and saved (via stdin) session
                        count per target
iSCSI Enterprise Target (IET) Patches and Build Process
The iSCSI Enterprise Target (IET) project is an open source project that provides iscsi-target services. The project is hosted on http://iscsitarget.sourceforge.net/ and can be downloaded either via the most recent tarball or current subversion version. The general recommended way is to use the most recent tarball, however, do pay attention to the patch changes as they sometimes contain invaluable changes.
Compiling from source can be accomplished by studying the README of the delivered source code. Several methods are available, such as the standard make, make install and also the dkms (Dynamic Kernel Module Support).
svn checkout https://iscsitarget.svn.sourceforge.net/svnroot/iscsitarget/trunk trunk.svn
cd trunk
make
make install
The version of IET that we provide has several features added and modified to provide cluster compatibility and faster backup speeds.
Our build environment is located on a host with CentOS5 64-bit support. Since we build iscsi-target with custom patches, we have chosen to use the quilt [quilt] toolset to manage the patches. Before we can start with patches, we need to obtain the current trunk of IET. The development takes place under /root/santools/iscsitarget. Before executing the following script iet_trunk_get.sh, verify its contents:
#!/bin/sh

VER=1.4.20

#
# to get a list of all trunk comments:
# http://iscsitarget.svn.sourceforge.net/viewvc/iscsitarget/trunk/?view=log
#

#
# do we have quilt patches applied
#
quilt top
ccode=$?
if [ $ccode -eq 0 ]; then
        echo "There are patches in place, pop them off first, trunk contains your working code!"
        exit 1
fi

#
# get a non-svn version and a svn'd version
#
rm -fr trunk
rm -fr trunk.svn

#
# remote to local
#iscsitarget.svn.sourceforge.net/svnroot/iscsitarget/

# get a working copy to which patches are applied and removed
svn export https://iscsitarget.svn.sourceforge.net/svnroot/iscsitarget/trunk

# get a real svn copy so you can svn diff things
svn checkout https://iscsitarget.svn.sourceforge.net/svnroot/iscsitarget/trunk trunk.svn

# put svn info into the exported trunk
svn info trunk.svn > trunk/svn.info

rev=$(svn info trunk.svn | grep Revision | cut -f2 -d' ')
cp -av trunk iscsitarget-$VER.$rev
tar -zcvf iscsitarget-$VER.$rev.tar.gz iscsitarget-$VER.$rev
rm -fr iscsitarget-$VER.$rev
The version number must be set to the currently released version. The script will ensure that the current trunk directory does not have any patches applied; otherwise you must remove the patches using quilt pop until they are all removed. Use quilt top to determine if patches are applied.
We download two copies of the trunk: one contains svn property files, the other one is a clean copy. The script also produces a file named iscsitarget-$VER.$rev.tar.gz that will be used as the source tarball for the resulting rpm build process. This file has no patches and contains a pristine copy of the IET source code. Using quilt we can look at which patches are actively maintained:
[root@bits-centos5-64 iscsitarget]# quilt series
patches/iet-00-version.patch
patches/iet-01-max-limits.patch
patches/iet-02-ddmap.patch
patches/iet-03-init.patch
patches/iet-04-proc-vpd.patch
patches/iet-05-proc-reservation.patch
patches/iet-06-proc-session.patch
patches/iet-07-tgtnotfound-svcunavailable.patch
The patches are located under the quilt managed patches directory. Patches can be applied using:
[root@bits-centos5-64 iscsitarget]# quilt push
Applying patch patches/iet-00-version.patch
patching file trunk/include/iet_u.h

Now at patch patches/iet-00-version.patch
To un-apply a patch use quilt pop. Before editing files, look at which files a patch impacts using:
[root@bits-centos5-64 iscsitarget]# quilt files
trunk/include/iet_u.h
Use the quilt edit command to edit files, or if you prefer a different editor, use this command once to force quilt to track the file within the current patch. After editing files, use the quilt refresh command to post the changes into the current patch. To determine the current patch, use the quilt top command. To visually see what changes the current patch brings, use quilt diff:
[root@bits-centos5-64 iscsitarget]# quilt diff
Index: iscsitarget/trunk/include/iet_u.h
===================================================================
--- iscsitarget.orig/trunk/include/iet_u.h
+++ iscsitarget/trunk/include/iet_u.h
@@ -1,7 +1,7 @@
 #ifndef _IET_U_H
 #define _IET_U_H

-#define IET_VERSION_STRING     "trunk"
+#define IET_VERSION_STRING     "1.4.20 svn 373 build 2010-11-30 Amherst College"

 /* The maximum length of 223 bytes in the RFC. */
 #define ISCSI_NAME_LEN 256
In the above example, one can see that a change has been made to the IET_VERSION_STRING.
The next sections discuss the purpose of the patches.
IET Patch: iet-00-version
The IET version patch allows us to identify the running kernel module during kernel module load time. The previous version number is suffixed manually with the checked out svn revision number. In addition to that we indicate the date of code assembly.
This patch affects the following file:
root@bits-centos5-64 iscsitarget]# quilt push
Applying patch patches/iet-00-version.patch
patching file trunk/include/iet_u.h

Now at patch patches/iet-00-version.patch
IET Patch: iet-01-max-limits
The max limits patch modifies two constants:
-
Maximum Incoming Connections (INCOMING_MAX)
-
Incoming Buffer Size (INCOMING_BUFSIZE)
The maximum incoming connection definition changes the number of queued TCP connections in the listen socket call. The original number was 32. The listen socket could be overrun resulting in dropped connections. The patch increases this limit to 255. It means that there can be 255 initiators simultaneously attempting to connect with the iscsi-target. This event can occur right after a SAN outage, for example. The idea/solution of this patch comes from the following article: http://blog.wpkg.org/2007/09/09/solving-reliability-and-scalability-problems-with-iscsi.
We have also encountered an issue when a large number of targets are offered during session discovery. The resulting SendTargets=All result would be truncated after 8 KB. It turns out that the INCOMING_BUFSIZE parameter is responsible for this setting; hence it has been increased to 32 KB.
This patch affects the following file:
[root@bits-centos5-64 iscsitarget]# quilt push
Applying patch patches/iet-01-max-limits.patch
patching file trunk/usr/iscsid.h

Now at patch patches/iet-01-max-incoming-conn.patch
IET Patch: iet-02-ddmap
The term dd refers to the standard UNIX tool named dd. The tool can be used to transfer data from a file or device to another file or device. The ddmap patch provides a bitmap in which bits are set to one if the associated 16 KB region has been written to. The patch does not distinguish between a write that changes data versus a write that does not change data.
This patch affects the following files:
[root@bits-centos5-64 iscsitarget]# quilt push
Applying patch patches/iet-02-ddmap.patch
patching file trunk/kernel/block-io.c
patching file trunk/kernel/ddmap.c
patching file trunk/kernel/ddmap.h
patching file trunk/kernel/file-io.c
patching file trunk/kernel/Makefile
patching file trunk/kernel/iscsi.c
patching file trunk/kernel/iscsi.h
patching file trunk/kernel/iscsi_dbg.h

Now at patch patches/iet-02-ddmap.patch
The patch implements code executed during iscsi-target’s startup and shutdown sequence and also within the block-io and file-io driver. The core of the code is within the ddmap.c file.
Refer to the DDMAP Kernel reference for detailed information.
IET Patch: iet-03-init
The init patch provides shell script hooks for pre and post startup and shutdown events of the iscsi-target services. Instead of hard-coding the changes into the init script, a single patch is created implementing callbacks that can be modified.
The implementation of the callbacks is managed by the iscsi-target-tools package. The following events and related actions are outlined:
- Pre Startup
-
routing, ddmap, targets
- Post Startup
-
iptables
- Pre Stop
-
iptables, ddmap, all_sessions_remove
- Post Stop
-
sleep
The routing action is responsible for configuring single subnet multi-interface routing. The ddmap action during startup manages the state of ddmaps on a per target/lun basis and on shutdown saves the current ddmap bitmaps using the /proc/net/iet/ddmap interface. The targets action configures the contents of the /etc/ietd directory. The details are described in the IET Configuration section. This patch affects the following file:
[root@bits-centos5-64 iscsitarget]# quilt push
Applying patch patches/iet-03-init.patch
patching file trunk/etc/initd/initd.redhat

Now at patch patches/iet-03-init.patch
IET Patch: iet-04-vpd
The Vital Product Data (VPD) patch provides VPD information about LUNs exposed by iscsi-target. The VPD information can be read via /proc/net/iet/vpd and looks as follows:
tid:2 name:iqn.1990-01.edu.amherst:iscsi4.pg-vlan345.vg-satabeast8-vol0.lv-csc0-gfs
        lun:0 path:/dev/vg_satabeast8_vol0/lv_csc0_gfs_vol00
             vpd_83_scsi_id: 41 4d 48 44 53 4b 2d 30 37 30 34 30 31 2d 30 32 AMHDSK-070401-02
             vpd_80_scsi_sn: AMHDSK-070401-02
tid:1 name:iqn.1990-01.edu.amherst:iscsi4.pg-vlan10.vg-satabeast8-vol0.lv-srvrux30-netlog
        lun:0 path:/dev/vg_satabeast8_vol0/lv_srvrux30_netlog_syslog_vol00
             vpd_83_scsi_id: 41 4d 48 44 53 4b 2d 30 39 30 36 31 38 2d 30 31 AMHDSK-090618-01
             vpd_80_scsi_sn: AMHDSK-090618-01
The VPD data is configured by the ietd.conf file using the Lun command and the parameters ScsiId and ScsiSN.
This patch affects the following files:
[root@bits-centos5-64 iscsitarget]# quilt push
Applying patch patches/iet-04-proc-vpd.patch
patching file trunk/kernel/Makefile
patching file trunk/kernel/config.c
patching file trunk/kernel/iscsi.h
patching file trunk/kernel/proc_vpd.c

Now at patch patches/iet-04-proc-vpd.patch
IET Patch: iet-05-reservation
The reservation patch provides information about SCSI reserve and release states of each LUN exposed by iscsi-target. The reservation state can be read via /proc/net/iet/reservation and looks as follows:
tid:4 name:iqn.1990-01.edu.amherst:iscsi4.pg-vlan10.vg-satabeast8-vol0.lv-vmc02-vmfs-vm-iet
        lun:0 path:/dev/vg_satabeast8_vol0/lv_vmc02_vmfs_vm_iet_vol00
                reserve:12778 release:12735 reserved:2872 reserved_by:none
It displays on a per LUN basis the following fields: the reserve value indicates how many times the SCSI reserve request was invoked. The release value indicates how many times the SCSI release request was invoked. A LUN reset, for example, can cause a release count to be skipped and hence the reserve and release values do not always match.
This patch affects the following files:
[root@bits-centos5-64 iscsitarget]# quilt push
Applying patch patches/iet-05-proc-reservation.patch
patching file trunk/kernel/Makefile
patching file trunk/kernel/config.c
patching file trunk/kernel/iscsi.h
patching file trunk/kernel/volume.c
patching file trunk/kernel/proc_reservation.c

Now at patch patches/iet-05-proc-reservation.patch
IET Patch: iet-06-session
The session patch adds informational fields such as the source and destination IP address of a session to the /proc/net/iet/session output. A sample is shown below:
tid:1 name:iqn.1990-01.edu.amherst:iscsi4.pg-vlan10.vg-satabeast8-vol0.lv-server01
        sid:1970324874527232 initiator:iqn.1994-05.com.redhat:swiscsi.server01
                cid:0 s_ip:10.0.1.90 d_ip:10.0.1.1 state:active hd:none dd:none
The target above has a single session with a source IP address of 10.0.1.90 (s_ip) and a destination IP address of 10.0.1.1 (d_ip).
This patch affects the following files:
[root@bits-centos5-64 iscsitarget]# quilt push
Applying patch patches/iet-06-proc-session.patch
patching file trunk/kernel/conn.c
patching file trunk/Makefile

Now at patch patches/iet-06-proc-session.patch
IET Patch: iet-07-tgtnotfound-svcunavailable
The target not found service unavailable patch, modifies the configuration of the response to a target that is not found. By default iscsi-target responds to a non-existent target with a target not found response which is also considered to be an error that the initiator has to handle. The initiator will give up asking for that target.
During failover of iscsi-target resources from node1 to a node2, for example, there exists a time frame during which the desired target is not available. Initiators, when loosing the connection with a target, will contact the portal from which they received the target.
However, there are some initiators such as SFnet based ones (RedHat AS3, AS4, ESX3 and CentOS 4) which upon loosing the target connection connect back to the same target IP address. If the iscsi-target is configured by default to respond with an ISCSI_STATUS_TGT_NOT_FOUND, then the initiator will not retry the connection and drops the target and its related LUNs. This is not the desired behavior.
Instead we would like the target to say, there was a problem with the target try again using the response ICSSI_STATUS_SVC_UNAVAILABLE. After receiving this response, the SFnet initiators will contact the portal and query for the next target’s portal IP address. This configuration is only necessary on the target server storage nodes.
Note the following code excerpt:
if ( tgtnotfound_svcunavailable )
        login_rsp_tgt_err(conn, ISCSI_STATUS_SVC_UNAVAILABLE);
else
        login_rsp_ini_err(conn, ISCSI_STATUS_TGT_NOT_FOUND);
The ISCSI_STATUS_UNAVAILABLE response is returned using a target error function, indicating to the initiator to retry the action. Eventually the initiator retries at the portal. [itusc]
The ISCSI_STATUS_TGT_NOT_FOUND response is returned using a initiator error function, indicating to the initiator that there is an unrecoverable error.
The following statement can be added to the ietd.conf file to enable this feature: TgtNotFoundRespondServiceUnavailable Yes
This patch affects the following files:
[root@bits-centos5-64 iscsitarget]# quilt push
Applying patch patches/iet-07-tgtnotfound-svcunavailable.patch
patching file trunk/usr/iscsid.c
patching file trunk/usr/iscsid.h
patching file trunk/usr/plain.c

Now at patch patches/iet-07-tgtnotfound-svcunavailable.patch
iSCSI Portal (iscsi-portal)
Architecture Overview (iscsi-portal)
The iscsi-portal refers to a collection of dependent services, such as heartbeat clustering, the iscsi_portal_daemon.plx and network configuration.

The iscsi-portal acts as an intermediary agent during discovery and normal sessions. Normal sessions are redirected to a target endpoint [itusc]. Since the iscsi-portal receives a connection from an initiator, it acts as a target to the initiator. The iscsi-portal also interacts with the targets exposed by iSCSI Enterprise Target (IET), hence the iscsi-portal is an initiator to the IET targets.
Heartbeat Cluster
The iscsi-portal can be deployed without cluster. However, performing maintenance on such system at any time involves risks such as an initiator not being able to reconnect with a target.
iSCSI Portal IP Address Resources
The network configuration in terms of VLANs is static on all nodes. The networking is configured such that no IP addresses are defined. The cluster will maintain the virtual IP addresses which are the equivalent of the iSCSI Portal IP addresses. The initiator connects with the iSCSI Portal IP address.
Networking
The iscsi-portal’s networking setup has to be configured in terms of VLANs and IP addresses like the iscsi-target server.
iSCSI Portal Discovery Session
Before the initiator accesses a target, it begins the discovery session with the iscsi-portal by connecting to the iscsi-portal’s IP address. The iscsi-portal’s IP address value determines which related IP addresses the iscsi-portal will query for targets. Once the iscsi-portal has queried all related IP addresses, it returns all unique TargetNames. However, instead of simply returning the related TargetAddress which is the target’s IP network portal, it replaces that with the IP address the initiator connected with, i.e. the iscsi-portal’s IP address. This TargetAddress change accomplishes two things:
-
the initiator returns to the portal upon establishing the normal session
-
the initiator remembers the IP address as the portal IP address for the given target and goes back to the portal address if the target connection is broken at a later time
The following mechanisms are employed to control which targets are discovered at the iscsi-target server:
-
targets.allow controls the IP addresses a target is exposed on
-
initiators.allow controls which initiators can discover/connect to a target
|
|
It is important to understand, that the iscsi-portal impersonates the initiator when performing discovery sessions with the target network portals. The impersonation is accomplished by using the initiator name in the discovery request. |
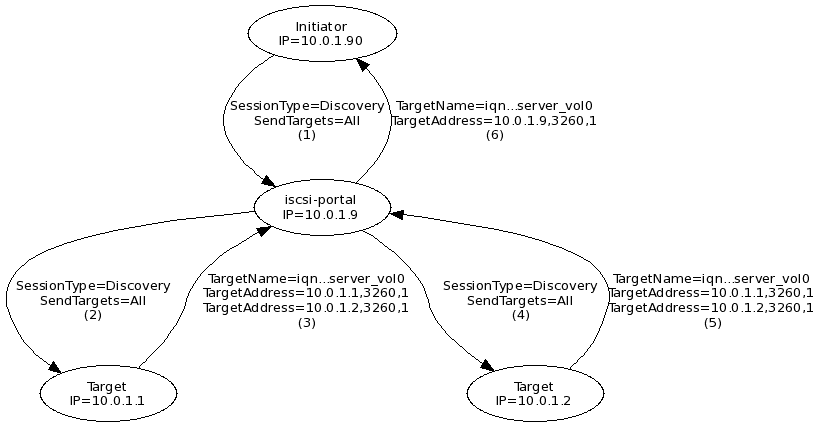
The above figure details the discovery session in conjunction with the iscsi-portal.
-
The initiator with the IP address 10.0.1.90 connects with the iscsi-portal’s IP address 10.0.1.9. The iscsi-portal now knows the name of the initiator, for example iqn.1994-05.com.redhat:swiscsi.srvrux30.netlog.
-
The iscsi-portal commences with querying related target network portals using the initiator name learned in previous step.
-
The TargetName=iqn…server_vol0 is returned with the associated IP addresses 10.0.1.1 and 10.0.1.2. Both addresses are returned because one cluster node presents two network portals. IET will return all available or configured IP addresses of a given target during the discovery session.
-
The iscsi-portal continues querying the next target network portal.
-
As before, the TargetName=iqn…server_vol0 is returned with the same two associated IP addresses.
-
The iscsi-portal returns the found TargetName=iqn…server_vol0 value and replaces the TargetAddress value with iscsi-portal’s IP address of 10.0.1.9, instead of the IP addresses returned by the target network portals.
iSCSI Portal Normal Session
Once the initiator has discovered its targets, it can logon to each target and gain access to provisioned LUNs. Normally the initiator would logon directly to the target, however, because the iscsi-portal returned its own IP address during discovery, the initiator will logon via the iscsi-portal.
The iscsi-portal’s design is such that it does not carry the actual iSCSI data traffic for provisioned targets and LUNs; hence, upon normal session establishment, it will redirect the logon request to an available target network portal instead. This redirection response is an iSCSI response code returned to an iSCSI login request. The redirection itself contains the TargetAddress with a value of the chosen target network portal’s IP address.
If there are multiple target network portal IP addresses to choose from, the iscsi-portal retains state about which IP address it handed out within the last 5 seconds and chooses the next IP address. This allows the iscsi-portal to distribute the logon connections across all available target network portals. The state is retained for 5 seconds to eliminate redundant SendTargets=All queries to all target network portals.
If the iscsi-portal has no available target network portals, it will return a blank response and delays it for 2 seconds. The initiator will automatically reattempt the normal session establishment. This condition exists during resource failover of a volume group and triggers the iscsi-portal to not retain the state, forcing it to scan for target network portals.
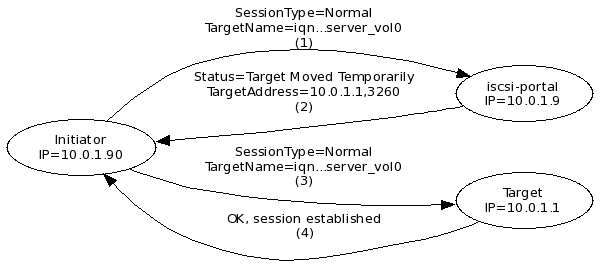
The above figure details the normal session in conjunction with the iscsi-portal.
-
The initiator attempts to establish a normal session given the target iqn…server_vol0 with the iscsi-portal’s IP address. This IP address was previously assigned by the iscsi-portal.
-
The iscsi-portal response includes a status code, indicating that the target moved temporarily, and a TargetAddress of one of the target’s network portals.
-
The initiator attempts to establish a normal session given the target iqn…server_vol with the target’s IP address returned in the previous step.
-
The target responds and the session is established.
iSCSI Portal and Multipathing
An initiator that establishes a single connection with a target will see the LUNs of that target once.
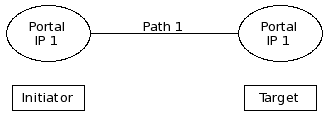
When either the initiator or target or both the initiator and the target support multiple network portals, the rules change.
If the initiator has multiple network portals, also known as IP address, the initiator will establish a connection with a target from each initiator network portal. So, if the initiator has two IP addresses and connects to a target with one network portal or IP address, the initiator will see the target’s LUNs twice.
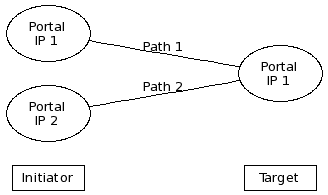
If the initiator has two network portals and connects to a target with two network portals, the initiator will see the target’s LUNs four times.
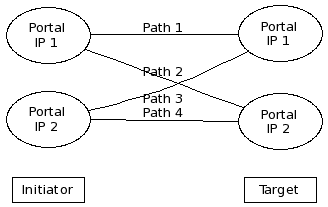
This side effect of multipathing due to a target having multiple network portals can impact hosts that don’t support multipathing.
The iscsi-portal manages this side effect, by only returning a single available network portal address when an initiator establishes the normal session. If the initiator has multiple network portals, the initiator establishes that many sessions and it is assumed that the host can handle the devices using the operating system specific multipath services.
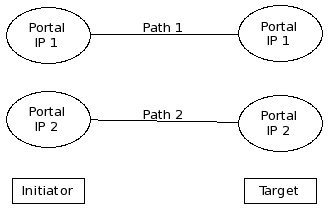
Software Package
The iscsi-portal consists of a single software package with the following components:
- iscsiportal
-
The iSCSI Portal software. Configuration and supplemental files are found under /etc/iscsi-portal.
- /etc/iscsi-portal/etc/config.pm
-
iscsi-portal configuration file
- /etc/iscsi-portal/iscsi_portal_daemon.plx
-
iscsi-portal daemon
General System Preparation
The /etc/hosts file should be populated with all cluster node names, in case DNS experiences a failure condition.
127.0.0.1   localhost.localdomain localhost
192.168.0.3 iscsi-portal-node1.amherst.edu iscsi-portal-node1
192.168.0.4 iscsi-portal-node2.amherst.edu iscsi-portal-node2
The /etc/sysconfig/iptables contains the iptables configuration and it should by default block all incoming traffic except for the following services:
-
ssh, tcp port 22
-
iscsi, tcp port 3260
-
cluster, udp 694
Networking Configuration
Several network interfaces require specific configuration features:
-
management
-
heartbeat
-
iSCSI
The management and heartbeat interfaces should be in different VLANs and subnets and can be configured with static IP addressing.
iSCSI interfaces should be configured to be brought online during boot up, however, without any associated IP addresses. The heartbeat cluster will manage that.
# Broadcom Corporation NetXtreme II BCM5708 Gigabit Ethernet
DEVICE=eth2
BOOTPROTO=none
HWADDR=00:15:c5:da:a4:70
ONBOOT=yes
VLAN=yes
DEVICE=eth2.10
BOOTPROTO=none
ONBOOT=yes
VLAN=yes
DEVICE=eth2.20
BOOTPROTO=none
ONBOOT=yes
Heartbeat Cluster
The CentOS 5 distribution currently provides heartbeat-2.1.3. Newer versions can be implemented with some adaptation. A complete user manual for Heartbeat can be found at: http://www.novell.com/documentation/sles10/pdfdoc/heartbeat/heartbeat.pdf. Several configuration files must be configured on each node before starting the heartbeat services.
Use the following commands to install the required packages for heartbeat.
[root@iscsi-target-node1 /]# yum install heartbeat
[root@iscsi-target-node1 /]# yum install heartbeat-gui
|
|
We have found that the heartbeat RPM from CentOS has a %pre script execution problem during the RPM installation. This can be resolved by re-running the yum install heartbeat command a second time. |
Before starting the heartbeat services, several vital configuration files must be established.
auth 2
2 sha1 somesecretpreferablelonganddifferentfromtheiscsitarget
The following file /etc/ha.d/ha.cf.template is not part of the distribution of hearbeat; however, it is a copy of ha.cf. One of the goals with the heartbeat configuration files is to keep them in sync across nodes. This is in contrast with heartbeat’s cluster resource management which is automatically synchronized across cluster nodes. The template is processed by the ha.cf.make script and it replaces @HA_UCAST@ variable with node specific unicast interface and IP address specifications.
logfacility     local0

@HA_UCAST@

node iscsi-portal-node1.amherst.edu
node iscsi-portal-node2.amherst.edu

ping 148.85.2.1
respawn root /usr/lib64/heartbeat/pingd -m 100 -d 2s -a pingd

#
# Specifies whether Heartbeat should run v2-style. We set it to on
#
crm yes
Each cluster node must be specified using the FQDN. Also recommended is a ping node specification, as it allows the cluster nodes to test the reachability of an IP address, the default gateway for example. This is used in conjunction with the pingd and provides a value that can be used as a resource location constraint value. Resources can be pinned to specific nodes based on the reachability of the surrounding network.
#!/bin/sh

#
# generate a host specific ha.cf file using uname -n
#
ROOTDIR=$(dirname $0)
cd $ROOTDIR

ha_host=$(uname -n)

case "$ha_host" in
        iscsi-portal-node1.amherst.edu)
                ha_ucast="ucast eth1 192.168.88.98"
                ;;
        iscsi-portal-node2.amherst.edu)
                ha_ucast="ucast eth1 192.168.88.97"
                ;;
        *)
                echo "missing hostname definition in $0"
                exit 1
esac

if [ ! -e ha.cf.template ]; then
        echo "ha.cf.template not found"
        exit 1
fi

cat ha.cf.template | \
        sed "s/@HA_UCAST@/$ha_ucast/" > ha.cf
The cluster node1 is usually used to make all configuration changes. Changes are propagated using the rsync tool. The following script is commonly invoked to synchronize specific files and directories on the cluster nodes (currently only node2):
#!/bin/sh

NODE2=iscsi-portal-node2

rsync -avrR \
        --delete \
        --files-from=amh_cluster_sync_include.conf \
        --exclude-from=amh_cluster_sync_exclude.conf \
        / $NODE2:/

/etc/ha.d/ha.cf.make
ssh $NODE2 /etc/ha.d/ha.cf.make
# cluster
/etc/ha.d/

# hosts
/etc/hosts

# iptables
/etc/sysconfig/iptables

# iscsi-portal
/etc/iscsi-portal/
/etc/rc.d/init.d/iscsi-portal
# iscsi-portal excludes
/etc/iscsi-portal/state/
Cluster Resources
Several cluster resources must be configured to make the iscsi-portal host functional:
-
stonith (Shoot the other node in the head)
-
portal IP address
In case cluster node1 looses its services and node2 considers node1 dead, node2 is designed to run the stonith resource, such that it can power off node1. This becomes more complex when the cluster has more than two nodes.
A portal IP address resource must be configured per VLAN.
We utilize the heartbeat GUI, called hb-gui, to configure the resources.
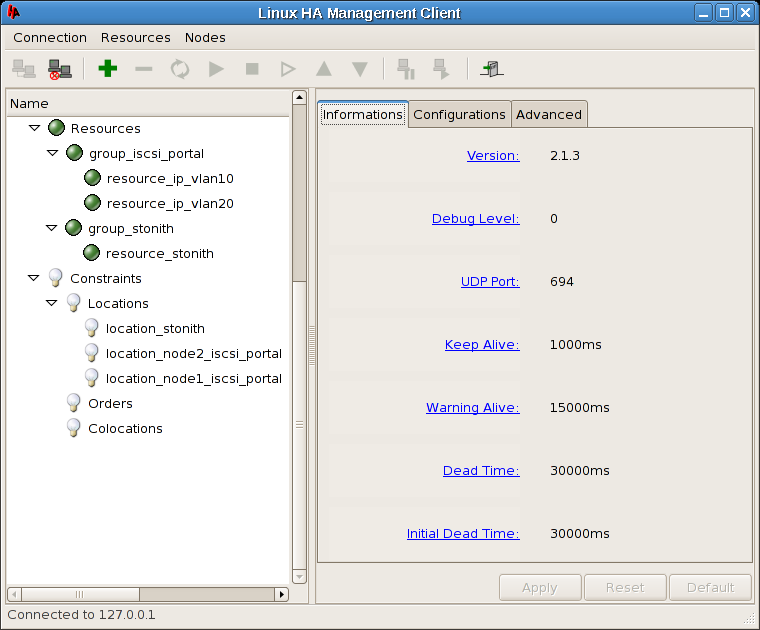
The top level item linux-ha in the hb_gui requires the following configuration changes:
-
Enable Stonith
The stonith action is configured to power off a non-functioning node.
Resources can be configured individually or as a group. The advantage of a grouped resource, is that one can add other resources into the group and can change the start and stop sequencing. Hence, all resources in this project are contained in resource groups.
Stonith
A resource group named group_stonith must be created and populated with a single resource named resource_stonith. The stonith resource is responsible for powering off a non-functioning node. Since our design consists of two nodes, we only allow node2 to stonith node1. This was chosen because we do not wish for both nodes to engage in a stonith operation at the same time. The underlying stonith code ensures that only node2 can actually perform the operation.
* group_stonith
Resource group container
Attributes:
        ordered:        true
        collocated:     true
        target_role:    started
| |
stonith resource
Attributes:
        Resource ID:    resource_stonith
        Type:           external/stonith_ssh_proxy
        Class:          stonith
        Provider:       heartbeat

Parameters:
        hostlist:       iscsi-portal-node1
        username_at_host: stonith@stonithhost
        ssh_orig_cmd_key: aaaa8572d97c52307940811f8a280e3a
|
We have derived our external/stonith_ssh_proxy resource from the heartbeat provided ssh resource and modified it to ssh into a host that manages power on/off operations of systems. Power operations are can be controlled using Intelligent Platform Management Interface (IPMI). Their interfaces are in a separate VLAN. Refer to the iscsi-target Stonith section for more details.
iSCSI Portal Resources
The iscsi-portal resources consist of iscsi-portal IP addresses. Configure for each VLAN an associated iscsi-portal IP address.
* group_iscsi_portal
Resource group container
Attributes:
        ordered:        true
        collocated:     true
        target_role:    started
| |
iscsi-portal IP address resource
Attributes:
        Resource ID:    resource_ip_vlan10
        Type:           IPaddr2
        Class:          ocf
        Provider:       heartbeat

Parameters:
        ip:             10.0.1.9
        nic:            eth2.10
        cidr_netmask:   255.255.0.0
| |
iscsi-portal IP address resource
Attributes:
        Resource ID:    resource_ip_vlan20
        Type:           IPaddr2
        Class:          ocf
        Provider:       heartbeat

Parameters:
        ip:             10.0.2.9
        nic:            eth2.20
        cidr_netmask:   255.255.0.0
|
Cluster Resource Locations
Resources if not configured with location constraints will execute on any random node of the cluster. Locations constraints can be assigned to resources or resource groups using runtime conditions such as #uname eq iscsi-portal-node2, meaning the resource is allowed to run if the current host matches iscsi-portal-node2. If the node is not available, then the resource is forced onto another online node. The condition gives the resource a preferred node.
* Constraints/Locations
        - location_stonith
        - location_node1_iscsi_portal
        - location_node2_iscsi_portal
        - ...
- ...
stonith is preferred on node2
Attributes:
        ID:             location_stonith
        Resource:       group_stonith
        Score:          Infinity
        Boolean:        And

Expressions:
        #uname  eq      iscsi-portal-node2.amherst.edu
| |
The location preference of the iscsi-portal service is node1 which occurs when the currently evaluated node is node1 and the pingd’s value is greater than or equal to 100.
Attributes:
        ID:             location_node1_iscsi_portal
        Resource:       group_iscsi_portal
        Score:          200
        Boolean:        And

Expressions:
        #uname  eq      iscsi-portal-node1.amherst.edu
        pingd   gte     100
| |
Alternate iscsi-portal service location is on node2
Attributes:
        ID:             location_node2_iscsi_portal
        Resource:       group_iscsi_portal
        Score:          100
        Boolean:

Expressions:
        #uname  eq      iscsi-portal-node2.amherst.edu
|
The pingd was previously configured under /etc/ha.d/ha.cf.template. Several ping nodes can be specified which heartbeat then pings using ICMP. Each pingable node adds a value to pingd. The value it adds is based on the pingd -m 100 configuration, in this case 100.
Services run on node1, if the score is the highest (200) which implies that the pingd value is greater than or equal to 100, i.e. if the ping node is functional and the currently evaluated cluster node is is node1. Otherwise node2 will take on the services having a lower score of (100). The ping node can be the default gateway, for example.
Operator’s Manual
The operator’s manual details the configuration options of the iscsi-portal daemon.
|
|
All file locations are located under /etc/iscsi-portal. |
./etc./README ./iscsi_portal_query.plx
./iscsi_portal_query.sh ./iscsi_portal_sendtargets.plx
| iscsi-portal configuration file | |
| iscsi-portal library files | |
| directory for tracking initiator target portal state | |
| iscsi-portal daemon | |
| iscsi-portal support files |
config.pm
The config.pm perl module consists of a configuration hash that controls the behavior of the iscsi-portal.
our %cfg = (
        #
        # iscsi
        #
        'listen_port' => 3260,
        'max_recv_data_segment_length' => 256 * 1024,

        #
        # keep it short to allow reasonable quick refreshes whe
        # resources move from one cluster node to another
        #
        'state_time_sec' => 5,

        #
        # syslog
        #
        'syslog_prefix' => 'iprt',

        #---------------------------------------------------------------------------
        # directory locations
        #---------------------------------------------------------------------------
        'state_directory' => dirname($0).'/state',
        'etc_directory' => dirname($0).'/etc',

        #
        # iscsi discovery portals: this is were initiators connect to and
        # we connect to the specified portal_addresses to determine where
        # the desired targets are.
        #
        'discovery_portals' =>
        {
                #-----------------------------------------------------------
                # vlan 10 iscsi
                #-----------------------------------------------------------
                '10.0.1.9' =>
                {
                        'portal_group_name' => 'pg_vlan10_fabric',
                        'portal_port' => 3260,
                        'portal_addresses' =>
                        [
                                # iscsi-target-node1
                                '10.0.1.1',
                                '10.0.1.2',
                                # iscsi-target-node2
                                '10.0.1.3',
                                '10.0.1.4',
                        ],
                },
                #-----------------------------------------------------------
                # vlan 20 iscsi
                #-----------------------------------------------------------
                '10.0.2.9' =>
                {
                        'portal_group_name' => 'pg_vlan20_fabric',
                        'portal_port' => 3260,
                        'portal_addresses' =>
                        [
                                # iscsi-target-node1
                                '10.0.2.1',
                                '10.0.2.2',
                                # iscsi-target-node2
                                '10.0.2.3',
                                '10.0.2.4',
                        ],
                },
        },

        #
        # removed targets: this is allows us to decommission targets
        # that some initiators just want to go after, they will stop
        # once rebooted usually, however, some like vmware just cannot handle
        # targets disappearing without being told.
        #
        # targets on this list are blocked by both the discovery session and
        # the target logon session
        #
        'targets_removed' =>
        [
                #'iqn.1990-01.edu.amherst.san0:sqlgrey1',
        ],
);
The listen_port is the TCP port number the daemon will listen on. It uses by default the standard iSCSI port number, 3260. The max_recv_data_segment_length should not be modified.
The state_time_sec should be under 20 seconds, indicating that the portal should only retain stateful information for less than 20 seconds. In our production environment we have found that 5 seconds is reasonable. The iscsi-portal retains state about the initiator and targets' portal addresses available and last used. When resource failover from iscsi-target-node1 to iscsi-target-node2 occurs, for example, the target’s portal addresses change. The failover takes less than 15 to 20 seconds.
The syslog_prefix can be changed to a desired syslog prefix. The state_directory can be modified to point to a desired directory. The etc_directory should not be modified.
The discovery_portals section is a nested hash structure reflecting the configuration of the iscsi-target cluster presented in the Architecture Overview (iscsi-target) section. Below is an excerpt of the above configuration with detailed comments:
                #-----------------------------------------------------------
                # vlan 10 iscsi
                #-----------------------------------------------------------
             '10.0.1.9' =>
                {
                     'portal_group_name' => 'pg_vlan10_fabric',
                     'portal_port' => 3260,
                     'portal_addresses' =>
                        [
                                # iscsi-target-node1
                                '10.0.1.1',
                                '10.0.1.2',
                                # iscsi-target-node2
                                '10.0.1.3',
                                '10.0.1.4',
                        ],
                },
| portal IP address, the initiator must be configured to connect with that IP address during the iSCSI discovery session. | |
| the portal_group_name is used for informational purposes. | |
| the TCP port number of the target’s portal_addresses. | |
| an array of portal_addresses holding the IP addresses of target portals available on its VLAN. |
The iscsi-portal when contacted at 10.0.1.9 with a discovery session, will query all portal_addresses listed above for available targets while impersonating using the initiator’s IQN (iSCSI Qualified Name).
Multiple portal IP addresses can be created to support multiple VLANs, for example.
The targets_removed array can be used to decommission targets that are not any longer in use. Some older initiators such as VMware’s ESX 3 series tend to hang onto a target after removing the target until the host is rebooted. The iscsi-portal when queried for this target’s portal addresses will return an iSCSI response indicating the target has been removed.
iscsi_portal_daemon.plx
The iscsi-portal daemon can be invoked to run in the background as a daemon or in the foreground. Several command line switches are available to enable verbose mode and debugging of PDUs.
[root@iscsi-portal-node1 iscsi-portal]# ./iscsi_portal_daemon.plx -h
./iscsi_portal_daemon.plx [-h] [-v] [-d] -i iqn | -f | -b | -k | -l

-h      help

-b      run the iscsi portal in the background (daemon)
-f      run the iscsi portal in the foreground
-k      kill background daemon

-v      verbose
-d      debug PDUs

-l      listen on port number other than the default (3260)
The default listen port is configured in config.pm.
The iscsi-portal daemon is normally started via a rc.d script:
[root@iscsi-portal-node1 iscsi-portal]# service iscsi-portal stop
Shutting down iscsi-portal:                                [  OK  ]
[root@iscsi-portal-node1 iscsi-portal]# service iscsi-portal start
Starting iscsi-portal:                                     [  OK  ]
Log Files
The following log lines from /var/log/messages contain a successful discovery conversation and normal target redirect transaction:
access_log> 10.0.1.90 connect to: 10.0.1.9 access_log> 10.0.1.90 initiator: iqn.1986-03.com.sun:swiscsi.srvruxa20.zfs.archive2 (session: Discovery) access_log> 10.0.1.90 initiator request: SendTargets=All access_log> 10.0.1.90 portal response: TargetName=iqn.1990-01.edu.amherst:iet.vg-vol0.lv-test-zfssnap access_log> 10.0.1.90 portal response: TargetAddress=10.0.1.9:3260,1
| The portal responds that it has a target available at the portal address of the portal itself. | |
| The initiator is finally redirected to the actual target’s portal IP address. |
Advanced Operator’s Manual
The following programs are not normally used by the iscsi-portal, however they can be used to debug the behavior of the iscsi-portal without impacting the daemon service.
|
|
All file locations are located under /etc/iscsi-portal. |
iscsi_portal_query.*
The iscsi_portal_query.plx script queries given the source IP of the initiator, the destination IP of the iscsi-portal, the initiator name and a desired target for an available target portal IP address. Note, that it does not say IP addresses. The portal will only hand out one target portal IP address per query. That way an initiator without multi-pathing support will only get a single target portal IP address.
The related shell script invokes the perl program and adds the debugging argument.
[root@iscsi-portal-node1 iscsi-portal]# ./iscsi_portal_query.sh \
>         10.0.1.90 \
>         10.0.1.9 \
>         iqn.1994-05.com.redhat:swiscsi.ietdebug.iscsigrey1.y2zx0s458m03741nv1975jax \
>         iqn.1990-01.edu.amherst:iet.iscsi-target4.pg-vlan10-iscsi.vg-satabeast5-vol0.lv-ietdebug-sqlgrey1-vol00
10.0.1.1:3260
[root@iscsi-portal-node1 iscsi-portal]# ./iscsi_portal_query.sh \
>         10.0.1.90 \
>         10.0.1.9 \
>         iqn.1994-05.com.redhat:swiscsi.ietdebug.iscsigrey1.y2zx0s458m03741nv1975jax \
>         iqn.1990-01.edu.amherst:iet.iscsi-target4.pg-vlan10-iscsi.vg-satabeast5-vol0.lv-ietdebug-sqlgrey1-vol00
10.0.1.2:3260
| upon the first query the iscsi-portal returned one available IP address | |
| on the second query the iscsi-portal returned the next available IP address. |
This response will be send to the initiator when the initiator attempts to establish the Normal iSCSI session.
iscsi_portal_sendtargets.plx
The iscsi_portal_sendtargets.plx script simulates an initiator and queries for available targets. Targets are expected to be configured to use the IQN of the initiator as the access control value.
[root@iscsi-portal-node1 iscsi-portal]# ./iscsi_portal_sendtargets.plx -h
./iscsi_portal_sendtargets.plx [-h] [-v] [-d] [-c] -i iqn | -l | -q pgname

-h      help

-i      initiator name and perform sendtargets=all against all discovery portals

-l      list current portal group names and their associated discovery session ip address

-c      debug a hardcoded initiator problem
-v      verbose
-d      debug PDUs
The -l option only reads information coming from the config.pm module.
[root@iscsi-portal-node1 iscsi-portal]# ./iscsi_portal_sendtargets.plx -l
pg_vlan10_fabric 10.0.1.9
pg_vlan20_fabric 10.0.2.9
The -i option is the initiator name used to perform a target discovery on all discovery portals. Normally the initiator would only be seeing a single portal, however, for debugging purposes it be useful to know which portal can see what targets given an initiator.
[root@iscsi-portal-node1 iscsi-portal]# ./iscsi_portal_sendtargets.plx -i iqn.1994-05.com.redhat:swiscsi.ietdebug.iscsigrey1
portal: 10.0.1.9 (pg_vlan10_fabric)
 target: iqn.1990-01.edu.amherst:iet.iscsi-target3.pg-vlan10-iscsi.vg-vol0.lv-test
portal: 10.0.2.9 (pg_vlan20_fabric)
The above example shows that the above initiator can see one target using the portal 10.0.1.9.
lib directory
The lib directory consists of Perl modules the iscsi-portal software uses. The iscsi.pm module provides low level Protocol Data Unit (PDU) packet assembly for the iSCSI protocol. It supports login, text command, and logout PDUs. The iscsiportal.pm module contains the core algorithm of the iscsi-portal. It provides target discovery services and target portal services. Target services handle target discovery and portal services control which initiator is receiving which target portal IP address. The lockutil.pm and logutil.pm are utility modules for resource locking and logging.
state directory
The state directory contains state for each active initiator. Each initiator has its own subdirectory keeping state for each available target. Here is a sample
state/iqn.1998-01.com.vmware:swiscsi.vmc02.node02
        iqn.1990-01.edu.amherst:iet.vg-vol1.lv-cscroot-data-vol00.data
        iqn.1990-01.edu.amherst:iet.vg-vol1.lv-cscroot-data-vol00.lck
The .data file contains the state information detailed below and the .lck file is a lock file used to ensure that the same initiator with multiple initiator portal IP addresses receives answers while a lock is in place on the data file.
$i_t_data1 = {
  'initiator' => 'iqn.1998-01.com.vmware:swiscsi.vmc02.node02',
  'last_refresh' => 1302884087,
  'target' => 'iqn.1990-01.edu.amherst:iet.vg-vol1.lv-cscroot-data-vol00',
  'last_portal_index' => 1,
  'portals' => {
    '10.0.1.2:3260,1' => {
      'portal_address' => '10.0.1.2',
      'tpgt' => '1',
      'portal_port' => '3260'
    },
    '10.0.1.1:3260,1' => {
      'portal_address' => '10.0.1.1',
      'tpgt' => '1',
      'portal_port' => '3260'
    }
  },
  'last_portal_count' => 2
};
The above portal state shows that the last chosen portal index was 1 out of an array of 2 possible portal addresses. Each target portal is detailed, consisting of the actual target portal IP address, the target portal group tag (which defaults to 1 in IET) and the portal’s TCP port (configured in config.pm under portal_port).
LVM Tools Reference
The LVM tools package has provided in the past automation tools to copy device data from and to other devices for backup purposes. Today, it is mainly used to automate the snapshot process of logical volumes.
Source and destination devices can be in form of files, logical volumes or block devices.
The LVM tools consists of a configuration file and several command line utilities described in the following sections.
/etc/lvm/lvm_tools.conf
The lvm_tools configuration file adjusts the following default parameters:
# default snap name suffix
DEFAULT_SNAP_SUFFIX=snap

# in percent (SM < 100GB, XL >= 100GB)
DEFAULT_SNAP_SPACE_SM=20
DEFAULT_SNAP_SPACE_XL=15

# enable md5 checks when doing remote or locally targeted snapshots
ENABLE_MD5=0

#
# enable raw devices on local copy sources (/dev/raw/rawN) (CentOS4 tested)
# this feature is incompatible with TOOL_PV and compression of LVs
#
ENABLE_RAW=1

#
# Expected minimum transfer rate (MB/s)
#
MIN_TRANSFER_RATE=4
Logical volume snapshots that are snapshots are suffixed with underscore followed by the value of DEFAULT_SNAP_SUFFIX. The default snapshot size is based on a percentage of the original logical volume size. The percentage dependents on the size of original logical volumes. Volumes less than 100GB use 20% any others use 15% of the original volume size.
It is not recommended to enable MD5 checks in a production environment, as it causes the lvm_copy command to read the source once using md5sum, then transfers the data, then read the target using md5sum.
Raw device support was developed for CentOS 4, hence this feature is not complete for CentOS 5, because /dev/raw was removed. The dd command would need additional parameters to support raw device IO which is provided via the -o parameter.
The MIN_TRANSFER_RATE can be used to define a warning/error condition during lvm_copy.
lvm_copy
The lvm_copy command is a tool to copy data from a source to a target. The source or target can be in form of files, logical volumes or devices.
The command syntax:
/usr/sbin/lvm_copy -s source_device -t target_device [-z] [-p] [-g] [-m module -o options]

lvm_copy will copy from a source lvm device to a target, the target will
be created based on the source lvm device size. If the source lvm device
is a snap device, then its origin device is determined and from that its
actual size. Use the lvm_snap_copy if you first want a snapshot of the
source device. The target can also be a remote device.

-s      source device
                file:/tmp/somefile
                 lvm:/dev/vg/lv
                 dev:/dev/sda

-t      target device
                file:/tmp/somefile
                 lvm:/dev/vg/lv
                 dev:/dev/sda
                file:host:/tmp/somefile
                 lvm:host:/dev/vg/lv
                 dev:host:/dev/sda
        The remote host field is used by ssh (public/private keys are required)

-z      compress with gzip (target must be a file)

-p      prepare target but do NOT copy the data (useful only for lvm)

-g      stage the target
        * lvm and dd: make target_lv_stage, copy data to it     when done successfully,
          delete original target and rename stage to original target
        * lvm and ddless: create target snapshot, run ddless, remove target snapshot
          if successful

-m      module to use for copying data. 'dd' is the default, 'ddless' is a tool
        which copies once all data and after that only the differences (however
        the source will always be fully read)

-o      module options (enclose them in quotes, so that they are not
        interpreted by lvm_copy)

        dd              refer to the man page of dd for more details

                bs=1M   handled by lvm_copy
                ...             any other parameters dd supports

        ddless          refer to the help of ddless for more details

                -v              handled by lvm_copy
                -s              handled by lvm_copy
                -t              handled by lvm_copy (does not support remote host or compression)
                -c              checksum file (required)
                ...             any other parameter ddless supports
The -s option refers to local files, LVM, or devices. The -t option refers to either local or remote devices. To copy a logical volume using the default dd command use:
lvm_copy -s lvm:/dev/vg_test/lv_test -t lvm:/dev/vg_big/lv_test
Notice, that the target volume must exist, however, the target logical volume does not need to exist. The lvm_copy command creates the logical volume automatically based on the source logical volume size. If the source logical volume is a snapshot, the origin logical volume is queried for the size. If the target logical volume requires resizing it will handle that automatically. In case of a block device, lvm_copy verifies the target block device size to ensure the device is large enough to hold the contents of the source device.
The -z compression option is only valid with file destinations. The -p parameter prepares the target devices but does not copy any data; this can be useful if the operator desires to execute other commands before the actual copy process begins. The -g parameters indicates that all operations should be done via a staging operation, for example, when writing data to a target logical volume, create a snapshot on that logical volume so that if the write fails, the snapshot can be removed without impact the data of the target logical volume.
The lvm_tools command has been enhanced to support different methods of copying data. The -m option defines the command name that will be invoked at the time of data copy. The default copy tool is dd. The -o parameter specifies additional arguments for the command specified with the -m parameter. Some parameters are automatically configured as shown in the above help screen.
This tool has been used in the past to backup many terabytes of data served by IET, initially utilizing dd, later on ddless to eliminate redundant writes.
lvm_snap_create
The lvm_snap_create command creates a snapshot of a logical volume, the command simplifies the snapshot creation as it automatically uses snapshot size based on a percentage of the origin logical volume size.
/usr/sbin/lvm_snap_create -s source_device [-t target_suffix] [-n snap_size] [-i io_block]

-s source lvm device
-t target suffix, by default, snap
-n snap size, by default 20% of LV < 100GB, 15% of LV >= 100GB
-c      chunk size
-i      io block, default 1, can be overriden with 0
If an existing snapshot is found, no further action is taken. The -t parameter is defined as DEFAULT_SNAP_SUFFIX under /etc/lvm/lvm_tools.conf with a default value of snap. Similarly, the -n parameter defines the desired snapshot size. The -c parameter defines the LVM chunk size, refer to the lvcreate command for more information. The -i parameter is an old hold over, it used to block iSCSI traffic while creating the snapshot due to LVM stability issues with CentOS 4. With Cent OS 5 this is not necessary anymore. The shell function callbacks are named system_io_disable and system_io_enable in the /etc/lvm/lvm_tools.conf file.
|
|
The lvm_+snap_create command is utilized by zfs_tools.sh. |
lvm_snap_remove
The lvm_snap_remove removes a snapshot logical volume. The command ensures that the logical volume removed is actually the snapshot and not accidentally the origin volume.
/usr/sbin/lvm_snap_remove -s source_device

-s source lvm device (must be a snapshot device)
|
|
The lvm_+snap_remove command is utilized by zfs_tools.sh. |
lvm_snap_copy
The lvm_snap_copy automates the snap copy process by invoking lvm_snap_create, lvm_copy and lvm_snap_remove to snap copy a logical volume.
/usr/sbin/lvm_snap_copy -s source_device -t target_device [-z] [-g]

lvm_snap_copy first creates a snapshot of a lvm source device, then invokes
lvm_copy to copy the snapshot content to the target lvm or target file, then
it removes the snapshot.

Refer to lvm_copy for more details about the source and target parameters.
The source paramter can ONLY be of type lvm, since you cannot create snapshot
of a device (like /dev/sda) or file.
lvm_iostat
The lvm_iostat tool is normally invoked via the iostat_top.sh operator tool that is part of the iscsitarget-tool chain. However, it can also be used standalone.
/usr/sbin/lvm_iostat [-h] [-n name] -r|-d output_dir

-h      help
-r      realtime data
-d      dump data to specified destination directory (for gnuplot/realtime analysis)

-n      device name (ex.: 'hd' would match hda, hdb; 'dm' would match device
        mapper devices; default matches hd[a-z]|sd[a-z]|dm-). Specify a
        regular expression in quotes, like dm-.* to refer to all device
        mapper devices.

Notes about determining block sizes:

1. lvm_iostat uses read_bytes/reads and write_bytes/writes to determine
block sizes of reads and writes.

2. sar and friends, gather rd_sec/s and wr_sec/s (which is read sectors/sec)
and avgrq-sz which is expressed in sector. The avgrq-sz does not distingiush
between reads and writes.

In depth references:
http://developer.osdl.org/dev/robustmutexes/src/fusyn.hg/Documentation/iostats.txt
http://www.xaprb.com/blog/2010/01/09/how-linux-iostat-computes-its-results/
Example realtime view:
device  displayname                                   read                write  read/s  write/s  #io  #io[ms]  read[bs]  write[bs]
dm-4    mpath_vg_satabeast8_vol0       8784686577152  8.0T 3529979366912   3.2T     18M     2.6M    1      386    112456       4926
dm-5    mpath_vg_satabeast8_vol1      12501548075008 11.4T 1404434280960   1.3T    1.0M     4.0M    0      536      8964      17382
DDLESS, DDMAP Reference
The ddless and ddmap tools reduce the amount of data read and written in contrast to the standard dd utility. The toolset has been validated on CentOS 5 and Solaris. The name ddless comes from the long-standing Unix command pun more and less, so we have dd and ddless.
Architecture Overview (ddless, ddmap)
The purpose of dd is to convert and copy a file, however, it lacks several features such as:
-
multi-threaded input/output
-
read only the data that has actually changed
-
write only the data that has actually changed
|
|
Keep in mind, for the following section, that when a reference is made to a block device, or just device, it is equally applicable to a file. In other words, just like dd reads from files and block devices, so can ddless. |
The standard dd command reads data using a command line specified block size which defaults to 512 bytes. ddless divides the source device into regions that are processed by worker threads. The number of worker threads can be adjusted on the command line.
The following is an example of ddless copying data from a source device to a target device, ignoring checksum calculations at this time meaning it will read and write all data. The following arguments are passed to ddless:
- -d
-
use direct IO when reading data, bypasses the buffer cache and this option is Linux specific
- -s
-
source device
- -c
-
checksum, leaving it blank requires the /dev/null specification and eliminates the checksum calculation process while writing data
- -t
-
target device
- -v
-
verbose
[root@iscsi-target ~]# ddless -d -s /dev/vg_satabeast3_vol0/lv_source -c /dev/null -t /dev/vg_satabeast3_vol0/lv_target -v
ddless> invoking ddless...
ddless> segment size: 16384 bytes
ddless> direct IO: 1
ddless> workers: 1
ddless> worker_id: 0 (0xd655010)
ddless> 8 MB read buffer
ddless> opened source device: /dev/vg_satabeast3_vol0/lv_source
ddless> source device size: 5368709120 bytes (5.00 GB)
ddless> source segments: 327680, remainder: 0 bytes
ddless> read buffers/job 640
ddless> read buffers/worker 640
ddless> checksum file: /dev/null
ddless> skipping checksum computations
ddless> worker_id: 0 (0xd655010)
ddless> opened target device: /dev/vg_satabeast3_vol0/lv_target
ddless> target device size: 5368709120 bytes (5.00 GB)
ddless> launching worker threads...
ddless> workers have been spawned, waiting...
ddless[40db5940]> worker_id: 0 (0xd655010) last_worker: 1
ddless[40db5940]> initial seek position: 0, ending position: 5368709119
ddless[40db5940]> current position (5368709119), done
ddless> total buffers read: 640
ddless> found changed segments 327680 (100.00%) of 327680 segments
ddless> wrote 5368709120 bytes (5.00 GB) to target
ddless> processing time: 31.00 seconds (0.52 minutes)
ddless> processing performance: 165.16 MB/s
5120 MB processed
| Note the performance measurement here and in subsequent tests. |
The above configured execution of ddless basically matches what is accomplished with the following dd command:
[root@iscsi-target ~]# dd iflag=direct if=/dev/vg_satabeast3_vol0/lv_source of=/dev/vg_satabeast3_vol0/lv_target bs=8M
640+0 records in
640+0 records out
5368709120 bytes (5.4 GB) copied, 80.6213 seconds, 66.6 MB/s
To reduce the amount of data written, ddless tracks checksums of data segments. Subsequent writes can then be reduced.
When ddless is configured to produce the checksum file, the first time through, ddless has to write all data. The data stream is divided into 16 KB segments. Two 32-bit checksums are computed using the CRC32 [crc32] and Murmur Hash [mh] resulting in a 64-bit checksum per 16 KB segment. These checksums are written to the ddless checksum file. If on subsequent writes the segment checksum value matches, the segment is not written again to the target, hence reducing writes. If the checksum value does not match on subsequent writes, the data is written to the target and the checksum is updated in the ddless checksum file.
- -c
-
specify a checksum file that should be stored along with the destination device
[root@iscsi-target ~]# ddless -d -s /dev/vg_satabeast3_vol0/lv_source -c target.ddless -t /dev/vg_satabeast3_vol0/lv_target -v
ddless> invoking ddless...
ddless> segment size: 16384 bytes
ddless> direct IO: 1
ddless> workers: 1
ddless> worker_id: 0 (0x1593010)
ddless> 8 MB read buffer
ddless> opened source device: /dev/vg_satabeast3_vol0/lv_source
ddless> source device size: 5368709120 bytes (5.00 GB)
ddless> source segments: 327680, remainder: 0 bytes
ddless> read buffers/job 640
ddless> read buffers/worker 640
ddless> checksum file: target.ddless
ddless> checksum file size: 2621440 bytes
ddless> new checksum file required
ddless> checksum array ptr: 0x2af46767a000
ddless> worker_id: 0 (0x1593010)
ddless> opened target device: /dev/vg_satabeast3_vol0/lv_target
ddless> target device size: 5368709120 bytes (5.00 GB)
ddless> launching worker threads...
ddless> workers have been spawned, waiting...
ddless[40c40940]> worker_id: 0 (0x1593010) last_worker: 1
ddless[40c40940]> initial seek position: 0, ending position: 5368709119
ddless[40c40940]> current position (5368709119), done
ddless> total buffers read: 640
ddless> found changed segments 327680 (100.00%) of 327680 segments
ddless> wrote 5368709120 bytes (5.00 GB) to target
ddless> processing time: 48.00 seconds (0.80 minutes)
ddless> processing performance: 106.67 MB/s
ddless> preparing stats file target.ddless.stats
5120 MB processed
| checksum file has been enabled | |
| number of changed segments is 100% on the first run | |
| performance has dropped due to the checksum calculations to 106 MB/s (initial performance 165 MB/s) |
The following diagram shows the data flow of ddless and the checksum
Now ddless will be invoked a second time without altering any arguments and the performance increases:
[root@iscsi-target ~]# ddless -d -s /dev/vg_satabeast3_vol0/lv_source -c target.ddless -t /dev/vg_satabeast3_vol0/lv_target -v
ddless> invoking ddless...
ddless> segment size: 16384 bytes
ddless> direct IO: 1
ddless> workers: 1
ddless> worker_id: 0 (0xeb3010)
ddless> 8 MB read buffer
ddless> opened source device: /dev/vg_satabeast3_vol0/lv_source
ddless> source device size: 5368709120 bytes (5.00 GB)
ddless> source segments: 327680, remainder: 0 bytes
ddless> read buffers/job 640
ddless> read buffers/worker 640
ddless> checksum file: target.ddless
ddless> checksum file size: 2621440 bytes
ddless> checksum array ptr: 0x2b8c27cc0000
ddless> worker_id: 0 (0xeb3010)
ddless> opened target device: /dev/vg_satabeast3_vol0/lv_target
ddless> target device size: 5368709120 bytes (5.00 GB)
ddless> launching worker threads...
ddless> workers have been spawned, waiting...
ddless[4172a940]> worker_id: 0 (0xeb3010) last_worker: 1
ddless[4172a940]> initial seek position: 0, ending position: 5368709119
ddless[4172a940]> current position (5368709119), done
ddless> total buffers read: 640
ddless> found changed segments 0 (0.00%) of 327680 segments
ddless> wrote 0 bytes (0.00 GB) to target
ddless> processing time: 40.00 seconds (0.67 minutes)
ddless> processing performance: 128.00 MB/s
ddless> preparing stats file target.ddless.stats
5120 MB processed
| no changes were written | |
| performance has increased to 128 MB/s (initial performance 165 MB/s) |
Utilizing multiple threads can increase input and output performance. The number of threads the system can handle depends on the IO channels and disk subsystem. The next example uses 2 threads:
[root@iscsi-target ~]# ddless -d -s /dev/vg_satabeast3_vol0/lv_source -c target.ddless -t /dev/vg_satabeast3_vol0/lv_target -v -w 2
ddless> invoking ddless...
ddless> segment size: 16384 bytes
ddless> direct IO: 1
ddless> workers: 2
ddless> worker_id: 0 (0x1554e010)
ddless> 8 MB read buffer
ddless> opened source device: /dev/vg_satabeast3_vol0/lv_source
ddless> worker_id: 1 (0x1554e888)
ddless> 8 MB read buffer
ddless> opened source device: /dev/vg_satabeast3_vol0/lv_source
ddless> source device size: 5368709120 bytes (5.00 GB)
ddless> source segments: 327680, remainder: 0 bytes
ddless> read buffers/job 640
ddless> read buffers/worker 320
ddless> checksum file: target.ddless
ddless> checksum file size: 2621440 bytes
ddless> checksum array ptr: 0x2b9045df5000
ddless> worker_id: 0 (0x1554e010)
ddless> opened target device: /dev/vg_satabeast3_vol0/lv_target
ddless> worker_id: 1 (0x1554e888)
ddless> opened target device: /dev/vg_satabeast3_vol0/lv_target
ddless> target device size: 5368709120 bytes (5.00 GB)
ddless> launching worker threads...
ddless[41219940]> worker_id: 0 (0x1554e010) last_worker: 0
ddless[41219940]> initial seek position: 0, ending position: 2684354559
ddless[42930940]> worker_id: 1 (0x1554e888) last_worker: 1
ddless[42930940]> initial seek position: 2684354560, ending position: 5368709119
ddless> workers have been spawned, waiting...
ddless[41219940]> current position (2684354559), done
ddless[42930940]> current position (5368709119), done
ddless> total buffers read: 640
ddless> found changed segments 0 (0.00%) of 327680 segments
ddless> wrote 0 bytes (0.00 GB) to target
ddless> processing time: 25.00 seconds (0.42 minutes)
ddless> processing performance: 204.80 MB/s
ddless> preparing stats file target.ddless.stats
5120 MB processed
| 2 threads, each processing a region of the block device | |
| no changes were written | |
| performance has increased to 204 MB/s (initial performance 165 MB/s) |
Increasing the threads to 4 brings the performance closer to the storage array ceiling:
[root@iscsi-target ~]# ddless -d -s /dev/vg_satabeast3_vol0/lv_source -c target.ddless -t /dev/vg_satabeast3_vol0/lv_target -v -w 4
ddless> invoking ddless...
...
ddless> launching worker threads...
ddless[411f5940]> worker_id: 0 (0x10383010) last_worker: 0
ddless[411f5940]> initial seek position: 0, ending position: 1342177279
ddless[41bf6940]> worker_id: 1 (0x10383888) last_worker: 0
ddless[41bf6940]> initial seek position: 1342177280, ending position: 2684354559
ddless[425f7940]> worker_id: 2 (0x10384100) last_worker: 0
ddless[425f7940]> initial seek position: 2684354560, ending position: 4026531839
ddless[42ff8940]> worker_id: 3 (0x10384978) last_worker: 1
ddless[42ff8940]> initial seek position: 4026531840, ending position: 5368709119
ddless> workers have been spawned, waiting...
ddless[411f5940]> current position (1342177279), done
ddless[41bf6940]> current position (2684354559), done
ddless[425f7940]> current position (4026531839), done
ddless[42ff8940]> current position (5368709119), done
ddless> total buffers read: 640
ddless> found changed segments 0 (0.00%) of 327680 segments
ddless> wrote 0 bytes (0.00 GB) to target
ddless> processing time: 18.00 seconds (0.30 minutes)
ddless> processing performance: 284.44 MB/s
ddless> preparing stats file target.ddless.stats
5120 MB processed
| 4 threads, each processing a region of the block device | |
| no changes were written | |
| performance has increased to 284 MB/s (initial performance 165 MB/s) |
|
|
The above examples do not include active data changes at source device. Empirical analysis shows that general workloads, such as file servers and virtual machines only make small amount of data changes over a period of one day, for example. |
To reduce the amount of data read, ddmap must be utilized. The ddmap is a bitmap created by a specifically patched version of IET (iSCSI Enterprise Target). Every time an iSCSI initiator writes to a group of sectors of a LUN, the related ddmap bitmap is updated. Refer to the DDMAP Kernel reference for detailed information.
The ddmap data can be extracted from the /proc/net/iet/ddmap file system structure and used as input to the ddless command using the following new command line argument:
- -m
-
read only those segments that are flagged in the ddmap bitmap file
The following is an example of our SAN backup process log using ddless and ddmap on Solaris of a 500 GB volume utilized by virtual machines:
2011-04-27 17:55:14 zfs-archive1 - copy> /root/santools/bin/ddless -v -s /dev/rdsk/c0t494554000000000044534B2D313130343237313735343436d0p0 -m /vg_satabeast7_vol1/ddless/iscsi4_l v_vmc03_vmfs_vm_iet_vol01.ddmap -t /dev/zvol/dsk/vg_satabeast7_vol1/iscsi4_lv_vmc03_vmfs_vm_iet_vol01_bk -c /vg_satabeast7_vol1/ddless/iscsi4_lv_vmc03_vmfs_vm_iet_vol01.ddless - w 4 512000 MB processed ddless> invoking ddless... ddless> segment size: 16384 bytes ddless> direct IO: 0 ddless> workers: 4 ddless> worker_id: 0 (807b208) ddless> 8 MB read buffer ddless> opened source device: /dev/rdsk/c0t494554000000000044534B2D313130343237313735343436d0p0 ddless> worker_id: 1 (807ba40) ddless> 8 MB read buffer ddless> opened source device: /dev/rdsk/c0t494554000000000044534B2D313130343237313735343436d0p0 ddless> worker_id: 2 (807c278) ddless> 8 MB read buffer ddless> opened source device: /dev/rdsk/c0t494554000000000044534B2D313130343237313735343436d0p0 ddless> worker_id: 3 (807cab0) ddless> 8 MB read buffer ddless> opened source device: /dev/rdsk/c0t494554000000000044534B2D313130343237313735343436d0p0 ddless> opened map: /vg_satabeast7_vol1/ddless/iscsi4_lv_vmc03_vmfs_vm_iet_vol01.ddmap
| utilization of ddmap input file to reduce reads | |
| the total buffers read is 14771 out of 64000 read buffers/job, a buffer is 8 MB | |
| observe the actual change percentage over a 24 hour period, a segment is 16 KB | |
| It took 5 minutes to backup a 500 GB volume - that is very fast. | |
| The processing performance is showing that we are not "hitting" the platters. |
The following diagram shows the data flow of ddless using both ddmap and ddles checksums:
DDLESS
The ddless tool can operate 3 different modes: copy data, compute checksum, and performance test:
-
copy data from source to destination device while maintaining a checksum file
-
compute checksum from a source device
-
performance test source device
ddless by Steffen Plotner, release date: 2010.05.01

Copy source to target keeping track of the segment checksums. Subsequent
copies are faster because we assume that not all of the source blocks change.

        ddless  [-d] -s <source> [-m ddmap ][-r <read_rate_mb_s>] -c <checksum>
                [-b] -t <target> [-w #] [-v]

Produce a checksum file using the specified device. Hint: the device could be
source or target. Use the target and a new checksum file, then compare it to
the existing checksum file to ensure data integrity of the target.

        ddless  [-d] -s <source> -c <checksum> [-v]

Determine disk read speed zones, outputs data to stdout.

        ddless  [-d] -s <source> [-v]

Outputs the built in parameters

        ddless  -p
Copy Data
To copy data using ddless the operator must specify at least the source and destination device using the -s and -t command line switches. In addition to that the -c command line argument must be either set to compute the ddless checksum file as data is read from the source device.
        ddless  [-d] -s <source> [-m ddmap ][-r <read_rate_mb_s>] -c <checksum>
                [-b] -t <target> [-w #] [-v]
- -d
-
use direct IO when reading data, bypasses the buffer cache and this option is Linux specific
- -s
-
a source device or file name
- -m
-
optional, the ddmap input file to reduce reads
- -r
-
optional, a maximum read rate per worker thread
- -c
-
checksum file updated as data is read from source device, if no checksum is desired specify /dev/null
- -b
-
does not process any data and only exists if a new checksum file is required; this can occur when the source device size has changed. This option is obsolete.
- -t
-
a target device or file name, ddless ensures that the target device is at least as large as the source device. A target file will grow as needed.
- -w
-
number of worker threads, defaults to 1
- -v
-
verbose execution
Compute DDLESS Checksum
ddless has the ability to compute the ddless checksum from any file or device. The device could be either a source or target device.
The backup processes keep track of the target device and the associated ddless checksum file. The ddless compute checksum process can be used to verify the current ddless checksum file, by reading the target and producing a temporary ddless checksum file. Compare the temporary ddless checksum file against the target’s ddless checksum file and they should match. This can be useful to verify the integrity of the target device over time. Our SAN archiving solution currently implements this concept.
ddless [-d] -s <source> -c <checksum> [-v]
- -d
-
use direct IO when reading data, bypasses the buffer cache and this option is Linux specific
- -s
-
a source device or file name
- -c
-
checksum file updated as data is read from source device
- -v
-
verbose execution
Performance Test
ddless has the ability to just read from the source device and provide read performance statistics. It is limited to a read block size of 8 MB.
ddless [-d] -s <source> [-v]
- -d
-
use direct IO when reading data, bypasses the buffer cache and this option is Linux specific
- -s
-
a source device or file name
- -v
-
verbose execution
[root@iscsi-target ~]# ddless -d -s /dev/sdm
8 MB  77 ms 103.90 MB/s
8 MB  43 ms 186.05 MB/s
8 MB  44 ms 181.82 MB/s
8 MB  43 ms 186.05 MB/s
8 MB  45 ms 177.78 MB/s
8 MB  44 ms 181.82 MB/s
8 MB  44 ms 181.82 MB/s
8 MB  44 ms 181.82 MB/s
8 MB  43 ms 186.05 MB/s
...
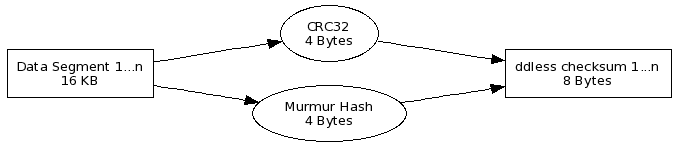
DDMAP
The command line tool ddmap is utilized by ietd_ddmap.sh and zfs_tools.sh which are part of the iscsitarget-tools package.
The ddmap allows the operator to read ddmap data from the /proc/net/iet/ddmap files and merge the data into a destination file. ddmap also provides command line switches for header and data dumps.
ddmap by Steffen Plotner, release date: 2010.05.01

Reads ddmap provided by iet and dumps either the header, the data or merges
it with another file for permanent storage of the change map of the underlying
volume.

        ddmap   -s <source> [-a] [-b] -t <target>

Parameters

        -s      ddmap source device
        -t      ddmap target device
        -a      dump the header
        -b      dump the data (hexdump)
        -v      verbose
        -vv     verbose+debug
- -s
-
a source ddmap data file coming either from /proc/net/iet/ddmap or a regular file
- -t
-
a target ddmap data file
- -a
-
dump the header of the ddmap file
- -b
-
dump the data of the ddmap file
- -v
-
verbose execution
- -vv
-
verbose execution with debug info
The following command line execution demonstrates dumping the header of a live ddmap file from /proc/net/iet/ddmap:
[root@iscsi-target ~]# ddmap -s /proc/net/iet/ddmap/iqn.1990-01.edu.amherst\:iet.iscsi-target4.pg-vlan10-iscsi.vg-satabeast8-vol1.lv-srvrnt40-vol00.0 -a
ddmap.device: /proc/net/iet/ddmap/iqn.1990-01.edu.amherst:iet.iscsi-target4.pg-vlan10-iscsi.vg-satabeast8-vol1.lv-srvrnt40vol00.0
ddmap.info: *ddmap*
ddmap.version: 1
ddmap.suspended: 0
ddmap.name_sum: 0x00002a73
ddmap.map_size: 24576 (u32)
ddmap.map_size_bytes: 98304 
| information string | |
| version 1 is the current data format layout | |
| set to 0 if the underlying target’s IO was not suspended, otherwise it is 1, refer to the DDMAP Kernel reference for detailed information. | |
| checksum of the ddmap's name, when merging maps, the ddmap command line tool verifies that merges are sourced from identically named ddmap files. | |
| map size in multiples of 32 bits unsigned integers | |
| map size in bytes |
The following command line execution shows the data dump output:
[root@iscsi-target ~]# ddmap -s /proc/net/iet/ddmap/iqn.1990-01.edu.amherst\:iet.iscsi-target4.pg-vlan10-iscsi.vg-satabeast8-vol1.lv-srvrnt40-vol00.0 -b
00000000: 00000000 00000000 00000000 00000000 04000000 02000000 00000000 00000000
00000020: 00000000 00000000 00000000 00000000 00000000 00000000 00000000 00000000
00000040: 00000000 00000000 00000000 00000000 00000000 00000000 00210000 00000000
00000060: 00000000 80000000 00000000 00000000 00000000 00000000 00000000 00000000
00000080: 00000000 00000000 00000000 00000000 00000000 00000000 00000000 00000000
000000a0: 00000000 00000000 00000000 00000000 00000000 00000000 00000000 00000000
000000c0: 00000000 00000000 00000000 00000000 00000000 00000000 00000000 00000000
000000e0: 00000000 00000000 00000000 00000000 00000000 00000000 00000000 00000018
...
...
00017fa0: 00000000 00000000 00000000 00000000 00000000 00000000 00000000 00000000
00017fc0: 00000000 00000000 00000000 00000000 00000000 00000000 00000000 00000000
00018000: 00000000 00000000 00000000 00000000 00000000 00000000 00000000 00000000
| bits that are set, indicate that a 16 KB segment has been written to |
The next operation involves extracting the ddmap data from /proc/net/iet/ddmap and storing it into a file:
[root@iscsi-target ~]# ddmap -s /proc/net/iet/ddmap/iqn.1990-01.edu.amherst\:iet.iscsi-target4.pg-vlan10-iscsi.vg-satabeast8-vol1.lv-srvrnt40-vol00.0 -t output.ddmap -v
ddmap> opened map: /proc/net/iet/ddmap/iqn.1990-01.edu.amherst:iet.iscsi-target4.pg-vlan10-iscsi.vg-satabeast8-vol1.lv-srvrnt40-vol00.0
ddmap> header size: 20
ddmap> target does not exist, creating new file
ddmap> opened target map: output.ddmap
ddmap> source->map_size: 24576 target->map_size: 0
ddmap> merge completed.
| a new output.ddmap file was created |
A subsequent run involving a merge:
[root@iscsi-target ~]# ddmap -s /proc/net/iet/ddmap/iqn.1990-01.edu.amherst\:iet.iscsi-target4.pg-vlan10-iscsi.vg-satabeast8-vol1.lv-srvrnt40-vol00.0 -t output.ddmap -v
ddmap> opened map: /proc/net/iet/ddmap/iqn.1990-01.edu.amherst:iet.iscsi-target4.pg-vlan10-iscsi.vg-satabeast8-vol1.lv-srvrnt40-vol00.0
ddmap> header size: 20
ddmap> opened map: z
ddmap> header size: 20
ddmap> name sum matches on source and target, good
ddmap> source is greater or equal to target size, good
ddmap> opened target map: output.ddmap
ddmap> source->map_size: 24576 target->map_size: 24576
ddmap> merge completed.
| the name checksum has been verified, comparing the checksum of the source to the checksum stored in the target file previously created |
DDMAP Kernel Reference
The ddmap’s purpose in the kernel of the iscsi-target is to track which blocks of a LUN are changing. In the interest of time and depth of knowledge required, it was decided to track block changes at the iscsi-target layer within the blockio and fileio modules. Introducing a device mapper module was considered but not pursued.
DDMAP data structures
To understand the following map offset computations, we have to know how the ddmap_data is defined:
#define DDMAP_SEGMENT_SIZE 16 * 1024    /* 16384 */
#define DDMAP_SEGMENT_SHIFT 14          /* 2^14 = 16384  */
#define DDMAP_SEGMENT_MASK 0x3FFF       /* (2^14)-1 */
#define DDMAP_U32_SHIFT 5               /* 2^5 = 32 bits */
#define DDMAP_U32_SIZE sizeof(u32)      /* each u32 word is 4 bytes */
#define DDMAP_512K_SHIFT 19             /* 2^19 = 524288 (512k) */
#define DDMAP_MAP_BIT_EXP 0x7C000       /* bits 2^14 ... 2^18 make up the map bit exponent */

struct ddmap_data {
        char *name;             /* target.lun exposed under /proc/net/iet/ddmap */
        u32 map_size;           /* units are in u32 *map */
        u64 map_size_bytes;     /* actual number of bytes */
        u32 *map;               /* ddmap of bits */
        u8 map_suspended;       /* 1 if map operations are suspended */
};
The name field is an allocated array of characters that contains the target name followed by a period followed by a LUN number. Given a target and a LUN, there is an associated file located under /proc/net/iet/ddmap. This interface allows us to export the map and perform other operations on the current map.
The map_size identifiers how many u32 map instances we need to allocate for a given LUN. If the LUN size is 10 GB, then we would need 20480 map instances (10 * 1024 * 1024 / 512 KB). Each map instance encodes 512 KB of data. The maximum LUN size supported is 2 PT bytes (232 * 512 KB = 2199023255552 KB) due to the 32 bit unsigned integer of map_size.
One can argue to change the map_size data type to u64 – I agree, it will require ddmap file changes, hence a full read of all data at that time, unless the ddmap file type id is bumped and we can read either u32 or u64 of map_size.
The max_size_bytes is map_size * 4 bytes.
The map is a pointer to an allocated array of ddmap entries. Each ddmap entry is a 32 bit unsigned integer and each bit refers to a 16 KB segment. If the bit is one then the related 16 KB segment has been written to, otherwise not. Each ddmap entry covers 512 KB of data. The least significant bit (LSB) of ddmap entry refers to the first 16 KB segment on the disk.
The map_suspended flag when set to 1 prevents write operations to both the underlying disk and the map. The flag is controlled via the proc interface described in a later section.
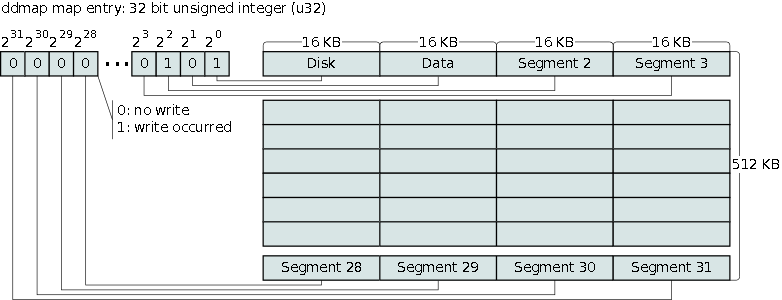
DDMAP core code
The function ddmap_lun_exec() processes the request and expects the ddmap data structure, the starting position on the disk where the change took place and the size of the change itself. A bitmap is used to track disk changes. A single bit encodes a 16 KB segment.
/*
 * lun: ddmap algorithm
 *
 * A single 16kb data segment is encoded as a bit, specifically, a bit is set
 * to indicate that a 16kb segment has changed. u32 type words are in use. Each
 * u32 word encodes 512kb of data. u32 words are used in increasing order (i.e.
 * the 1st u32 word refers to the first 512kb of disk data). Within a u32 word,
 * the bits are processed from least to most significant bit (i.e. for the first
 * u32 word, bit 0 is the first 16kb segment of data, bit 1 is the second 16kb
 * segment of data and so on).
 *
 * byte 0 bit 1 maps to 16kb of data (first block of data)
 * byte 0 bit 2 maps to 16kb of data (2nd)
 * byte 0 bit 4 maps to 16kb of data (3rd)
 * byte 0 bit 8 maps to 16kb of data (4th up to bit 32)
 * ...
 */
int
ddmap_lun_exec(struct ddmap_data *ddmap_data, loff_t ppos, u32 size)
{
        u32 *map = ddmap_data->map;
        loff_t ppos_align;
        loff_t map_offset;
        u32 map_bit_exp;
        u32 map_bit;
        u32 map_mask;
        int size_bits;

        /*
         * loop and wait until the map is resumed (there is on purpose NO locking used
         * when accessing the map_suspended state, in case of cache incoherencies, we
         * are ok with having the value 1 appear even if the value was just set to 0,
         * worst case a 1 second delay during a snapshot)
         */
        while ( ddmap_data->map_suspended )
        {
                dprintk(D_DDMAP, "map suspended: %d (waiting...)\n", ddmap_data->map_suspended);
                schedule_timeout_interruptible(msecs_to_jiffies(1000));
        }

        /*
         * the alignment value is simply the current position minus the current position
         * ANDed with the inverse of the segment mask which is 0x3fff
         *
         * bits within a 16 Kb segment are ignored (0 ... (2^14)-1)
         */
        ppos_align = ppos - (ppos & ~(loff_t)DDMAP_SEGMENT_MASK);

        dprintk(D_DDMAP, "ppos=%llu size=%d\n",
                ppos, size);

        /*
         * ensure that the ppos is aligned at 16KB boundary. If there
         * is a remainder, then move the ppos to the left on the number
         * line and increase size accordingly.
         *
         * ppos_align is the modulo of ppos and 16KB
         */
        ppos-=ppos_align;
        size+=ppos_align;

        /*
         * the loop below will includes values up to and including the value
         * of size; hence we subtract one, example: given 4096 as a size, we
         * would process bytes 0 through 4095, which is in effect 4096 bytes.
         */
        size--;

        dprintk(D_DDMAP, "ppos=%llu size=%d (ppos_align=%llu)\n",
                ppos, size, ppos_align);

        /*
         * the map offset is computed by taking the current position and dividing it
         * by 512KB using a right shift
         */
        map_offset = ppos >> DDMAP_512K_SHIFT;

        /*
         * the map bit exponent is computed by masking and shifting it to the right
         */
        map_bit_exp = (ppos & DDMAP_MAP_BIT_EXP) >> DDMAP_SEGMENT_SHIFT;
        map_bit = 1 << map_bit_exp; /* 2^bit_exp */

        size_bits = size >> DDMAP_SEGMENT_SHIFT;

        dprintk(D_DDMAP, "map=%p map_offset=%llu (u32) map_bit=0x%08x (exp=%u) size_bits=%d\n",
                map, map_offset, map_bit, map_bit_exp, size_bits);

        map += map_offset;

        /*
         * given the size, divi it up into 16KB chunks (size_bits),
         * for each set the bit in the dd map and apply the changes to the
         * bitmap in sets of u32.
         */
        map_mask = 0x00000000;
        do {
                map_mask = map_mask | map_bit;

                dprintk(D_DDMAP, "map=%p map_bit=0x%08x size_bits=%02d map_mask=%08x\n",
                        map, map_bit, size_bits, map_mask);

                map_bit = map_bit << 1;
                if ( map_bit == 0 )
                {
                        dprintk(D_DDMAP, "map=%p val=%08x mask=%08x\n", map, *map, map_mask);
                        atomic_set_mask(map_mask, map);

                        map_bit = 1;
                        map_mask = 0x00000000;
                        map++;
                }

                size_bits--;
        } while (size_bits >= 0);

        if ( map_mask && map < ddmap_data->map + ddmap_data->map_size )
        {
                dprintk(D_DDMAP, "map=%p val=%08x mask=%08x post\n", map, *map, map_mask);
                atomic_set_mask(map_mask, map);
        }

        return 0;
}
The following section details several mathematical computations that are expressed using C bitwise operators allowing for fastest execution speed. There is no floating point support in the kernel, hence we use integer math and bitwise operators.
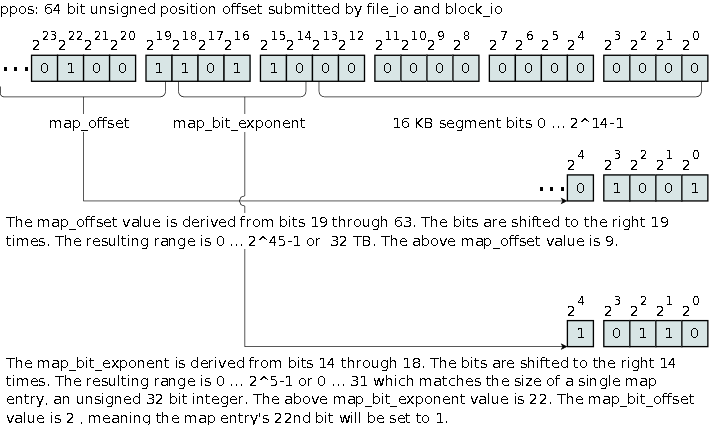
The following computations occur when the fileio or blockio layer performs a write to the underlying block device. Reads are ignored. The prototype of a request is defined as follows:
ddmap_lun_exec(struct ddmap_data *ddmap_data, loff_t ppos, u32 size)
ppos_align
Since we are working in 16 KB segments, we need to align the starting position such that it is evenly divisible by 16384. The following algorithm is used to calculate the aligned position:
ppos_align = ppos - (ppos & ~(loff_t)DDMAP_SEGMENT_MASK);
We subtract from the current ppos the value of ppos ANDed with the inverse mask of DDMAP_SEGMENT_MASK 0x3FFF the equivalent of 16383. We are filtering out the bits within the first 16 KB, bits 0 through 13 and keeping the remaining bits.
Using the above formula and a current ppos value of 17000 we would end up at 16384. We are shifting the beginning point to the left by 616 bytes. This in turn requires us to adjust the size of the request also by 616 bytes as seen by the following code segment:
ppos-=ppos_align;
size+=ppos_align;
At this time ppos is aligned on a 16 KB boundary and the size tells us how many data bytes have changed. The next step involves computing the map offset.
The size variable is reduced by one byte to accommodate the concept of processing 0 through n-1 bytes which is in effect n bytes.
map_offset
The initial map_offset is computed by taking the value of ppos and dividing it by 512 KB. This is accomplished via a shift right operation:
map_offset = ppos >> DDMAP_512K_SHIFT;
The map_offset pointer references a 32 bit unsigned integer; hence we need to identify the starting bit.
map_bit_exp and map_bit
The starting bit is computed as the bit exponent value in terms of 2map_bit_exp. The value of map_bit_exp is determined by utilizing the bits 214 through 218 from ppos. First mask out those bits, and then we shift them to the right:
map_bit_exp = (ppos & DDMAP_MAP_BIT_EXP) >> DDMAP_SEGMENT_SHIFT;
This exponent value is used to compute a bit pattern with a single bit set to one:
map_bit = 1 << map_bit_exp; /* 2^bit_exp */
size_bits
The write request is invoked with a size parameter indicating how many bytes to write.
The size_bits value is the computed by taking the number of bytes to write and dividing that into the segment size. Each bit encodes a 16 KB data segment.
size_bits = size >> DDMAP_SEGMENT_SHIFT;
Setting map bits
At this point we have a map_offset and the first map_bit that will be set to one indicating that this 16 KB segment has been written to; it does not indicate if the write made an actual change to the data. This does not matter because ddless when invoked with the checksum feature will only write out actual changes when copying data from a iet based snapshot to the archive.
       map += map_offset;

       /*
        * given the size, divi it up into 16 KB chunks (size_bits),
        * for each set the bit in the dd map and apply the changes to the
        * bitmap in sets of u32.
        */
       map_mask = 0x00000000;
       do {
               map_mask = map_mask | map_bit;

               dprintk(D_DDMAP, "map=%p map_bit=0x%08x size_bits=%02d map_mask=%08x\n",
                       map, map_bit, size_bits, map_mask);

               map_bit = map_bit << 1;
               if ( map_bit == 0 )
               {
                       dprintk(D_DDMAP, "map=%p -> %08x mask=%08x\n", map, *map, map_mask);
                       atomic_set_mask(map_mask, map);

                       map_bit = 1;
                       map_mask = 0x00000000;
                       map++;
               }

               size_bits--;
       } while (size_bits >= 0);

       if ( map < ddmap_data->map + ddmap_data->map_size )
       {
               dprintk(D_DDMAP, "map=%p -> %08x mask=%08x post\n", map, *map, map_mask);
               atomic_set_mask(map_mask, map);
       }
The map pointer is adjusted based on the current map_offset. The map_mask is cleared out and we begin the loop. First we perform an OR operation on the working map_mask and the current map_bit. The OR operation sets a bit. Then we move the map_bit to the left (from the LSB to MSB part of the 32 bit unsigned integer). If the map_bit changes to zero, then we need to go to next map location and save the current map_mask value in the map using the atomic_set_mask kernel function. We keep decrementing the size_bits until it is zero.
At the end if the map pointer is still within the map’s data range, we perform a final atomic_set_mask to include any missing bits that have not been processed by the loop’s atomic_set_mask kernel function.
Target LUN Initialization
When a LUN of a target is configured the ddmap_lun_init function is invoked using the following prototype:
ddmap_lun_init(struct iet_volume *volume, loff_t vol_size, struct ddmap_data *ddmap_data)
The volume object, its size and the ddmap_data structure are provided. First we determine the number of segments by dividing vol_size by the data segment size which is 16 KB.
ddmap_segments = vol_size >> DDMAP_SEGMENT_SHIFT;
The map_size is computed by taking the resulting ddmap_segments and dividing them by 32 bits which is the width of a map entry.
ddmap_data->map_size = ddmap_segments >> DDMAP_U32_SHIFT;
Now we can determine the number of bytes the map uses, allocate memory for it and initialize the memory.
ddmap_data->map_size_bytes = DDMAP_U32_SIZE * ddmap_data->map_size;
ddmap_data->map = vmalloc(ddmap_data->map_size_bytes);
if (!ddmap_data->map)
       return -ENOMEM;
memset(ddmap_data->map, 0, ddmap_data->map_size_bytes);
Under /proc/net/iet/ddmap, a proc_name entry is allocated that consists of the target name followed by a period and the LUN number. For example, if the target name is iqn.1990-01.edu.amherst:my-big-target and the LUN number is 10, then /proc/net/iet/ddmap entry would be:
/proc/net/iet/ddmap/iqn.1990-01.edu.amherst:my-big-target.10
DDMAP proc interface
The ddmap proc interface provides read and write capabilities. When reading from iet/ddmap the kernel transfers the ddmap contents into user space memory which can then be read using the UNIX cat or dd command. When writing to iet/ddmap the operator can issue commands such as zap the current map or dump the contents of the map via dprintk.
Reading from the /proc/net/iet/ddmap interface
Reading the contents of the map produces the following header followed by the map entries:
struct ddmap_header {          /* structure aligns to 32 bit words */
       char info[8];           /* ddmap ascii header */
       u32 version;            /* version of header+data */
       u32 name_sum;           /* sum of characters of target.lun */
       u32 map_size;           /* units are in u32 *map */
}
The info field contains the ASCII string ddmap followed by a NULL byte.
The version field contains currently the number 1.
The name_sum field is composed by adding the ASCII values of the proc/net/iet/ddmap file entry. This field identifies the data set – it may not be unique. The tool ddmap facilitates merging multiple ddmap files. The merge process ensures that the name_sum matches among the related files target and LUN ddmap files.
The map_size was previously defined in the section DDMAP data structures.
The reading process does not provide any locking mechanism when transferring the map from kernel space memory to user space memory. To read the map consistently, refer to the next section using the commands mapsuspend and mapresume.
The reading of the ddmap is generally performed via the following command:
dd if=$proc_ddmap of=$VGMETA_DIR/$ddmap.$ts.ddmapdump bs=1k
The minimum block size is 20 bytes derived from the ddmap_header.
Writing to the /proc/net/iet/ddmap interface
The write interface of ddmap supports on a per target and lun basis the following commands:
-
mapzap
-
mapdump
-
mapsuspend
-
mapresume
The mapzap command clears the current map.
The mapdump command dumps the current map in a hex dump format using dprintk. This is only used for debugging purposes.
The mapsuspend command suspends all interaction with the map and hence also suspends all write tasks generated by the initiator. It is imperative that one submits the mapresume command in a timely basis.
The mapresume command resumes all interactions with the map.
The following commands outline the process of taking a consistent snapshot using LVM and providing a ddmap of 16 KB segments that have been written to:
#
# suspend the map and all write operations of a given target
#
echo -n mapsuspend > /proc/net/iet/ddmap/iqn.1990-01.edu.amherst:targetname.0

#
# wait for 5 seconds to let the IET kernel worker threads settle down
#
sleep 5

#
# create LVM snapshot
#
lvcreate –s –n lv_snapshot –L20G /dev/vg_satabeast/lv_test

#
# extract the current map using the ddmap tool (or use dd to speed things up)
#
ddmap –s /proc/net/iet/ddmap/iqn.1990-01.edu.amherst:targetname –t /tmp/lun.ddmap

#
# zap the map
#
echo -n mapzap > /proc/net/iet/ddmap/iqn.1990-01.edu.amherst:targetname.0

#
# resume the map and hence write operations
#
echo –n mapresume > /proc/net/iet/ddmap/iqn.1990-01.edu.amherst:targetname.0

#
# use ddless and the generated ddmap to read segments that have been written to
# and write them to a backup device
#
ddless –s /dev/vg_satabeast/lv_snapshot –m /tmp/lun.ddmap –t /dev/backupdevice
DDMAP Debugging and Examples
The ddmap examples section attempts to demonstrate how writes by the iSCSI initiator impact the contents of ddmap.
Add the following configuration line to modprobe.conf and reload the iscsi-target services:
options iscsi_trgt debug_enable_flags=1024
This debugging option is not recommended on a production system as it may impact input/output performance.
The following examples assume a 12 GB disk LUN that is exposed via a target to an initiator. The disk will have the following information using fdisk:
Disk /dev/sdb: 12 MB, 12582912 bytes
1 heads, 24 sectors/track, 1024 cylinders
Units = cylinders of 24 * 512 = 12288 bytes
First we issue a command to clear the current map
[root@iscsi-centos5 ~]#echo -n mapzap > /proc/net/iet/ddmap/iqn.1990-01.edu.amherst\:iet.iscsi-target0.pg-vlan10-iscsi.vg-bigdisk-vol0.lv-junk.0
Using the command line tool ddmap we can dump the contents of the current map:
[root@iscsi-centos5 ~]# ddmap -s /proc/net/iet/ddmap/iqn.1990-01.edu.amherst\:iet.iscsi-target0.pg-vlan10-iscsi.vg-bigdisk-vol0.lv-junk.0 -b
00000000: 00000000 00000000 00000000 00000000 00000000 00000000 00000000 00000000
00000020: 00000000 00000000 00000000 00000000 00000000 00000000 00000000 00000000
00000060: 00000000 00000000 00000000 00000000 00000000 00000000 00000000 00000000
Let us write one 16 KB segment at the beginning of the disk using the initiator. To view the contents of the kernel ring buffer use dmesg. Finally use ddmap to view current map:
[root@iscsi-centos5 ~]# dd if=/dev/zero of=/dev/sdb bs=16384 count=1 seek=0
1+0 records in
1+0 records out
16384 bytes (16 kB) copied, 0.00238055 seconds, 6.9 MB/s

[root@iscsi-target0 iscsi-target]# dmesg
iscsi_trgt: blockio_make_request(87) rw=1 ppos=0 tio{ pg_cnt=4 idx=0 offset=0 size=16384 }
iscsi_trgt: ddmap_lun_exec(86) ppos=0 size=16384
iscsi_trgt: ddmap_lun_exec(100) ppos=0 size=16383 (ppos_align=0)
iscsi_trgt: ddmap_lun_exec(121) map=ffffc2001017d000 map_offset=0 (u32) map_bit=0x00000001 (exp=0) size_bits=0
iscsi_trgt: ddmap_lun_exec(135) map=ffffc2001017d000 map_bit=0x00000001 size_bits=00 map_mask=00000001
iscsi_trgt: ddmap_lun_exec(153) map=ffffc2001017d000 val=00000000 mask=00000001 post

[root@iscsi-target0 iscsi-target]# ddmap -s /proc/net/iet/ddmap/iqn.1990-01.edu.amherst\:iet.iscsi-target0.pg-vlan10-iscsi.vg-bigdisk-vol0.lv-junk.0 -b
00000000: 0000000100000000 00000000 00000000 00000000 00000000 00000000 00000000
00000020: 00000000 00000000 00000000 00000000 00000000 00000000 00000000 00000000
00000060: 00000000 00000000 00000000 00000000 00000000 00000000 00000000 00000000
| Note that the first bit of the first 4 byte unsigned integer was affected. |
Next we are going to write another 16 KB segment right after the first segment:
[root@iscsi-centos5 ~]# dd if=/dev/zero of=/dev/sdb bs=16384 count=1 seek=1
1+0 records in
1+0 records out
16384 bytes (16 kB) copied, 0.00311362 seconds, 5.3 MB/s

root@iscsi-target0 iscsi-target]# ddmap -s /proc/net/iet/ddmap/iqn.1990-01.edu.amherst\:iet.iscsi-target0.pg-vlan10-iscsi.vg-bigdisk-vol0.lv-junk.0 -b
00000000: 0000000300000000 00000000 00000000 00000000 00000000 00000000 00000000
00000020: 00000000 00000000 00000000 00000000 00000000 00000000 00000000 00000000
00000060: 00000000 00000000 00000000 00000000 00000000 00000000 00000000 00000000
| Note that the second bit of the first 4 byte unsigned integer was affected. |
The next experiment writes data to the last 16 KB segment of the disk using the following commands:
[root@iscsi-centos5 ~]# dd if=/dev/zero of=/dev/sdb bs=16384 count=1 seek=767
1+0 records in
1+0 records out
16384 bytes (16 kB) copied, 0.00302301 seconds, 5.4 MB/s

[root@iscsi-target0 iscsi-target]# ddmap -s /proc/net/iet/ddmap/iqn.1990-01.edu.amherst\:iet.iscsi-target0.pg-vlan10-iscsi.vg-bigdisk-vol0.lv-junk.0 -b
00000000: 00000003 00000000 00000000 00000000 00000000 00000000 00000000 00000000
00000020: 00000000 00000000 00000000 00000000 00000000 00000000 00000000 00000000
00000060: 00000000 00000000 00000000 00000000 00000000 00000000 00000000 80000000
| Note that the highest bit of the last 4 byte unsigned integer was affected. |
Let us write to the middle (4 MB through 8 MB) of the provided disk:
[root@iscsi-centos5 ~]# dd if=/dev/zero of=/dev/sdb bs=1M count=4 seek=4
4+0 records in
4+0 records out
4194304 bytes (4.2 MB) copied, 0.121437 seconds, 34.5 MB/s

[root@iscsi-target0 iscsi-target]# ddmap -s /proc/net/iet/ddmap/iqn.1990-01.edu.amherst\:iet.iscsi-target0.pg-vlan10-iscsi.vg-bigdisk-vol0.lv-junk.0 -b
00000000: 00000003 00000000 00000000 00000000 00000000 00000000 00000000 00000000
00000020: ffffffff ffffffff ffffffff ffffffff ffffffff ffffffff ffffffff ffffffff
00000060: 00000000 00000000 00000000 00000000 00000000 00000000 00000000 80000000
| Note that all bits of row 0x00000020 have changed. |
Writing a non-aligned segment of data:
[root@iscsi-centos5 ~]# dd if=/dev/zero of=/dev/sdb bs=20000 count=1 seek=40
1+0 records in
1+0 records out
20000 bytes (20 kB) copied, 0.0171866 seconds, 1.2 MB/s
[root@iscsi-target0 iscsi-target]# dmesg
iscsi_trgt: blockio_make_request>(87) rw=1 ppos=798720 tio{ pg_cnt=1 idx=195 offset=0 size=4096 }
iscsi_trgt: ddmap_lun_exec(83) ppos=798720 size=4096
iscsi_trgt: ddmap_lun_exec(103) ppos=786432 size=16383 (ppos_align=12288)
iscsi_trgt: ddmap_lun_exec(120) map=ffffc2001017d000 map_offset=1 (u32) map_bit=0x00010000 (exp=16) size_bits=0
iscsi_trgt: ddmap_lun_exec(134) map=ffffc2001017d004 map_bit=0x00010000 size_bits=00 map_mask=00010000
iscsi_trgt: ddmap_lun_exec(152) map=ffffc2001017d004 val=00000000 mask=00010000 post
iscsi_trgt: blockio_make_request(87) rw=1 ppos=802816 tio{ pg_cnt=5 idx=196 offset=0 size=20480 }
iscsi_trgt: ddmap_lun_exec(83) ppos=802816 size=20480
iscsi_trgt: ddmap_lun_exec(103) ppos=802816 size=20479 (ppos_align=0)
iscsi_trgt: ddmap_lun_exec(120) map=ffffc2001017d000 map_offset=1 (u32) map_bit=0x00020000 (exp=17) size_bits=1
iscsi_trgt: ddmap_lun_exec(134) map=ffffc2001017d004 map_bit=0x00020000 size_bits=01 map_mask=00020000
iscsi_trgt: ddmap_lun_exec(134) map=ffffc2001017d004 map_bit=0x00040000 size_bits=00 map_mask=00060000 iscsi_trgt: ddmap_lun_exec(152) map=ffffc2001017d004 val=00010000 mask=00060000 post
[root@iscsi-target0 iscsi-target]# ddmap -s /proc/net/iet/ddmap/iqn.1990-01.edu.amherst\:iet.iscsi-target0.pg-vlan10-iscsi.vg-bigdisk-vol0.lv-junk.0 -b
00000000: 00000003 00070000
iscsi_trgt: ddmap_lun_exec(152) map=ffffc2001017d004 val=00010000 mask=00060000 post
[root@iscsi-target0 iscsi-target]# ddmap -s /proc/net/iet/ddmap/iqn.1990-01.edu.amherst\:iet.iscsi-target0.pg-vlan10-iscsi.vg-bigdisk-vol0.lv-junk.0 -b
00000000: 00000003 00070000 00000000 00000000 00000000 00000000 00000000 00000000
00000020: ffffffff ffffffff ffffffff ffffffff ffffffff ffffffff ffffffff ffffffff
00000060: 00000000 00000000 00000000 00000000 00000000 00000000 00000000 80000000
00000000 00000000 00000000 00000000 00000000 00000000
00000020: ffffffff ffffffff ffffffff ffffffff ffffffff ffffffff ffffffff ffffffff
00000060: 00000000 00000000 00000000 00000000 00000000 00000000 00000000 80000000
Given a requested blocksize of 20,000 and a seek position of 40 the starting position is 800,000 and the ending position is 820,000. However, due to the nature of sector alignment, the initiator is first forced to read neighboring sectors before commencing with the write at the desired location.
Follow the highlighted variables and values to see how the system performs two separate write requests and modifies the map’s contents.
| When blockio_make_request is invoked the alignment problem has been resolved. | |
| The first write requests impacts the range 798720 + 4096 = 802816 which | |
| when aligned to a 16 KB segment is 786432 + 16384 = 802816. | |
| This operation produces one map bit 0x00010000. | |
| The second write request impacts the range 802816 + 20480 = 823296 which | |
| is properly aligned to a 16 KB segment. | |
| The size request is larger than 16384, hence 2 map bits are produced: 0x00060000. | |
| Combining the map bits from the first write with the second write using a bitwise OR operation produces the final map of 0x0007000. |
ZFS Archive
Architecture Overview
The Solaris ZFS filesystem has built-in support not only for filesystems but also volumes, which are read/write block devices backed by the ZFS storage environment. The zfs-archive utilizes ZFS volumes for SAN backup storage. We currently support the Equallogic and the iSCSI Enterprise Target (with ddmap patches) as SAN architectures requiring backups of their LUNs. The following diagram depicts the data flow.
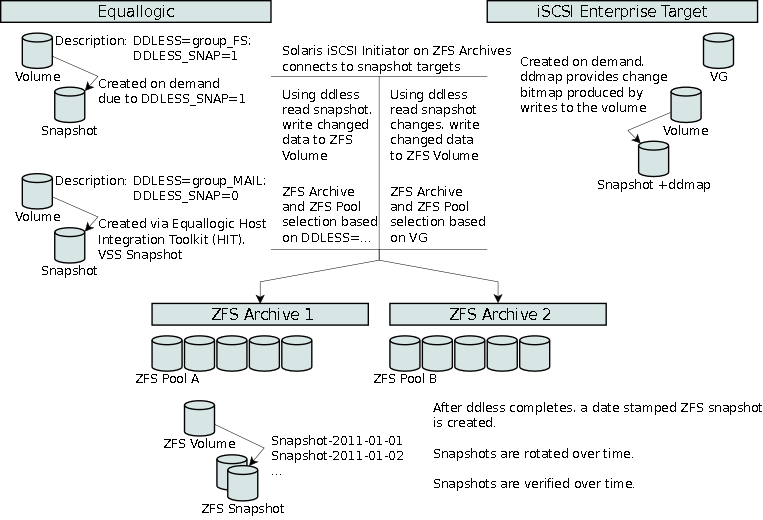
The backup of the Equallogic volumes is not as advanced as we could hope for, since an entire volume has to be read during the time of backup. Of course, one could argue to utilize native Equallogic Replication, however, that would require another Equallogic group at the archiving location.
The backup of the iSCSI Enterprise Target is highly optimized as it only reads segments that have been written to during daily operations. New or resized volumes require a complete read during the time of backup.
Multiple zfs-archive hosts are supported and in use, allowing for concurrent backups of large data sets. To reduce the actual disk usage of ZFS volumes, ddless is utilized to only write the actually changed data segments during backup. This applies to both the Equallogic and the iSCSI Enterprise Target.
Once data has been written to a ZFS volume, a snapshot is created and named using the current date and time stamp. Several meta data components are added as custom properties to the ZFS volume. Custom properties are a native feature of the ZFS file system.
Several cron jobs exist, one to handle the rotation of snapshots. A common but highly configurable rotation scheme is to keep all daily backups for 2 months, weekly backups for 4 months and monthly backups for 2 months, resulting in a total of a 1 year backup window. Another cron job verifies the consistency of the the snapshots. This can be done, because ddless keeps ddless checksums of written data. These checksums can be recreated by reading the data from the snapshot volumes, computing their checksums and verifying them against historical data.
The snapshots of ZFS volumes designate the final resting place of the backup data, however, an interface is required allowing an operator to reach this data. Currently, we are utilizing the Solaris native iSCSI Target software (in the future this will be ComStar based) to expose the ZFS snapshots. Because ZFS snapshots are read-only, ZFS snapshots are cloned and then exposed via Solaris iSCSI Target.
A user interface has been developed, called tkzfs, allowing the operator to view and access ZFS volumes and their snapshots, specifically clones of snapshots. The application tkzfs was written in Perl utilizing the Tk user interface and is supported on Solaris, Windows and Linux. The reason for cross platform support is that on each platform, tkzfs interacts with the respective iSCSI initiator to connect with the Solaris iSCSI Target. On Windows we support the Microsoft iSCSI initiator and QLogic iSCSI command line tools. On Linux, CentOS 5, we support the native iSCSI initiator software.
The tkzfs software was developed such that it presents a view of ZFS volumes and their snapshots from multiple zfs-archive hosts, providing the operator an enterprise view of their backup data.
System Installation
The zfs-archive hosts currently utilizes OpenSolaris snv_111b, 2009.06 which is a preview release of Solaris 11, hence this document will refer to the operating system and its configuration options using the term Solaris. It is possible to utilize Solaris 10, however, during testing we have found several non-fixable performance problems with network card drivers.
The installation directory of the zfs-archive software is located under /root/santools.
Solaris Native Packages
Several packages must be added to aid compiling source code and providing iSCSI initiator and target services.
$ pkg install gcc-dev
$ pkg install SUNWiscsiu
$ pkg install SUNWiscsir
$ pkg install SUNWiscsitgtu
$ pkg install SUNWiscsitgtr
$ pkg install SUNWxwinc
$ pkg install SUNWxorg-headers
$ pkg install SUNWsmmgr
The SUNWiscsiu package provides iSCSI management utilities and the SUNWiscsir package provides the iSCSI device driver component, also known as the iSCSI initiator of Solaris. The SUNWiscsitgtu package provides iSCSI target mangement utilities and SUNWiscsitgtr provides the iSCSI target daemon software.
In order to later compile the Tk software, the X11 header files are required and provided by SUNWxwinc and SUNWxorg-headers.
SNMP service startup scripts are provided by SUNWsmmgr.
Network Configuration
The default network configuration utilizes NWAM (Network Auto-Magic) which should be disabled using the following commands:
$ svcadm disable svc:/network/physical:nwam
$ svcadm enable svc:/network/physical:default
If multiple Intel e1000 interfaces are to be bundled using the link aggregation protocol use the following commands:
$ ifconfig e1000g0 down; ifconfig e1000g0 unplumb
$ ifconfig e1000g1 down; ifconfig e1000g1 unplumb
$ dladm create-aggr -l e1000g0 -l e1000g1 aggr0
$ dladm modify-aggr -L passive aggr0
$ dladm create-vlan -l aggr0 -v 10 aggr0v10s0
$ dladm create-vlan -l aggr0 -v 20 aggr0v20s0
The dladm command is part of the Solaris Crossbow project aiding with configuring virtual network interface and link aggregation.
Modify the /etc/kernel/drv/e1000g.conf file to enable large frame sizes:
MaxFrameSize=3,3;
If Intel 10Gb interfaces are used, add the following configuration values to /kernel/drv/ixgbe.conf:
default_mtu = 9000;
tx_ring_size = 4096;
rx_ring_size = 4096;
rx_group_number = 16;
Specify the static IP address in the /etc/hostname.[interface] file. Replace the [interface] part with the interface name created using the dladm command. The IP address of the first network interface eth0 is configured under /etc/hostname.eth0.
The netmask is configured using the file /etc/netmasks. Modify the /etc/defaultrouter file to contain the IP address of the network gateway.
If DNS resolution is required modify the /etc/nsswitch.conf and /etc/resolv.conf:
hosts: files dns
domain amherst.edu
nameserver 148.85.1.1
nameserver 148.85.1.3
iSCSI Initiator Configuration
To improve the performance of the iSCSI initiator, disable the TCP Nagle algorythm in the file /kernel/drv/iscsi.conf. This is discussed in detail at [solnagle].
tcp-nodelay=1;
Network Time Protocol Configuration
Add NTP reference servers to /etc/inet/ntp.conf as follows:
server 148.85.1.10
server 148.85.1.11
Enable the NTP service.
$ svcadm enable ntp
SSH Configuration
The windows based tkzfs tool requires the use of PUTTY’s plink software to access the zfs-archive host. Several SSH ciphers have to be added to Solaris for the connectivity to function:
# support PUTTY plink...
Ciphers aes256-cbc,aes128-cbc,3des-cbc,blowfish-cbc
Third Party Packages
Some of the following third party packages are required depending on the deployment configuration.
-
ddless
-
socat
-
Tk-804
ddless is the data transfer tool used to read data from both the Equallogic and the iSCSI Enterprise Target and write data to ZFS volumes. ddless is required.
socat is used in conjunction with an advanced tool called zfs_copy.plx and only when zfs_copy.plx is used to transfer data across hosts.
Tk-804 is only required if the operator desired to run tkzfs on the Solaris system directly.
The following sections explain the installation of these tools. All tools are provided in form of a compressed tar archive.
ddless
The ddless package provides two command line tools: ddless and ddmap. Ensure that both tools end up under /root/santools/bin.
$ tar -zxvf ddless-2.1.tar.gz
$ cd ddless-2.1
$ make
gcc -O3 -Wall  -DSUNOS   -c -o dd_file.o dd_file.c
gcc -O3 -Wall  -DSUNOS   -c -o dd_murmurhash2.o dd_murmurhash2.c
gcc -O3 -Wall  -DSUNOS   -c -o dd_log.o dd_log.c
gcc -O3 -Wall  -DSUNOS   -c -o dd_map.o dd_map.c
gcc -O3 -Wall  -DSUNOS   -c -o ddless.o ddless.c
gcc -O3 -Wall  -DSUNOS  -o ddless dd_file.o dd_murmurhash2.o dd_log.o dd_map.o ddless.o -lz
gcc -O3 -Wall  -DSUNOS   -c -o ddmap.o ddmap.c
gcc -O3 -Wall  -DSUNOS  -o ddmap ddmap.o dd_file.o dd_log.o dd_map.o -lz
$ cp ddless ddmap /root/santools/bin
socat
socat is a highly configurable communication tool, similar to netcat.
$ tar -zxvf socat-1.7.1.1.tar.gz
$ cd socat-1.7.1.1
$ ./configure
$ make
$ cp socat /root/santools/bin
Tk
Tk requires a special build script for Solaris which is provided below:
#!/bin/sh

prog=Tk-804.028_501

rm -fr $prog
tar -zxvf $prog.tar.gz
cd $prog
perl Makefile.PL CCCDLFLAGS="-fPIC" OPTIMIZE="-O2"

for m in $(find . -name "Makefile"); do
        echo $m
        cat $m | sed -e 's/CCCDLFLAGS = .*/CCCDLFLAGS = -fPIC/' > /tmp/m
        mv /tmp/m $m
        cat $m | sed -e 's/OPTIMIZE = .*/OPTIMIZE = -O2/' > /tmp/m
        mv /tmp/m $m
done

make

echo "do a make test, make install when you are ready"
santools
The santools directory structure contains command line tools to backup and restore data from and to the Equallogic SAN and the iSCSI-Target SAN. New SAN architectures can be adopted by providing interfaces for SAN management and instantiating slightly modified copies of the *_luncopy.plx and *_restore.plx scripts.
The santools directory consists of the following components:
- santools
-
This directory makes up the management tools of the ZFS Archive host.
- bin/
-
Contains binaries previously built in the ZFS System Installation section such as ddless, ddmap, socat.
- cron_update.plx
-
Multiple ZFS Archive hosts require crontab management, cron_update.plx performs automated crontab editing.
- ddless_maint.sh
-
Validates current ddless checksums of ZFS volumes.
- devfsadm_job.sh
-
Cleans not in use logical device links
- disk_list.plx
-
List currently attached disks and their serial number, size and attachment.
- disk_size.plx
-
Display disk size.
- eql_luncopy_job.sh
-
Cron job invocation wrapper of Equallogic SAN backup.
- eql_luncopy.plx
-
Equallogic specific LUN backup tool.
- eql_restore.plx
-
Equallogic specific LUN restore tool.
- etc/
-
Contains configuration files.
- config.pm
-
Contains configuration data that utilized by santools.
- format_label
-
Input file for format command, used when processing LUNs greater than 2 TB.
- sync_exclude.conf
-
Multiple ZFS Archive hosts are managed using rsync. This file contains exclusions.
- sync_include.conf
-
Multiple ZFS Archive hosts are managed using rsync. This file contains inclusions.
- iet_luncopy_job
-
Cron job invocation wrapper of iSCSI Enterprise Target SAN backup.
- iet_luncopy.plx
-
iSCSI Enterprise Target specific LUN backup tool.
- iet_restore.plx
-
iSCSI Enterprise Target specific LUN restore tool.
- lib/
-
Contains library files use by santools.
- common.pm
-
A common perl library providing database access, parallelization functions, logging and resource locking.
- EqlScript.pm
-
Equallogic vendor provided interface.
- eqlutil.pm
-
Interface wrapper for many Equallogic specific functions.
- ietutil.pm
-
Interface wrapper for iSCSI Enterprise Target and Logical Volume Management (LVM) functions.
- Sun2Tb.pm
-
SUN specific module to detect and handle devices over 2 TB and no GPT partition table.
- SunDiskInfo.pm
-
Interface wrapper for obtaining disk meta data.
- SunIscsiInitiator.pm
-
Interface wrapper for the Solaris iSCSI initiator.
- SunZfs.pm
-
Interface wrapper for the Solaris ZFS commands.
- log/
-
Contains a log files produced by santools specific cron jobs.
- ndd.sh
-
Script to optimize the network stack parameters.
- path_to_inst_fix.plx
-
Purges unused entries in /etc/path_to_inst.
- port_inc_get.plx
-
Utilized by zfs_copy.plx when involving remote systems as targets.
- snapcheck_job.sh
-
Cron job invocation wrapper of the snapshot verification tool.
- snapcheck.plx
-
Verifies existing ddless checksums against ZFS volume snapshots.
- snaprotate_job.sh
-
Cron job invocation wrapper of the ZFS snapshot rotation feature.
- snaprotate.plx
-
Manages ZFS snapshots based on configurable schedules.
- src/
-
Contains the source code of programs specifically compiled for santools.
- state/
-
Contains stateful information of santools.
- sync_all.sh
-
Synchronizes all zfs-archive hosts.
- sync_host.sh
-
Configures the current hosts’s iSCSI initiator settings.
- tkzfs*
-
Contains the GUI tool tkzfs.
- zfs_copy.plx
-
Copies ZFS file systems and volumes including related snapshots. Supports copying to remote systems.
- zfs_customprop_del.sh
-
Script to remove custom property from a ZFS file system or volume.
- zfs_customprop_set.sh
-
Script to define a custom property for a given ZFS file system or volume.
- zfs_df.sh
-
Output a list df like listing of ZFS volumes.
- zfs_list.sh
-
Output a complete listing of ZFS volumes and their snapshots.
- zfs_zvols.plx
-
Output a human readable and machine parsable report of zpool and ZFS volumes.
Equallogic
The following sections describe the details of interacting with the Equallogic SAN and its backup and restore tools.
Equallogic Volume Backup
The backup script has been for historical reasons called eql_luncopy.plx as we had initially developed a system/process specific to copying LUNs, hence eql_luncopy.plx.
The backup process can either copy a single volume from the a given Equallogic group or a set of volumes using a filter. The filter is defined as a string and submitted to the backup process. The backup process parses the comment field located in volumes on the Equallogic to determine if the volume is part of the filter. Below is an example of this showing two Equallogic volumes:
Volume Name: lv-sample-d
Description:  Sample LUN (DDLESS=FILE_A)

Volume Name: lv-mail-exchmdb-d
Description:  Mail Server Mailbox Stores (DDLESS=MAIL_A,DDLESS_SNAP=0)
The description field, even so it is free-form, has been laid out to support structured data that other programs can read, parse and interpret. Parentheses are used to denote a group of options designated for a specific software component. In this case, the label DDLESS= followed by the optional label DDLESS_SNAP= is utilized by eql_luncopy.plx.
When backing up using a filter specification, all Equallogic volumes are enumerated, however, only the ones with a matching DDLESS=_ value are chosen.
The DDLESS_SNAP=0 property can be set to inform eql_luncopy.plx to skip creating a current snapshot of the Equallogic volume and instead use an existing snapshot created by HIT (Host Integration Toolkit). This is commonly configured for Microsoft Exchange database volumes.
$ ./eql_luncopy.plx [-h] [-g eqlogicname] -s volume | -f ddless_filter,...

-h      help
-g      equallogic name
-s      process a specific volume
-f      filter on DDLESS=___ to process a set of volumes, multiple
        filters can be specified separated with commas.
The -g option specifies the name of the Equallogic system as defined in etc/config.pm. The -s option requires the Equallogic volume name to be backed up. The -f option provides the filter value described above. The operator can backup either by volume or ddless filter value.
The job arguments do not specify the destinations zpool as it would be cumbersome to manually invoke a backup at a given moment. The destination location must stay consistent in order to minimize backup storage. Hence, several configuration options are defined in config.pm that are relevant to the Equallogic:
        #---------------------------------------------------------------------------
        # equallogic group configuration(s)
        #---------------------------------------------------------------------------
        'default_eqlogic' => 'g-elogic0',
        'g-elogic0' =>
                {
                        'ip' => 'x.x.x.x',
                        'user' => 'grpadmin',
                        'pass' => '?',

                        'concurrent_workers' => 4,
                },
The above configures a default_eqlogic device which requires details such as the ip, user, pass and concurrent_workers. The first three parameters are used to connect with the Equallogic SAN using telnet. The concurrent workers parameter must be manually tuned to the hosts ability to concurrently run jobs. Keep in mind, that each job using ddless is highly multithreaded, using 4 concurrent threads. Having 4 concurrent workers running with each 4 concurrent input/output threads means your system is 16 concurrent input/output threads.
The next section defines which zfs-archive host is to handle which filter values and their destination zpools:
        #---------------------------------------------------------------------------
        # eqlogic luncopy map: there are multiple zfs archive hosts, each
        # responsible for specific ddless filter tags, writing data
        # to a specific zpool. Each zpool is required to have a file system called
        # zpool/ddless to store the ddless checksum files
        #---------------------------------------------------------------------------
        'eql_luncopy_map' =>
        {
                'zfs-archive1' =>
                {
                        'expose_snapshots_to_ip' => 'x.x.x.x',

                        'filter_pool_map' =>
                        {
                                'MAIL_A'                => 'vg_satabeast1_vol0',
                                # continue with filters...
                        },

                        'pool_default' => 'vg_satabeast1_vol1',
                        'pool_zfs_options' =>
                        {
                                # production zfs-archive1
                                'vg_satabeast1_vol0' =>
                                        '-o compression=on '.
                                        '-o refreservation=none '.
                                        '-o edu.amherst:snaprotate_schedule=SNAP_ROTATE_A',

                        },
                },

                'zfs-archive2' =>
                {
                        'expose_snapshots_to_ip' => 'x.x.x.x',
                        'filter_pool_map' =>
                        {
                                'FILE_A'              => 'vg_satabeast2_vol0',
                                # continue with filters...
                        },

                        'pool_default' => 'vg_satabeast2_vol0',
                        'pool_zfs_options' =>
                        {
                                # production zfs-archive2
                                'vg_satabeast2_vol0' =>
                                        '-o compression=on '.
                                        '-o refreservation=none '.
                                        '-o edu.amherst:snaprotate_schedule=SNAP_ROTATE_A',
                        },
                },
        },
The eql_luncopy_map hash supports multiple zfs-archive hosts. In the example above, zfs-archive1 and zfs-archive2.
To expose a snapshot from the Equallogic to a zfs-archive host an Access Control entry must be created for a given IP address. The element expose_snapshots_to_ip defines the IP address. The Equallogic supports Access Control entries using IP address, IQN, and CHAP. The eql_luncopy.plx script supports access control using the IP address of the zfs-archive host. This functionality will change in the future to support all options.
The Equallogic Access Control entry only exists for the duration of the backup. The Access Control entry applies to the snapshot only and not the volume.
The filter_pool_map defines which volumes matching the specified filter value are backed up to which zpool location. A pool_default can be specified in case a volume is chosen that does not have a DDLESS= definition in the description of the Equallogic volume.
In the above example, the filter value MAIL_A is backed up to +vg_satabeast1_vol0'. The prefix vg means volume group and is the intended equivalent of a zpool.
Each zpool location requires ZFS creation options that a directly utilized when creating ZFS volumes. The example above shows that compression is enabled on newly created volumes, the refreservation is set to none, allowing snapshots being created as long as there is enough zpool space (refer to man zfs for more details). A custom attribute is added to each ZFS volume, namely a edu.amherst:snaprotate_schedule attribute with a value of SNAP_ROTATE_A. ZFS supports the addition of custom properties which can be named using the reverse components of the current domain name followed by a colon and then any string. The snapshot rotation facility is explained later in this document.
Equallogic Volume Backup Details
For a given Equallogic volume, connecting with the Equallogic unit is the first step during the backup process. An Equallogic volume snapshot is created or utilized depending on the DDLESS_SNAP settings in the description of the Equallogic volume. Retrieve the iSCSI target’s IQN (iSCSI qualified name). The target in this context refers to the snapshot we will be reading from. Disconnect from the Equallogic environment as this control session will timeout during the backup process.
The Solaris iSCSI initiator establishes a connection with the Equallogic unit using the previously obtained IQN of the Equallogic snapshot target. The Equallogic supports only a single LUN per target, hence we can process LUN 0 without enumerating other LUNs.
Before data can be written, a ZFS volume is provisioned. This step also requires the verification of volume size changes. If the source volume size has changed, modify the ZFS volume size.
Each ZFS volume has a related ddless checksum file. A checksum is computed for every 16 KB segment read from the source volume. The checksum is computed using the CRC32 and Murmur Hash function. When volume sizes change, ddless will recreate the ddless checksum file. Normally that would also cause all data to be written again which is not desired. Because of that, the backup process re-creates the checksum file using the current ZFS volume, that has been grown, as its source. Once the step is complete, the checksum file size is valid in relation to the source volume and backup volume.
The ddless process is now invoked reading all data from the source volume, computing checksums on the fly and comparing them to the existing checksums. If there are checksum differences, data is written to the ZFS volume, more specifically, only the actual changes are written to the ZFS volume.
Once ddless has completed, a backup of the current ddless checksum is made to aid the snapshot verification process. Next, it creates a ZFS snapshot of the ZFS volume using the current time stamp as the name of the snapshot.
Cleanup steps include disconnecting the Solaris iSCSI initiator session, reconnecting with the Equallogic unit and removing the snapshot from the Equallogic. Snapshots are retained on the Equallogic if the DDLESS_SNAP setting in the description field of the Equallogic volume was utilized.
Equallogic Volume Restore
The restore script eql_restore.plx allows the operator to restore data from a ZFS volume or ZFS volume snapshot to a new Equallogic volume. The script does not permit the use of an existing volume for safety reasons.
$ ./eql_restore.plx [-h] -s zvol [-g eqlogicname] -t volume

-h      help

-s      source zfs volume (zpool/zvol or zpool/zvol@snapshot)
-g      equallogic name (must be defined in eql.conf, default g-elogic0)
-t      target equallogic volume (must NOT exist)
The -g option specifies the name of the Equallogic system as defined in etc/config.pm. The -s option specifies the ZFS source volume or volume snapshot. The -t option specifies the Equallogic target volume name, it must not already exist.
iSCSI Enterprise Target
The following sections describe the details of interacting with the iSCSI Enterprise Target SAN and its backup and restore tools.
iSCSI Enterprise Target Volume Backup
The backup script has been for historical reasons called iet_luncopy.plx as we had initially developed a system/process specific to copying LUNs, hence iet_luncopy.plx.
$ ./iet_luncopy.plx -h
./iet_luncopy.plx [-h] -a [-i] | -s vg/lv [-i] | -l

-h      help

-a      process all volumes
-s      process single vg/lv

-i      integrity check of last vg/lv luncopy operation

-l      show a listing of candidate volumes
Similarly as the eql_luncopy.plx script, the iet_luncopy.plx does not expose all options at the command line to reduce operator interaction complexity. The iet_luncopy.plx tool can list candidate backup volumes using the -l option and backs up either a single volume using the -s option from the iSCSI Enterprise Target or all volumes using the -a option.
The santools/etc/config.pm file contains the following configuration details interacting with the iscsi-target hosts:
        #
        # iet group configuration
        #
        'iet_cluster' =>
        {
                'iscsi-target-node1' =>
                {
                        'discovery_ip' => 'x.x.x.x',
                        'enabled' => 1,
                        'zfs_prefix' => 'iscsi',
                },
                'iscsi-target-node2' =>
                {
                        'discovery_ip' => 'x.x.x.x.',
                        'enabled' => 1,
                        'zfs_prefix' => 'iscsi',
                }
        },
The above example configures two iscsi-target nodes. Each host is accessed using ssh and a ssh private/public key located under etc/id_rsa_iscsi_target. Following each host, the iSCSI discovery IP address is defined. Each host can be enabled or disabled during backup and the ZFS volume prefix defaults to iscsi. The Equallogic does not have such prefix definition because the Equallogic’s group name is used as the prefix.
The next configuration section shows which iSCSI Enterprise Target logical volumes are backed to which ZFS pools.
        'iet_luncopy_map' =>
        {
                'zfs-archive1' =>
                {
                        'pool_map' =>
                        {
                                'vg_satabeast8_vol0' => 'vg_satabeast7_vol0',
                                'vg_satabeast8_vol1' => 'vg_satabeast7_vol1',
                        },

                        'zfs_options' =>
                                '-o compression=on '.
                                '-o refreservation=none '.
                                '-o edu.amherst:snaprotate_schedule=SNAP_ROTATE_A',
                },
         },
The above pool mapping indicates that zfs-archive1 host is responsible for backing up Linux LVM based logical volumes originating from vg_satabeast8_vol# to the ZFS pool named vg_satabeast7_vol#.
Each zpool location requires ZFS creation options that a directly utilized when creating ZFS volumes. The example above shows that compression is enabled on newly created volumes, the refreservation is set to none, allowing snapshots being created as long as there is enough zpool space (refer to man zfs for more details). A custom attribute is added to each ZFS volume, namely a edu.amherst:snaprotate_schedule attribute with a value of SNAP_ROTATE_A. ZFS supports the addition of custom properties which can be named using the reverse components of the current domain name followed by a colon and then any string. The snapshot rotation facility is explained later in this document.
iSCSI Enterprise Target Volume Backup Details
Before the backup process begins, a naming convention detail must be addressed. LVM logical volumes on Linux reside on volume groups. The complete name of a volume is the volume group followed by the logical volume name. The backup process strips the volume group component from the volume which assumes that the operator does not maintain duplicate logical volume names and also allows the operator to see a clean name space when restoring data.
The iet_backup.plx script interacts with the iscsi-target servers using ssh and the script located at /etc/iscsi-target/zfs_tools.sh.
The zfs_tools.sh script is invoked to initiate the establishment of a snapshot of a given volume and to provide meta data about the snapshot specifically the target name of the snapshot. The target name, IQN (iSCSI Qualified Name) is what the Solaris iSCSI initiator connects before backing up the actual data.
If the backup process was invoked with the -i option, the integrity feature is requested. The integrity feature generates the ddless checksum of the snapshot volume on the iscsi-target host. It then derives a hash that can be compared with the data on the zfs-archive host after the backup process has completed. If the hashes differ, then a data inconsistency error has occurred. We have found that this issues does not occur under normal circumstances. Volumes that have data inconsistencies are marked as DDMAP_DIRTY meaning they will be read completely on the next backup cycle.
The backup process obtains the ddmap data from the iscsi-target host of the volume currently being backed up. The ddmap data allows the backup process to only read segments of data that have been written to by initiators connected with the iscsi-target host. If the ddmap state is DDMAP_CLEAN, then the ddmap data can be used. If the state is DDMAP_DIRTY, then a complete read occurs.
The Solaris iSCSI initiator establishes a connection with the iscsi-target host (or the iscsi-portal) using the previously obtained IQN of the LVM snapshot target. The iscsi-target hosts is engineered to only support a single LUN per target. This is not a limitation of iSCSI Enterprise Target, it is a limit imposed by the iscsi-target’s support tools. Supporting only a single LUN allows the backup process to manage only LUN 0 without enumerating other LUNs.
Before data can be written, a ZFS volume is provisioned. This step also requires the verification of volume size changes. If the source volume size has changed, modify the ZFS volume size.
Each ZFS volume has a related ddless checksum file. A checksum is computed for every 16 KB segment read from the source volume. The checksum is computed using the CRC32 and Murmur Hash function. When volume sizes change, ddless will recreate the ddless checksum file. Normally that would also cause all data to be written again which is not desired. Because of that, the backup process re-creates the checksum file using the current ZFS volume, that has been grown, as its source. Once the step is complete, the checksum file size is valid in relation to the source volume and backup volume.
The ddless process is now invoked reading data from the source volume using ddmap to indicate which 16 KB segments it should read, computing checksums on the fly and comparing them to the existing checksums. If there are checksum differences, data is written to the ZFS volume, more specifically, only the actual changes are written to the ZFS volume.
Once ddless has completed, a backup of the current ddless checksum is made to aid the snapshot verification process. Next, it creates a ZFS snapshot of the ZFS volume using the current time stamp as the name of the snapshot.
Cleanup steps include disconnecting the Solaris iSCSI initiator session and removing the iscsi-target snapshot.
iSCSI Enterprise Target Volume Restore
The restore script iet_restore.plx allows the operator to restore data from a ZFS volume or ZFS volume snapshot to a new iscsi-target LVM volume. The script does not permit the use of an existing volume for safety reasons.
$ ./iet_restore.plx -h
./iet_restore.plx [-h] -s zvol -g volumegroup -t volume

-h      help

-s      source zfs volume (zpool/zvol or zpool/zvol@snapshot)
-g      volume group (the host is determined by querying members of 'iet_cluster'
-t      target iet volume (must NOT exist)
The -g option specifies the name of destination volume group which must be identified within the iet_cluster configuration of the santools/etc/config.pm file. The destination volume group implies which iscsi-target host it involves. The -s option specifies the ZFS source volume or volume snapshot. The -t option specifies the LVM logical volume name, it must not already exist.
Solaris 2 TB Disk Read/Write Issue
During the development of the santools suite for the zfs-archive hosts it has been noticed that there can be problems reading data from LUNs greater than or equal to 2 TB. Anytime, this section refers to reading, it also applies to writing.
Before ddless reads data from a device, it seeks to the end of the device to determine how large it is. Devices that are larger than 2 TB and have no partition table, appear to have a size of 0 bytes when the seek operation is performed.
Research indicates that the disk geometry can be obtained by using prtconf or by calling ioctl and requesting for the disk information defined in DKIOCGMEDIAINFO. It might be logical to say, just use DKIOCGMEDIAINFO to get the disk size, instead of the seek to the end; however, that makes matters worse. If the process reads from the device starting, reveals that Solaris constantly performs MODE SENSE, READ, MODE SENSE, READ, …. The mode sense attempt to determine the disk size, then it reads a block and on it goes. The MODE SENSE inquiries are wasting performance to the point when we used to read at 110 MB/s we are now reading 30 MB/s - so this is not going to work.
The solution is the apply an EFI partition label and then Solaris happily reads the device data at full speed.
The issue with "blindly" applying an EFI label is that the label occupies some of the space at the beginning and end of the disk. The 2TB.pm module takes care of reading the first 64 KB and last 64 KB of a large device and storing that in temporary files. Then the EFI label is applied. Once the data is normally processed with ddless, the temporary files are applied to the current backup volume.
This process only applies to volumes greater than 2 TB. The iet_luncopy.plx, iet_restore.plx and eql_luncopy.plx, eql_restore.plx have been modified to support devices greater than 2 TB.
TkZFS
The TkZFS tool was created to aid visual management of the zfs-archive snapshots. TkZFS presents the backup volumes and snapshots from multiple zfs-archive hosts in a hierarchical tree structure, displaying details on a neighboring panel. From the user interface the operator can create clones of snapshots and expose them to specific iSCSI initiators. Depending on the operating system, the TkZFS tool can mount the clone’d snapshots by interacting with the native operating system iSCSI initiator. On Windows the Microsoft iSCSI initiator and QLogic command line interface are supported. On Linux the open-iscsi initiator is supported.
TkZFS User Interface
The TkZFS tool can be invoked from the command as follows:
$ ./tkzfs.sh
The following screen shot was taken on Solaris:
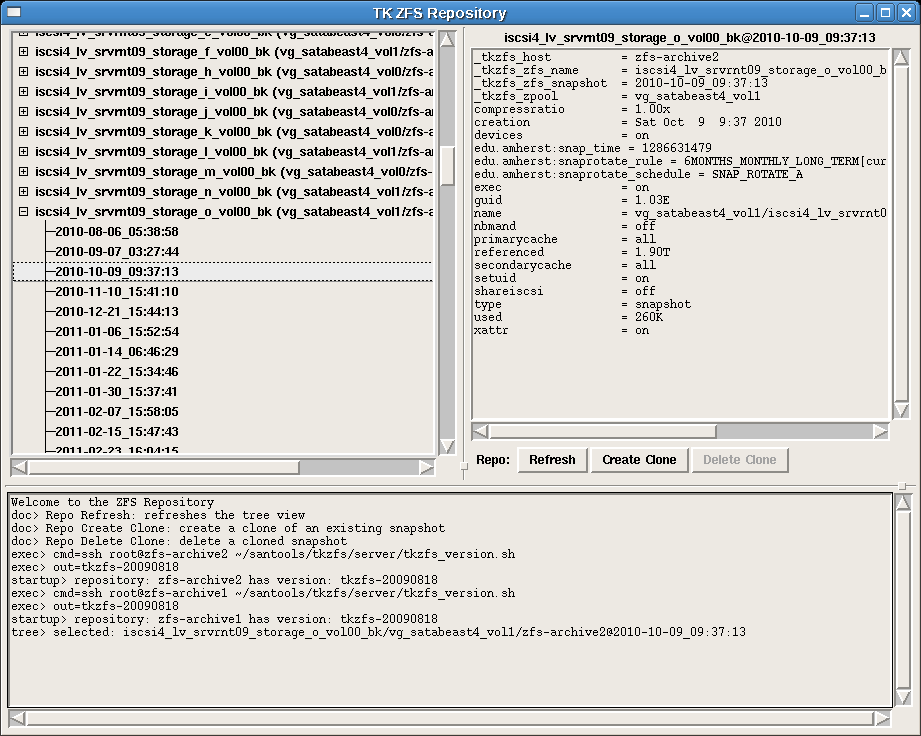
The user interface provides functions to refresh the tree view, create clone of a selected snapshot and remove a clone. Snapshots in ZFS are read-only hence a clone has to be created allowing the clone to be readable and writable. Once the clone is removed, data written to the clone is lost.
The following screen shot was taken on Windows:
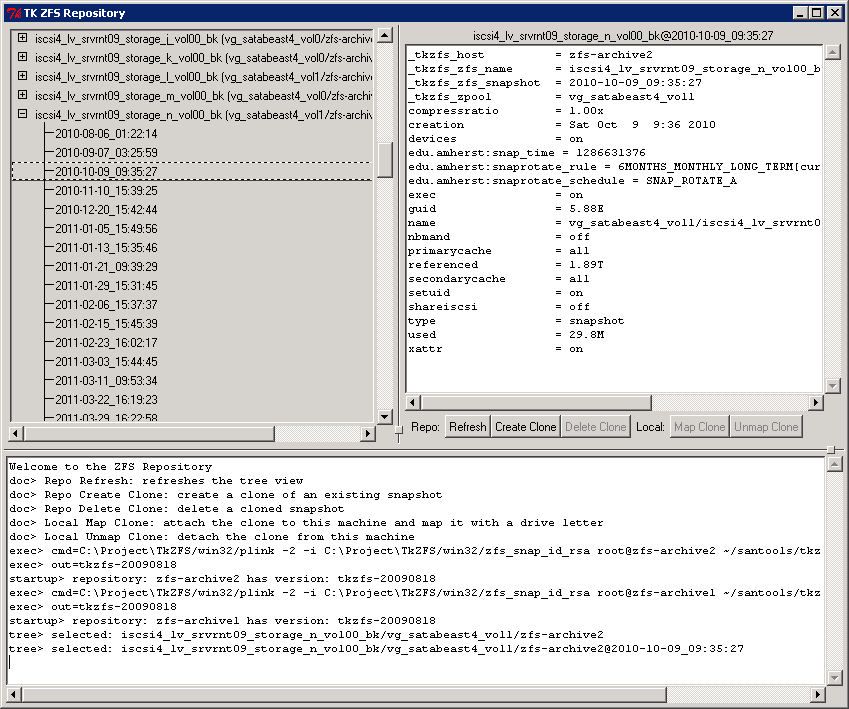
The user interface for Windows provides additional features to map and unmap a clone.
TkZFS Create Clone
The operator can create a ZFS clone of an existing ZFS snapshot only. A ZFS snapshot is inherently read-only and hence is not suitable for exposure via iSCSI or FC target - specifically the "shareiscsi=on" property cannot be modified on ZFS snapshots.
The following dialog allows the operator to specify the details of creating a clone from a snapshot:
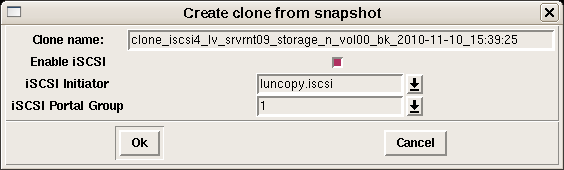
- Clone Name
-
The clone name can be modified and is by default prefixed with the label "clone_" followed by the complete ZFS volume and snapshot name. The "@" symbol that normally separates the volume and snapshot name has been replaced with an underscore.
- Enable iSCSI
-
When the checkbox is set, the "shareiscsi=on" property will be set on the ZFS clone, allowing access to the clone by an iSCSI initiator. This feature utilizes the traditional iSCSI target daemon in Solaris. In the future this requires some work to make this compatible with Comstar (a kernel based implementation of Solaris iSCSI Target and Fiber Channel target).
- iSCSI Initiator
-
If the clone is exposed via iSCSI, this drop down option allows the operator to select which iSCSI initiator can access this clone. The list of iSCSI initiators is controlled via the iscsitadm list initiator command on Solaris.
- iSCSI Portal Group
-
This value defaults to 1 and should not be changed.
TkZFS Delete Clone
The operator can delete a ZFS clone by first selecting a clone and then choosing the Delete Clone button. The operation can take some time depending on the number of changes the clone has processed. Ensure that the iSCSI initiator has been disconnected from the clone’s iSCSI target service.
TkZFS Map Clone
The concept of mapping a clone means to connect with an iSCSI initiator to the clone’s LUN and to possibly mount a file system from the first disk partition. The later part applies specifically to Windows. On Linux the clone’s LUN appears in the operating system and no file systems are mounted as it is unclear how the data is structured on the disk, partitions versus LVM, for example.
On Windows, mapping a clone invokes the Disk Management user interface (diskmgmt.msc). Then the iSCSI initiators connects with the clone’s LUN. After a short period of time, a new disk appears in the Disk Management tool. TkZFS then attempts to mount the first partition’s file system and assigns it the next available drive letter. If any of these operations fail, the operator can retry the map operation.
On Linux, mapping a clone only provides a device path specification, such as /dev/sd_. The operator is then responsible for activating LVM volume groups, for example.
There is no concept of mapping a clone for VMware ESX or ESXi because it is sufficient to expose the ZFS clone to VMware and then mount the VMFS file system from the exposed LUN. The specific operation in VMware ESXi 4.x is to add new storage and then choose to either keep the disk signature or to make a new signature.
TkZFS Unmap Clone
The unmap clone operation performs the exact same steps as the map clone operation described above in reverse order.
TkZFS Server and Client
The TkZFS subsystem consists of a server and client component.
The server component consists of several scripts to maintain the TkZFS tree data and to interact with the local iSCSI target component of Solaris (currently iscsitadm is implemented, a future version will utilize the Comstar architecture).
The client component is a multi-platform software package written in Perl and requires the Perl Tk package to be installed.
TkZFS Server
The TkZFS server component resides on each zfs-archive host under santools/tkzfs/server.
-rwxr-xr-x 1 root root       25 2009-05-02 21:09 iscsitadm.sh
-rwxr-xr-x 1 root root       74 2009-01-17 21:06 iscsi_target_get_iname.sh
-rwxr-xr-x 1 root root       67 2009-01-12 20:24 iscsi_target_list_initiators.sh
-rwxr-xr-x 1 root root       57 2009-01-12 20:24 iscsi_target_list_portalgroups.sh
-rwxr-xr-x 1 root root      107 2009-01-17 21:12 iscsi_target_lun0_guid.sh
-rwxr-xr-x 1 root root       54 2009-08-18 12:46 tkzfs_version.sh
-rwxr-xr-x 1 root root       24 2009-05-05 22:47 zfs.sh
-rw-r--r-- 1 root root 11345861 2011-07-03 22:25 zfs_tree.cache
-rw-r--r-- 1 root root      134 2009-08-17 22:28 zfs_tree.conf
-rwxr-xr-x 1 root root      869 2009-10-10 22:25 zfs_tree.sh
There are several wrapper scripts to provide support for iscsitadm and zfs commands. They are invoked by the TkZFS client component via SSH. The zfs_tree.cache file is maintained by a cron job running every 3 hours executing the zfs_tree.sh script. The zfs_tree.conf file contains no operator configurable options.
TkZFS Client
The TkZFS client component must be copied to a client workstation running Windows, Linux or Solaris. It consists of the following files and requires initial configuration.
-rw-r--r-- 1 root root 1909 2009-08-18 12:39 config.pm
| TkZFS client configuration file | |
| Platform specific TkZFS component | |
| Multi-platform TkZFS component | |
| Update batch or shell script for TkZFS client |
The win32 directory contains Windows specific utilities such as putty, disk-vpd.exe Disk Vital Product Data derived from [mslunvpd] and WriteProt.exe Disk Media Write Protection tool from [joewriteprot].
#
# tkzfs config
#
package config;
use strict;
require Exporter;

use Data::Dumper;
use File::Basename;
use Sys::Hostname;

my $ROOT = dirname($0);

our @ISA = qw(Exporter);
our @EXPORT = qw(
        %cfg
        );

our %cfg = (
        #
        # the application's root directory
        #
        'root_dir' => $ROOT,

        #
        # local version
        #
        'version' => 'tkzfs-20090818',

        #
        # currently known repositories
        #
        'repositories' =>
        {
                'zfs-archive1' =>
                {
                        'comment' => 'repo-A',
                        'enabled' => 1,
                        'iscsitadm_portalgrp' => '1',
                        'iscsi_target_ip' => 'x.x.x.x',
                },
                'zfs-archive2' =>
                {
                        'comment' => 'repo-B',
                        'enabled' => 1,
                        'iscsitadm_portalgrp' => '1',
                        'iscsi_target_ip' => 'x.x.x.x',
                },
        },

        #
        # OS dependent settings
        #
        'os' =>
        {
                'MSWin32' =>
                {
                        'ssh' => "$ROOT/win32/plink -2 -i $ROOT/win32/zfs_snap_id_rsa root\@",
                        'mapclone' => 1,
                        'qla_cmd' => '"C:\Program Files\QLogic Corporation\SANsurferiCLI\iscli"',
                },
                'solaris' =>
                {
                        'ssh' => "ssh root\@",
                        'mapclone' => 0,                # not implemented
                },
                'linux' =>
                {
                        'ssh' => "ssh root\@",
                        'mapclone' => 1,
                },
        },

        #
        # host dependent settings
        #
        'host' =>
        {
                'zfs-archive1' =>
                {
                },

                'zfs-archive2' =>
                {
                },

                'host-win' =>
                {
                        'zfsrepo_iscsitadm_initiator' => 'host-win.iscsi',
                        'iscsi_hba' => 'ms_iscsi',
                },

                'host-qla' =>
                {
                        'zfsrepo_iscsitadm_initiator' => 'host-qla.iscsi',
                        'iscsi_hba' => 'qla_iscsi',
                        'iscsi_hba_instance' => '0',
                },

                'host-linux' =>
                {
                        'zfsrepo_iscsitadm_initiator' => 'host-linux.iscsi',
                        'iscsi_hba' => 'open_iscsi',
                },
        },
The version field value indicates the version of TkZFS. It is important to note that the actual version value is controlled on the server side of TkZFS via santools/tkzfs/server/tkzfs_version.sh. If the version numbers don’t match then the update.* script is invoked to update the TkZFS client component. This requires the correct version to be configured under santools/tkzfs/client/config.pm, because when the client is updated, it receives a fresh copy of santools/tkzfs/client/config.pm.
The repositories section contains multiple references to different ZFS repositories. Each repository is configured with a comment field. The enabled field allows the operator to temporarily disable/enable access to a specific zfs-archive host. The iscsiadm_portalgrp attribute must currently contain the fixed value 1. The iscsi_target_ip is the IP address of the iSCSI target services on the zfs-archive. The TkZFS’s client’s iSCSI initiator establishes a connection using the iscsi_target_ip address.
The os section contains configuration options depending on the operating system. Operating systems must support the configuration of a ssh channel between the TkZFS client and TkZFS server component. The mapclone feature is currently only enabled for Windows and Linux hosts (based on current needs). The qla_cmd feature is specific to iSCSI QLogic HBAs using the iscli command line utilities.
The host section identifies configuration options specific to the host on which the TkZFS client executes on. The above example shows no configuration options on the zfs-archive hosts because the mapclone feature is not currently implemented in the user interface on Solaris. Other hosts that support the mapclone feature require the configuration of the iSCSI initiator name alias, zfsrepo_iscsitadm_initiator. This alias is specified when creating an iSCSI initiator reference on the zfs-archive host using iscsitadm create initiator --iqn iSCSI_node_name local_initiator command. This alias is used as the default value for the iSCSI Initiator in the "Create clone from snapshot" dialog. The iscsi_hba value depends on the operating system and HBA: ms_iscsi refers to Microsoft iSCSI, qla+iscsi refers to QLogic iSCSI HBA which also requires the iscsi_hba_instance value and the open_iscsi on Linux.
Snapshot Rotation
ZFS Snapshots are tagged with a user-defined attribute/value pair during snapshot creation. This tag is controlled by zfs_options under santools/etc/config.pm such as: -o edu.amherst:snaprotate_schedule=SNAP_ROTATE_A.
A crontab entry invokes the snapshot rotation job santools/snaprotate_job.sh every night to prune older snapshots. The shell script is a wrapper that manages rotation log files and history. The actual snapshot rotation code is controlled by santools/snaprotate.plx.
./snaprotate.plx [-h] -s zfs_object | -a [-n]

-h      help
-a      process all zfs volumes and filesystems, only choose those that have the
        custom property edu.amherst:snaprotate_schedule defined
-s      process a specific zfs volume or filesystems, the custom property
        edu.amherst:snaprotate_schedule must be defined
-n      simulate, no changes are made
The above command can be run on either all ZFS volumes or specific ZFS volumes containing snapshots that contain the custom property edu.amherst:snaprotate_schedule. The value of this property is configured further under santools/etc/config.pm to control the rotation rules.
        #---------------------------------------------------------------------------
        # snap rotate does not create snapshots, rather it rotates existing
        # snapshots. Snaprotate schedules are time based. A volume or zfs
        # object can only have a single schedule assigned.
        #---------------------------------------------------------------------------
        'snaprotate_schedules' =>
        {
                #
                # production schedule
                #
                'SNAP_ROTATE_A' =>
                [
                        {
                                'name' => '2MONTHS_DAILY_SHORT_TERM',
                                'freq' => 'daily',
                                'duration' => 60,       # implied unit is days, due to frequency
                        },
                        {
                                'name' => '4MONTHS_WEEKLY_MEDIUM_TERM',
                                'freq' => 'weekly',
                                'duration' => 16,       # implied unit is weekly, due to frequency
                        },
                        {
                                'name' => '6MONTHS_MONTHLY_LONG_TERM',
                                'freq' => 'monthly',
                                'duration' => 6,        # implied unit is monthly, due to frequency
                        },
                ],
         }
The above configuration example provides daily snapshots for a duration of 60 days and is named 2MONTHS_DAILY_SHORT_TERM. This value is added to the snapshot’s custom properties, identified by edu.amherst:snaprotate_rule. Snapshots older than the first rule are kept on a weekly basis for a duration of 16 weeks, basically 4 months. Snapshots older than the previous rule are kept on a monthly basis for a duration of 6 months. To summarize, the above configuration provides one year worth of backups, 2 months daily, 4 months weekly and 6 months monthly snapshots.
Snapshot Verification
Since all data is written using the ddless and the associated ddless checksum, the system can verify the contents of the ZFS snapshots by recomputing their ddless checksum file and comparing it to the existing ddless checksum file. Each ZFS snapshot has an associated ddless checksum file. The iet_luncopy.plx and eql_luncopy.plx scripts update them and create historical copies.
A crontab entry invokes the snapshot verification, snapcheck_job.sh, and performs several maintenance tasks: it removes orphaned ddless checksum files and verifies the ddless checksum files against current snapshots.
Orphaned ddless checksum files occur when the snapshot rotation tool is utilized. The snapshot verification process verifies a fixed number of ZFS volume’s snapshot contents by computing their ddless checksum and comparing it to the historical ddless checksum file. If they match all is OK, otherwise the operator is in informed. Each day the same number of fixed snapshots are processed from different ZFS volumes.
The snapshot verification is invoked via the following command:
./snapcheck.plx [-h] -s zpool/zname@snapshot | -d | -o

This code uses ddless to compute the ddless checksum of a given snapshot and
compares it to the ddless checksums in the repository. The -s allows you to
check a single snapshot adhoc. The -d is meant to be invoked by cron and
verifies snapshots continuously.

-h      help
-s      snapshot name to check
-d      daily check of  snapshots
-o      delete orphaned ddless signature files (i.e. snapshot has been deleted and
        ddless signature is left behind - the snaprotate code does not delete the
        ddless signature files.)
When do we get ddless checksum mismatches? In general there should not be any mismatches, however, underlying data corruption could produce a data mismatch.
A ddless_maint.sh script has been provided to recompute the ddless checksums of existing ZFS volumes in case they differ.
Maintenance Jobs
Since the backup jobs handle a lot of different LUNs over time, some maintenance has to be done to manage dangling logical device links that are not in use and to clean up unused etc/path_to_inst entries. The path_to_inst file contains signatures of devices and their permanently assigned minor device numbers. The system will eventually run out of minor device numbers for disk devices and hence requires maintenance. Details about path_to_inst can be found at [soldevnum].
The devfsadm_job.sh script performance the dangling logical device name cleanup and attempts to remove unused entries from /etc/path_to_inst. Unfortunately, the Solaris kernel does not know about this clean process of /etc/path_to_inst, hence a reboot is required every n months. The number depends on how many LUNs the system is backing up, once the job indicates that it cannot find LUN 0, the problem has occurred. The backup job connects to the desired target and should be able to process at least LUN 0 from that target. If the minor numbers for disks cannot be allocated, the connection with the target is successful, however, no disk device are visible.
Crontab
Normally an operator would maintain crontab using crontab -e, however, with the zfs-archive it is important to allow the operator to centrally manage crontab and have it automically update on each respective zfs-archive host. A tool, cron_update.plx has been created to facilitate this need.
The cron_update.plx program maintains a section of crontab entries defined in santools/etc/config.pm and outputs them into the host specific crontab environment.
        'cron' =>
                {
                        #
                        # zfs-archive1
                        #
                        'zfs-archive1' => '
# hourly zfs tree refresh for tkzfs
3 * * * * /root/santools/tkzfs/server/zfs_tree.sh refresh > /dev/null

# 7:00am daily
3 7 * * *  /root/santools/snapcheck_job.sh
...
...
                        ',

                        #
                        # zfs-archive2
                        #
                        'zfs-archive2' => '
...
...
                        ',
The config.pm example above shows two zfs-archive hosts, each with its own section of crontab entries. Since the config.pm is synchronized on each zfs-archive host, executing cron_update.plx on a specific host, updates that host’s crontab entries found in the config.pm file.
The example below is the output when running cron_update.plx on zfs-archive1:
2011-07-05 22:58:30 zfs-archive1 - cron> updating zfs-archive1
2011-07-05 22:58:30 zfs-archive1 - cron> reading current crontab settings into /root/santools/state/cron.zfs-archive1.current
2011-07-05 22:58:30 zfs-archive1 - cron> crontab -l > /root/santools/state/cron.zfs-archive1.current
2011-07-05 22:58:31 zfs-archive1 - cron> updating cron with /root/santools/state/cron.zfs-archive1.new
2011-07-05 22:58:31 zfs-archive1 - cron> crontab < /root/santools/state/cron.zfs-archive1.new
Below is an example of the resulting crontab entries when editing them with crontab -e on the host zfs-archive1.
#--- MuLtIhOsT CrOn BeGiN: zfs-archive1 (2011-07-05 22:20:13)

# hourly zfs tree refresh for tkzfs
3 * * * * /root/santools/tkzfs/server/zfs_tree.sh refresh > /dev/null

# 7:00am daily
3 7 * * *  /root/santools/snapcheck_job.sh

# 8:00am daily
3 8 * * *  /root/santools/devfsadm_job.sh > /dev/null 2>&1

# every 3 months on the 1st at 9:30 am
30 9 1 * * echo "reboot due to devfsadm kernel state required"

# 10:00pm daily
3 22 * * * /root/santools/snaprotate_job.sh

# 11:00pm daily
3 23 * * * /root/santools/eql_luncopy_job.sh MAIL_A

# 1:00pm daily
3 13 * * * /root/santools/eql_luncopy_job.sh FILE_A

# every 12 hours
3 15   * * * /root/santools/iet_luncopy_job.sh -a
3 3    * * * /root/santools/iet_luncopy_job.sh -a -i

#--- MuLtIhOsT CrOn EnD: zfs-archive1
Synchronizing the ZFS-Archive hosts
In order to keep all zfs-archive hosts in sync, a sync_all.sh has been provided allowing the operator to manage multiple zfs-archive hosts and sync_host.sh is specific to each host.
The sync_all.sh should be generally invoked when making changes to santools/etc/config.pm, for example. The sync_all.sh tool uses rsync to synchronize files across multiple zfs-archive hosts. It then invokes on each host the cron_update.plx script followed by the sync_host.sh script.
The sync_host.sh script configures the Solaris iSCSI initiator and Solaris iSCSI target, namely the initiators that are allowed to communicate with the iSCSI target, on the zfs-archive host.
These script have to be adapted to the operator’s environment.
#!/bin/sh

#
# sync scripts and code among a set of hosts
# keep log and state files local to each host
#
# Steffen Plotner, 2009
#

ROOT="/root/santools"
SLAVES='fqdn2'

#
# sync files (exclude yourself)
#
for host in $SLAVES; do
        rsync -avrR \
                --delete \
                --files-from=$ROOT/etc/sync_include.conf \
                --exclude-from=$ROOT/etc/sync_exclude.conf \
                / $host:/
done

HOSTS='fqdn1 fqdn2'
for host in $HOSTS; do
        ssh $host "$ROOT/cron_update.plx"
        ssh $host "$ROOT/sync_host.sh"
done
#!/bin/sh

#
# host sync/config - this script runs in the context of the current host
#

#
# iscsi initiator setup (disabled by default, it will run as it needs it
# and if you keep the default to disabled, SUN won't hang on a reboot attempting
# to connect to targets it cannot reach anymore.
#
echo "sync> configuring iscsi initiator on host $host"
svcadm disable iscsi_initiator
iscsiadm modify discovery -s enable
iscsiadm modify initiator-node --configured-sessions 4

host=$(uname -n)
if [ $host = "zfs-archive1" ]; then
        iscsiadm modify initiator-node --node-name iqn.1986-03.com.sun:zfs.archive1
elif [ $host = "zfs-archive2" ]; then
        iscsiadm modify initiator-node --node-name iqn.1986-03.com.sun:zfs.archive2
else
        echo "unknown host?"
        exit 1
fi

#
# iscsi target setup
#
echo "sync> configuring iscsi target on host $host"
iscsi_ip=$(cat /etc/hostname.eth2v141s0)
svcadm enable iscsitgt
iscsitadm create tpgt 1 2>/dev/null
iscsitadm modify tpgt -i $iscsi_ip 1

# setup allowed initiator names for systems that interact with TkZFS
iscsitadm create initiator -n iqn.2000-04.com.qlogic:qla4010.fs20533b05122 2>/dev/null
Operator Tools
The following section explains several useful operators when managing the zfs-archive hosts.
zfs_df.sh
The zfs_df.sh tool lists the same information as zfs list however, it includes additional columns that aid in identifying how disk space is allocated by the volume versus its snapshots.
NAME                                                                          VOLSIZE  REFRESERV  RATIO  USEDDS  USEDSNAP  USEDREFRESERV  USEDCHILD   USED  RESERV
vg_satabeast7_vol0/iscsi4_lv_srvrnt09_storage_p_vol00_bk                        1.17T       none  1.02x   1.17T      481G              0          0  1.64T    none
zfs_list.sh
The zfs_list.sh tool recursively lists all types of file systems, volumes and snapshots.
zfs_customprop_del.sh
The zfs_customprop_del.sh script removes a custom property from a ZFS object, such as a volume, snapshot, or file system. The custom property is prefixed with edu.amherst:.
zfs_customprop_set.sh
The zfs_customprop_set.sh script sets a custom property on a ZFS object, such as a volume, snapshot, or file system.
zfs_zvols.plx
The zfs_zvols.plx script output either a parsable or human readable report about the zfs-archive host’s ZFS volumes and snapshots.
root@zfs-archive1:~/santools# ./zfs_zvols.plx -h
./zfs_zvols.plx [-h] [-v]

-h      help
-v      verbose
-r      human readable report
zfs_copy.plx
The zfs_copy.plx tools aids with copying ZFS data streams on the same host or across hosts. Generally when transferring ZFS snapshots across hosts, the ZFS documentation recommends using SSH as the transport agent, however, SSH is slow when encrypting such streams. The zfs_copy.plx tool also uses SSH to communicate with the remote host however, it sets up a process socat to listen on a port provided by port_inc_get.plx and then transfers the data to the listening daemon increasing performance greatly.
The zfs_copy.plx is a highly advanced tool carefully wrapping itself around the command set of zfs send and zfs receive. The operator is expected to understand these two commands before diving into the zfs_copy.plx tool.
The remote host is expected to be either a zfs-archive containing the santools directory structure or another Solaris system with ZFS support consisting of at least the socat program and port_inc_get.plx.
The command zfs_copy.plx is documented below:
$ ./zfs_copy.plx -h
./zfs_copy.plx [-h] [-iI snap] -s [host]:zpool/zvolA@snap [-F] -t [host]:zpool/zvolB
./zfs_copy.plx [-h]            -s [host]:zpool/zvolA@snap [-F] -t [host]:zpool -p

-h      help

-i      incremental data transfer from -i snap to -s snap (man zfs send)
-I      incremental data transfer from -I snap to -s snap transferring all
        intermediate snapshots as individual snapshots  (man zfs send)
-s      host name or IP address, source zpool and zfs object, such as zvol
-F      force rollback of last snapshot (man zfs receive)
-t      host name or IP address, target zpool and target object name
-p      preserve all zfs properties (implies zfs send -R)  (man zfs send,receive)

The source object must have at least one snapshot.

If you use -p, then internally we use zfs send -R (includes all snapshots up to
zvolA@snap) and zfs receive -d which implies that the source and destination
pool cannot be the same, on different hosts they can, but not on the same host.

Without the -p the data is copied, the properties are not copied and the above
restriction does not apply, i.e. you can copy a zvol on the same hosts within
the same zpool.

If you want to copy starting with a specific snapshot and then incremental
snapshots in the future from a source to destination use two commands:

        1) zfs_copy.plx            -s [host]:zpool/zvolA@snap -t [host]:zpool/zvolB
        2) zfs_copy.plx [-iI snap] -s [host]:zpool/zvolA@snap -t [host]:zpool/zvolB

The first command creates a target zvol and the snapshot name from the
source(!). Then you can send incremental snapshots. This implies that -p
cannot be used here, because -p would include ALL prior snapshots.
Bibliography
-
[mh] Austin Appleby. Murmur Hash. http://sites.google.com/site/murmurhash
-
[crc32] Cyclic Redundancy Check. http://en.wikipedia.org/wiki/Cyclic_redundancy_check
-
[rfc3720] Internet Small Computer Systems Interface. http://www.ietf.org/rfc/rfc3720.txt
-
[heartbeat] SUSE Linux Enterprise Server Heartbeat. http://www.novell.com/documentation/sles10/pdfdoc/heartbeat/heartbeat.pdf
-
[iet] iSCSI Enterprise Target. http://iscsitarget.sourceforge.net
-
[quilt] Patch Management Tool. http://savannah.nongnu.org/projects/quilt
-
[soldevnum] You too can understand device numbers and mapping in Solaris. http://sunsite.uakom.sk/sunworldonline/swol-12-1996/swol-12-sysadmin.html
-
[solnagle] Should the iSCSI Initiator use the Nagle Algorithm by default. http://opensolaris.org/jive/thread.jspa?messageID=176520
-
[mslunvpd] How you can uniquely identify a LUN in a Storage Area Network. http://blogs.msdn.com/b/adioltean/archive/2004/12/30/344588.aspx
-
[joewriteprot] WriteProt. http://www.joeware.net/freetools/tools/writeprot/index.htm
-
[asciidoc] AsciiDoc. http://www.methods.co.nz/asciidoc/
-
[graphviz] Graphviz - Graph Visualization Software. http://www.graphviz.org/
-
[dia] Dia. http://live.gnome.org/Dia
-
[gimp] gimp - GNU Image Manipulation Program. http://www.gimp.org/